

Learning how to scrape Indeed can give you direct access to real-time job postings, salary data, and hiring trends—without the hassle of manual searches. With the right tools, you can automatically extract job titles, company names, locations, and salaries from Indeed.
In this guide, I’ll show you how to extract job listings from Indeed using Python, ScraperAPI, and Selenium. By the end, you’ll be able to:
- Collect real-time job data to track hiring trends
- Extract key details like job titles, company names, locations, and salaries
- Bypass anti-scraping measures to avoid CAPTCHAs and IP blocks
- Save job listings in structured formats like CSV and JSON for further analysis
With this step-by-step approach, you’ll build a fully functional Indeed scraper that can automate data collection and give you valuable insights into the job market.
Ready? Let’s dive in!
Why Scrape Indeed Job Postings?
Indeed hosts millions of job postings from companies worldwide, making it one of the best sources for real-time insights into the job market.
Indeed job data can help you:
- Stay ahead of job market trends: Identify which industries are growing, what roles are in demand, and how hiring patterns are shifting.
- Research salaries and benefits: Compare compensation across job titles, industries, and locations to understand what companies offer.
- Discover in-demand skills: See which qualifications, certifications, and technologies employers are looking for so you can stay competitive.
- Monitor company hiring activity: Track job postings from specific companies to understand their growth strategies and hiring needs.
- Improve your hiring strategy: If you’re a recruiter or employer, analyzing job descriptions can help you refine your listings, salary offerings, and benefits to attract top talent.
- Find better job opportunities: If you’re searching for a job, analyzing postings can help you spot trends, find companies actively hiring, and tailor your applications accordingly.
Extracting information from Indeed can give you a significant advantage if you need structured, real-time job data to support your research, job search, hiring decisions, or career planning.
How to Scrape Indeed Job Postings with Python and ScraperAPI
Before we start scraping, it’s essential to understand how Indeed structures its job postings so we can extract the correct data efficiently.
How to Find Job Listings on Indeed.com
Open your browser and go to Indeed.com.
- Enter a job title in the search bar (e.g., “Software Developer”).
- Enter a location in the “Where” field (e.g., “Las Vegas, NV”).
- Click Search, and you should see a list of job postings.
- Right-click on any job posting and select Inspect (Chrome) or Inspect Element (Firefox) to open Developer Tools.
Hover over different elements to see how job details are structured in the HTML.
Breaking Down the HTML Structure
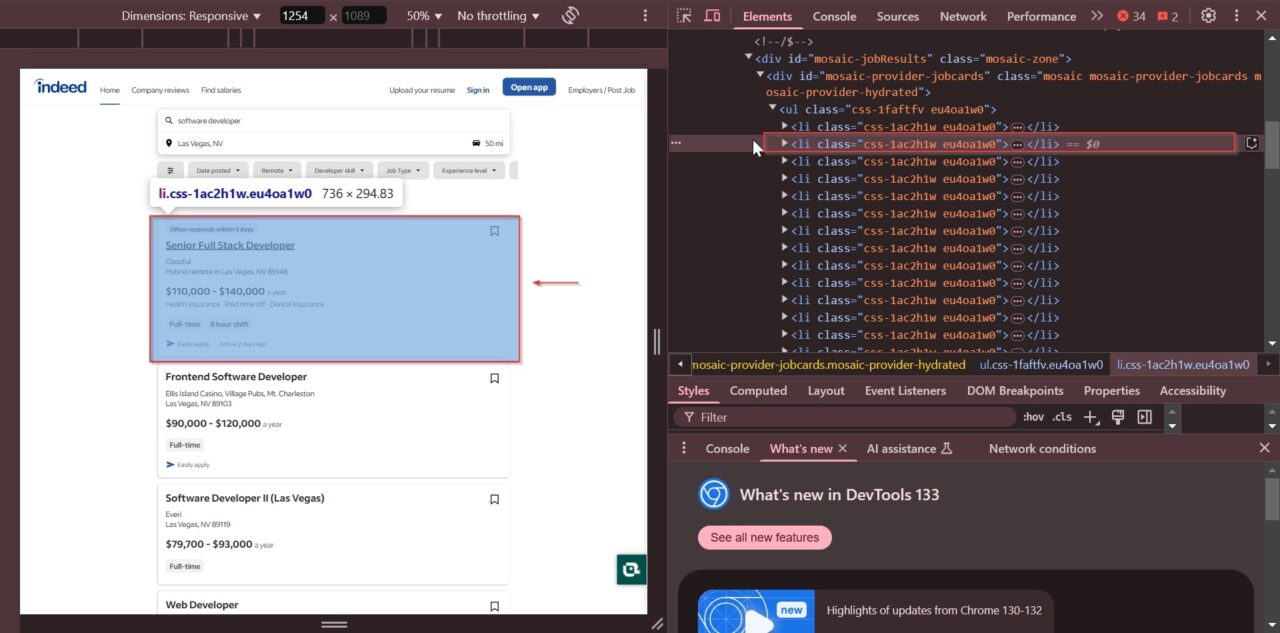
After inspecting the page, we can see that all the job postings are stored in a <div> with the id “mosaic-jobResults”:

Each individual job posting is stored inside a <li> tag with the class "css-1ac2h1w eu4oa1w0">:
Inside each job container, we can extract the following details:
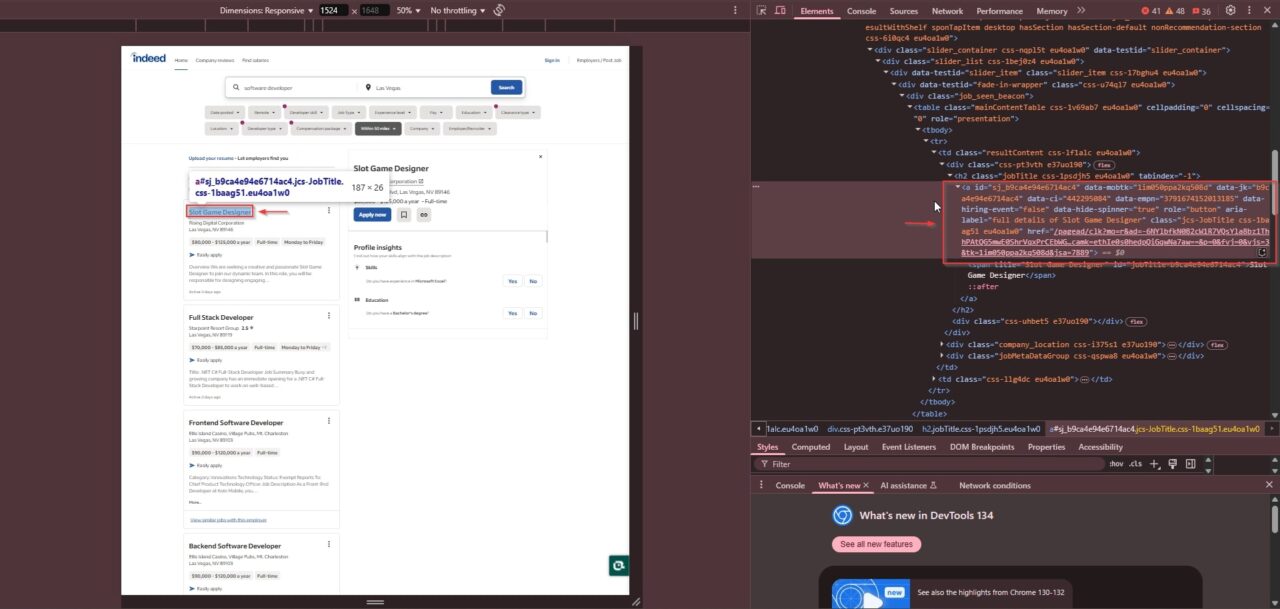
- Job Title: Found inside an
<a>tag with the class"jcs-JobTitle css-1baag51 eu4oa1w0":
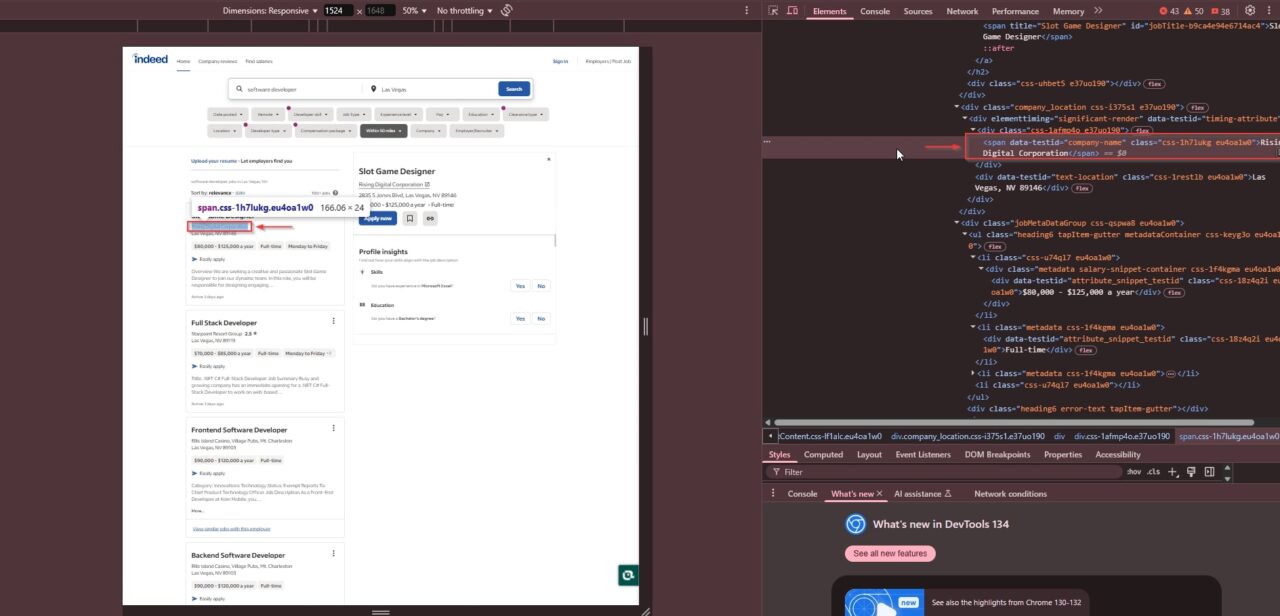
- Company Name: Located within a
<span>tag with the class"css-1h7lukg eu4oa1w0":
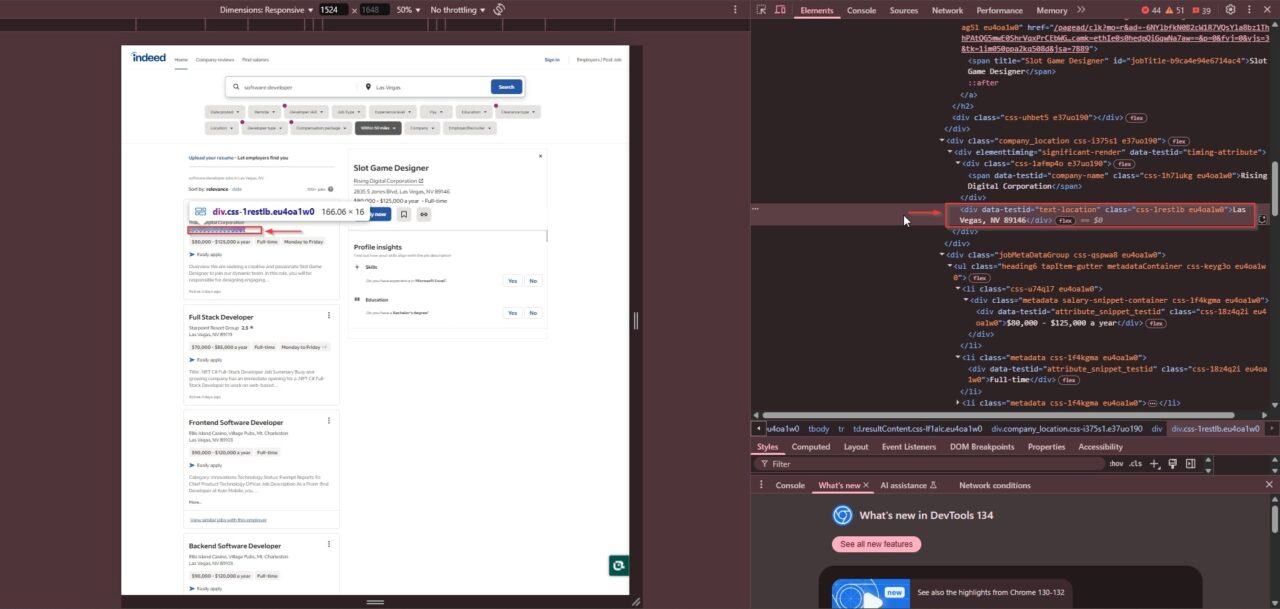
- Location: Appears in a
<div>tag with the class"css-1restlb eu4oa1w0":
- Salary (if available): Found in an
<h2>tag with the class"css-1rqpxry e1tiznh50":

- Job Type: Stored in a
<div>tag with the class"css-18z4q2i eu4oa1w0", indicating whether the role is full-time, part-time, or contract-based:

Now that we know how Indeed organizes job listings, we can move on to writing a scraper using ScraperAPI and Python to extract this data efficiently.
Project Requirements
You’ll need the right tools and setup to scrape Indeed job postings. Here are the key requirements to ensure a smooth and efficient scraping process:
1. Python Installed
You need Python 3.x installed on your system. You can download the latest version from python.org.
2. Required Python Libraries
We’ll use the following Python libraries to handle requests, parse data, and interact with dynamic content:
requests– To send HTTP requests and retrieve HTML contentBeautifulSoup– To parse and extract job data from HTMLSelenium– To interact with dynamic job listings using a headless browserJSONandCSV– To store and organize scraped data
You can install these libraries using:
pip install requests beautifulsoup4 selenium
3. ScraperAPI Account
Indeed has strict anti-scraping measures, so using ScraperAPI helps avoid detection and bypass restrictions like CAPTCHAs and IP blocking. You’ll need to sign up for an account at ScraperAPI and obtain an API key.
4. Web Driver for Selenium (if using Selenium)
If you’re using Selenium, you’ll need to download the appropriate WebDriver for your browser:
- ChromeDriver (for Google Chrome)
- GeckoDriver (for Mozilla Firefox)
Ensure the driver version matches your browser version.
With these tools and libraries set up, you’ll be ready to start scraping Indeed job listings efficiently!
Now that you have the necessary tools, it’s time to start scraping Indeed job postings using Python and ScraperAPI. Since Indeed dynamically loads job listings using JavaScript, we’ll use ScraperAPI’s Render Instruction Set to handle JavaScript rendering and extract job data efficiently.
How to Scrape Indeed Job Postings with Python and ScraperAPI
Now that we understand how Indeed structures job listings, let’s write a Python script to scrape job postings efficiently. We’ll use ScraperAPI to bypass anti-bot protections and BeautifulSoup to parse the HTML content.
Step 1: Install Required Libraries
Before writing any code, ensure you have the necessary Python libraries installed. Open your terminal or command prompt and run:
pip install requests beautifulsoup4
Then, import the required modules in your Python script:
import requests
import json
import time
import random
from bs4 import BeautifulSoup
Step 2: Setting Up ScraperAPI
For this step, you’ll need your API Key if you don’t have one, head to ScraperAPI and sign up for free.
Replace "YOUR_API_KEY" with your actual ScraperAPI key here:
API_KEY = "YOUR_API_KEY"
SCRAPERAPI_URL = "https://api.scraperapi.com/"
BASE_URL = "https://www.indeed.com/jobs?q=software+developer&l=Las+Vegas&start={page}"
BASE_URL: Defines the Indeed job search URL for “Software Developer” jobs in Las Vegas. The{page}parameter will help us paginate through multiple job listings.
Step 3: Extracting Indeed Job Data
Next, let’s create a function called scrape_indeed_jobs(). This function will handle:
- Sending requests to Indeed
- Extracting job details
- Handling retries if something goes wrong
def scrape_indeed_jobs(start_page):
    jobs = []  # Store job listings
    page_number = start_page
Indeed lists about 10 jobs per page. We’ll scrape multiple pages by incrementing page_number.
for _ in range(MAX_PAGES):
        attempt = 0  # Keep track of retry attempts
Here, MAX_PAGES defines how many pages we scrape. If MAX_PAGES = 5, we scrape 5 pages (~50 jobs).
Each time we request a new page, we’ll pass the correct URL to ScraperAPI:
while attempt < MAX_RETRIES:
            try:
                url = BASE_URL.format(page=page_number)
                params = {
                    "url": url,
                    "api_key": API_KEY,
                }
                response = requests.get(SCRAPERAPI_URL, params=params)
How it works:
- We replace
{page}inBASE_URLwith the actualpage_number. - ScraperAPI fetches the page while handling bot detection for us.
If the request is successful (200 OK), we extract job details using BeautifulSoup:
if response.status_code == 200:
                    soup = BeautifulSoup(response.text, "html.parser")
                    job_elements = soup.find("div", attrs={"id": "mosaic-jobResults"})
                    individual_job_elements = job_elements.find_all("li", class_="css-1ac2h1w eu4oa1w0")
This extracts all job listings inside <li class="css-1ac2h1w eu4oa1w0">.
We loop through each job posting and extract the following:
- Job title
- Company name
- Location
- Salary (if available)
Job type (Full-time, Part-time, etc.)
for job_element in individual_job_elements:
                        job_title = job_element.find_next("a", class_="jcs-JobTitle css-1baag51 eu4oa1w0").find("span").text if job_element.find_next("a", class_="jcs-JobTitle css-1baag51 eu4oa1w0") else "N/A"
                        company_element = job_element.find_next("span", class_="css-1h7lukg eu4oa1w0") if job_element.find_next("span", class_="css-1h7lukg eu4oa1w0") else "N/A"
                        location_element = job_element.find_next("div", class_="css-1restlb eu4oa1w0") if job_element.find_next("div", class_="css-1restlb eu4oa1w0") else "N/A"
                        job_type_element = job_element.find_next("h2", class_="css-1rqpxry e1tiznh50") if job_element.find_next("h2", class_="css-1rqpxry e1tiznh50") else "N/A"
                        salary_element = job_element.find_next("div", class_="css-18z4q2i eu4oa1w0") if job_element.find_next("div", class_="css-18z4q2i eu4oa1w0") else "N/A
Once we’ve extracted the data, we format it nicely and store it in a list:
jobs.append({
                            "Job Title": job_title,
                            "Company": company_element.text.strip() if company_element != "N/A" else "N/A",
                            "Location": location_element.text.strip() if location_element != "N/A" else "N/A",
                            "Salary": salary_element.text.strip() if salary_element != "N/A" else "N/A",
                            "Job Type": job_type_element.text.strip() if job_type_element != "N/A" else "N/A"
                        })
Now, we have all job listings stored in jobs!
If we get a 500 error, we retry up to MAX_RETRIES times:
elif response.status_code == 500:
                    print(f"Error 500 on attempt {attempt + 1}. Retrying in {2 ** attempt} seconds...")
                    time.sleep(2 ** attempt)
                    attempt += 1
At the end of each loop, we move to the next page and add a random delay (to avoid detection):
page_number += 10  # Move to the next page
        time.sleep(random.uniform(5, 10))
Step 4: Saving the Extracted Data
Finally, we run our scraper and save the results in a JSON file:
if __name__ == "__main__":
    job_listings = scrape_indeed_jobs(START_PAGE)
    if job_listings:
        with open("indeed_jobs.json", "w", encoding="utf-8") as json_file:
            json.dump(job_listings, json_file, indent=4, ensure_ascii=False)
        print("Saved job posting(s) to 'indeed_jobs.json'")
It will save a JSON file that looks like this:
[
    {
        "Job Title": "Slot Game Designer",
        "Company": "Rising Digital Corporation",
        "Location": "Las Vegas, NV 89146",
        "Salary": "$80,000 - $125,000 a year",
        "Job Type": "N/A"
    },
    {
        "Job Title": "Slot Game Designer",
        "Company": "Rising Digital Corporation",
        "Location": "Las Vegas, NV 89146",
        "Salary": "$80,000 - $125,000 a year",
        "Job Type": "N/A"
    },
    {
        "Job Title": "Full Stack Developer",
        "Company": "Starpoint Resort Group",
        "Location": "Las Vegas, NV 89119",
        "Salary": "$70,000 - $85,000 a year",
        "Job Type": "N/A"
    },
    {
        "Job Title": "Software Developer -- Entry Level",
        "Company": "CGI Group, Inc.",
        "Location": "Henderson, NV 89077",
        "Salary": "$55,600 - $91,700 a year",
        "Job Type": "N/A"
    },
    {
        "Job Title": "Frontend Software Developer",
        "Company": "Ellis Island Casino, Village Pubs, Mt. Charleston",
        "Location": "Las Vegas, NV 89103",
        "Salary": "$90,000 - $120,000 a year",
        "Job Type": "N/A"
    }.....
Now we have all the Indeed job data we need!
Here’s the complete code for the scraper:
import requests
import json
import time
import random
from bs4 import BeautifulSoup

API_KEY = "YOUR_API_KEY"
SCRAPERAPI_URL = "https://api.scraperapi.com/"
BASE_URL = "https://www.indeed.com/jobs?q=software+developer&l=Las+Vegas&start={page}"
START_PAGE = 0
MAX_RETRIES = 3
MAX_PAGES = 5

def scrape_indeed_jobs(start_page):
    jobs = []
    page_number = start_page

    for _ in range(MAX_PAGES):
        attempt = 0
        while attempt < MAX_RETRIES:
            try:
                url = BASE_URL.format(page=page_number)
                params = {
                    "url": url,
                    "api_key": API_KEY,
                }

                response = requests.get(SCRAPERAPI_URL, params=params)

                if response.status_code == 200:
                    soup = BeautifulSoup(response.text, "html.parser")
                    job_elements = soup.find("div", attrs={"id": "mosaic-jobResults"})
                    individual_job_elements = job_elements.find_all("li", class_="css-1ac2h1w eu4oa1w0")

                    for job_element in individual_job_elements:
                        job_title = job_element.find_next("a", class_="jcs-JobTitle css-1baag51 eu4oa1w0").find("span").text if job_element.find_next("a", class_="jcs-JobTitle css-1baag51 eu4oa1w0") else "N/A"
                        company_element = job_element.find_next("span", class_="css-1h7lukg eu4oa1w0") if job_element.find_next("span", class_="css-1h7lukg eu4oa1w0") else "N/A"
                        location_element = job_element.find_next("div", class_="css-1restlb eu4oa1w0") if job_element.find_next("div", class_="css-1restlb eu4oa1w0") else "N/A"
                        job_type_element = job_element.find_next("h2", class_="css-1rqpxry e1tiznh50") if job_element.find_next("h2", class_="css-1rqpxry e1tiznh50") else "N/A"
                        salary_element = job_element.find_next("div", class_="css-18z4q2i eu4oa1w0") if job_element.find_next("div", class_="css-18z4q2i eu4oa1w0") else "N/A"

                        jobs.append({
                            "Job Title": job_title,
                            "Company": company_element.text.strip() if company_element != "N/A" else "N/A",
                            "Location": location_element.text.strip() if location_element != "N/A" else "N/A",
                            "Salary": salary_element.text.strip() if salary_element != "N/A" else "N/A",
                            "Job Type": job_type_element.text.strip() if job_type_element != "N/A" else "N/A"
                        })

                    print(f"Scraped page {page_number // 10 + 1}")
                    break


                elif response.status_code == 500:
                    print(f"Error 500 on attempt {attempt + 1}. Retrying in {2 ** attempt} seconds...")
                    time.sleep(2 ** attempt)
                    attempt += 1
                else:
                    print(f"HTTP {response.status_code}: {response.text[:500]}")
                    return None

            except requests.exceptions.ReadTimeout:
                print(f"Timeout on attempt {attempt + 1}. Retrying in {2 ** attempt} seconds...")
                time.sleep(2 ** attempt)
                attempt += 1
            except requests.exceptions.RequestException as e:
                print(f"Request failed: {e}")
                return None

        page_number += 10
        time.sleep(random.uniform(5, 10))

    return jobs

if __name__ == "__main__":
    job_listings = scrape_indeed_jobs(START_PAGE)
    if job_listings:
        if job_listings:
            with open("indeed_jobs.json", "w", encoding="utf-8") as json_file:
                json.dump(job_listings, json_file, indent=4, ensure_ascii=False)
            print("Saved job posting(s) to 'indeed_jobs.json'")
Scraping Indeed Job Postings with a Headless Browser
So far, we’ve successfully scraped Indeed job postings using ScraperAPI with Requests and BeautifulSoup. But what if we need an alternative method to handle JavaScript-rendered content with an automated browser? That’s where Selenium with a headless browser comes in!
Selenium by itself is often detected as a bot when scraping websites like Indeed. To avoid this, we’re using SeleniumWire, which allows us to configure a proxy for all browser traffic. Instead of making requests directly, we’ll route everything through ScraperAPI in proxy mode. This makes our browser activity look more like an actual user, helping us bypass bot detection.
Step 1: Install Required Libraries
First, install the necessary Python libraries:
pip install undetected-chromedriver selenium selenium-wire beautifulsoup4 csv
Here’s what we’re using:
undetected-chromedriver: Helps bypass bot detection by avoiding Selenium fingerprintingselenium-wire: Lets us route traffic through ScraperAPI as a proxybeautifulsoup4: Extracts job data from HTMLcsv: Saves the scraped data into a file
Step 2: Setting Up Selenium with ScraperAPI in Proxy Mode
Next, we need to set up Selenium with ScraperAPI as a proxy. We start by defining the ScraperAPI proxy URL, which includes our API key. The proxy URL is formatted to tell ScraperAPI that we need JavaScript rendering enabled and that we want traffic to come from the US:
APIKEY = 'YOUR_API_KEY'
indeed_url = "https://www.indeed.com/jobs?q=software+developer&l=Las+Vegas"

proxy_url = f"http://scraperapi.render=true.country_code=us:{APIKEY}@proxy-server.scraperapi.com:8001"
We then configure Selenium options to prevent it from being detected as an automated browser. One common way websites detect bots is through “Blink Features”, which are automation flags that Selenium leaves behind. By disabling them, we make the browser look more like a normal user session:
from selenium.webdriver.chrome.options import Options

options = Options()
options.add_argument("--disable-blink-features=AutomationControlled")
Now, we configure SeleniumWire to route all browser traffic through ScraperAPI. Instead of making requests from our local IP, all traffic will go through ScraperAPI, which rotates IPs and handles CAPTCHAs automatically:
seleniumwire_options = {
    'proxy': {
        'http': proxy_url,
        'https': proxy_url,
    },
    'verify_ssl': False,
}
Next, we launch an undetected Chrome browser using SeleniumWire, ensuring that aScraperAPI handles all network requests
import undetected_chromedriver as uc

driver = uc.Chrome(options=options, seleniumwire_options=seleniumwire_options)
print(f"Fetching URL: {indeed_url}")
driver.get(indeed_url)
This command launches a Chrome browser, routes its requests through ScraperAPI, and opens Indeed’s job search page for software developers in Las Vegas.Web pages don’t always load instantly, so we add a short delay to give Indeed enough time to fully load job postings before scraping:
from time import sleep

print("Waiting for page to load...")
sleep(20)
If we scrape too quickly, we might get blocked or receive incomplete results. A 20-second wait time ensures the page loads fully before proceeding.
Step 3: Extracting Job Listings Dynamically
Now that the page has loaded, we wait until the job listings container appears. Websites sometimes delay rendering content, so we use WebDriverWait to ensure the data is available before we extract it.
from selenium.webdriver.common.by import By
from selenium.webdriver.support.ui import WebDriverWait
from selenium.webdriver.support import expected_conditions as EC
from bs4 import BeautifulSoup

try:
    WebDriverWait(driver, 15).until(
        EC.presence_of_element_located((By.ID, "mosaic-jobResults"))
    )
except:
    print("Could not locate job results.")
    driver.quit()
    exit()
If Indeed blocks our request or asks for a CAPTCHA, the script will exit to prevent unnecessary retries. Otherwise, we proceed by parsing the job listings using BeautifulSoup.
soup = BeautifulSoup(driver.page_source, 'html.parser')
driver.quit()

job_results = soup.find("div", attrs={"id": "mosaic-jobResults"})
job_elements = job_results.find_all("li", class_="css-1ac2h1w eu4oa1w0") if job_results else []
Step 4: Extracting Job Details
Once we have the job listings, we loop through each listing and extract key details:
jobs_data = []
for job_element in job_elements:
    job_title_tag = job_element.find("a", class_="jcs-JobTitle css-1baag51 eu4oa1w0")
    job_title = job_title_tag.find("span").text if job_title_tag else "N/A"

    company_element = job_element.find("span", class_="css-1h7lukg eu4oa1w0")
    company_name = company_element.text.strip() if company_element else "N/A"

    location_element = job_element.find("div", class_="css-1restlb eu4oa1w0")
    job_location = location_element.text.strip() if location_element else "N/A"

    job_type_element = job_element.find("h2", class_="css-1rqpxry e1tiznh50")
    job_type = job_type_element.text.strip() if job_type_element else "N/A"

    salary_element = job_element.find("div", class_="css-18z4q2i eu4oa1w0")
    salary = salary_element.text.strip() if salary_element else "N/A"

    job_link = f"https://www.indeed.com{job_title_tag['href']}" if job_title_tag and job_title_tag.has_attr("href") else "N/A"

    jobs_data.append([job_title, company_name, job_location, salary, job_type, job_link])
We check whether each job detail exists before extracting it. If a particular element isn’t available, we return “N/A” instead of causing an error.
Step 5: Saving the Data to a CSV File
Once we have collected all job postings, we store them in a CSV file so we can analyze them later.
import csv

if jobs_data:
    with open("indeed_jobs.csv", "w", newline="", encoding="utf-8") as csv_file:
        writer = csv.writer(csv_file)
        writer.writerow(["Title", "Company", "Location", "Salary", "Job Type", "Job Link"])
        writer.writerows(jobs_data)
    print("Saved job posting(s) to 'indeed_jobs.csv'")

print("Scraping session complete.")
This ensures that all job listings are saved in a structured format, which you can use for analysis, job tracking, or market research.
Here’s the complete code for the scraper:
from selenium.webdriver.chrome.options import Options
from selenium.webdriver.common.by import By
from selenium.webdriver.support.ui import WebDriverWait
from selenium.webdriver.support import expected_conditions as EC
import undetected_chromedriver as uc
from bs4 import BeautifulSoup
import csv
from time import sleep

APIKEY = 'YOUR_API_KEY'
indeed_url = "https://www.indeed.com/jobs?q=software+developer&l=Las+Vegas"

proxy_url = f"http://scraperapi.render=true.country_code=us:{APIKEY}@proxy-server.scraperapi.com:8001"
options = Options()
options.add_argument("--disable-blink-features=AutomationControlled")

seleniumwire_options = {
    'proxy': {
        'http': proxy_url,
        'https': proxy_url,
    },
    'verify_ssl': False,
}

driver = uc.Chrome(options=options, seleniumwire_options=seleniumwire_options)
print(f"Fetching URL: {indeed_url}")
driver.get(indeed_url)

print("Waiting for page to load...")
sleep(20)

try:
    WebDriverWait(driver, 15).until(
        EC.presence_of_element_located((By.ID, "mosaic-jobResults"))
    )
except:
    print("Could not locate job results")
    driver.quit()
    exit()

soup = BeautifulSoup(driver.page_source, 'html.parser')
driver.quit()

job_results = soup.find("div", attrs={"id": "mosaic-jobResults"})
job_elements = job_results.find_all("li", class_="css-1ac2h1w eu4oa1w0") if job_results else []

jobs_data = []
for job_element in job_elements:
    job_title_tag = job_element.find("a", class_="jcs-JobTitle css-1baag51 eu4oa1w0")
    job_title = job_title_tag.find("span").text if job_title_tag else "N/A"

    company_element = job_element.find("span", class_="css-1h7lukg eu4oa1w0")
    company_name = company_element.text.strip() if company_element else "N/A"

    location_element = job_element.find("div", class_="css-1restlb eu4oa1w0")
    job_location = location_element.text.strip() if location_element else "N/A"

    job_type_element = job_element.find("h2", class_="css-1rqpxry e1tiznh50")
    job_type = job_type_element.text.strip() if job_type_element else "N/A"

    salary_element = job_element.find("div", class_="css-18z4q2i eu4oa1w0")
    salary = salary_element.text.strip() if salary_element else "N/A"


    job_link = f"https://www.indeed.com{job_title_tag['href']}" if job_title_tag and job_title_tag.has_attr("href") else "N/A"

    jobs_data.append([job_title, company_name, job_location, salary, job_type, job_link])

if jobs_data:
    with open("indeed_jobs.csv", "w", newline="", encoding="utf-8") as csv_file:
        writer = csv.writer(csv_file)
        writer.writerow(["Title", "Company", "Location", "Salary", "Job Type", "Job Link"])
        writer.writerows(jobs_data)
    print("Saved job posting(s) to 'indeed_jobs.csv'")

print("Scraping session complete.")
This is how the output should look after scraping:

Conclusion: Choose the Best Method for Scraping Indeed Job Postings
Scraping job listings from Indeed gives you access to real-time hiring trends, salary insights, and in-demand skills without manual searching. In this guide, you learned how to scrape Indeed using Python, ScraperAPI, and Selenium, along with strategies to bypass anti-bot protections and structure your data efficiently.
ScraperAPI with Requests is the best method for most scraping needs—it’s fast, lightweight, and avoids the overhead of running a browser. However, if JavaScript-heavy pages require automation, a headless browser with Selenium can help, though it comes with added complexity and detection risks.
If you want to scrape job listings quickly, reliably, and without the hassle of CAPTCHAs or IP blocks, ScraperAPI is the way to go. Try it today and start scraping smarter!
Sign up for ScraperAPI and get started!
Happy scraping!
FAQ
Is it legal to scrape Indeed.com?
Web scraping Indeed.com falls into a legal gray area. While publicly accessible data can often be scraped under fair use principles, Indeed’s Terms of Service prohibit automated data extraction. Violating these terms could result in legal consequences or blocked IP access. To stay compliant, it’s best to respect robots.txt files and avoid scraping personal or sensitive data.
Can Indeed be scraped using headless browsers such as Playwright?
Yes, Playwright can scrape Indeed job listings by automating a headless browser to load JavaScript-rendered content. However, Indeed does not rely heavily on JavaScript for job listings, meaning a proxy-based solution like ScraperAPI with Requests is a faster and more efficient approach. Headless browsers like Playwright should only be used when necessary, as they are resource-intensive and more likely to trigger anti-bot protections.
What tools are best for web scraping job listings from Indeed?
The best tools for scraping Indeed job listings include ScraperAPI for fast and efficient proxy-based scraping, Requests and BeautifulSoup for parsing static content, and Selenium or Playwright for handling JavaScript-heavy pages when necessary. ScraperAPI is the top choice for scraping Indeed because it can bypass IP blocks, handle CAPTCHAs, and render JavaScript if needed, making it a reliable and scalable solution.