


AI agents can plan, but they can’t scrape. They can decide “I need to check Amazon and Walmart for MacBook prices,” but without a scraper, they can’t fetch the data.
You could connect ScraperAPI to LangChain as a custom tool, and it would work. ScraperAPI already handles retries, IP rotation, CAPTCHA, and JavaScript rendering, so your agent doesn’t get blocked. But the output is raw HTML, which means you still need to write wrappers, parsing logic, and code to make the results usable.
The LangChain + ScraperAPI integration removes that friction. It ships with prebuilt tools that plug directly into an agent and return structured results:
ScraperAPIGoogleSearchToolfinds live product pages without needing hardcoded URLsScraperAPIAmazonSearchToolreturns clean Amazon data in JSONScraperAPIToolscrapes any webpage with JS rendering, IP rotation, and CAPTCHA bypass for reliable price extraction from sites like Walmart and Best Buy.
This shifts the workflow from “scrape → parse → reason” to simply “reason with structured results.”
In this tutorial, we’ll build a price monitoring agent that searches Amazon, Google, and retail sites, extracts live pricing data, and compares results to surface the best deal.
Let’s get started.
Prerequisites
Before we start, make sure you have the following:
- Python 3.8+ installed
- OpenAI API key (or another LLM provider)
- ScraperAPI account + API key (Get one here)
Basic familiarity with LangChain agents and Python
Step 1: Set Up the Project Environment
Create and Activate a Virtual Environment
First, let’s isolate our project dependencies using a virtual environment. This helps avoid version conflicts and keeps your system clean.
mkdir ai_price_monitor       # Create a new project folder
cd ai_price_monitor          # Move into the folder
python3 -m venv venv         # Create a virtual environment named "venv"
source venv/bin/activate     # Activate the environment (Windows: venv\Scripts\activate)
Create a requirements.txt File
In your project root (ai_price_monitor/), create a file named requirements.txt with the following contents:
Add the following packages to build your requirements.txt file :
langchain: The core library to build agents and toolchainslangchain_openai: Integrates LangChain with OpenAI’s GPT modelslangchain_scraperapi: Tools for scraping the web using ScraperAPIopenai: Required bylangchain_openaito communicate with GPTstreamlit: For building the optional web interface
langchain
langgraph
langchain_openai
langchain_scraperapi
openai
streamlit
Install All Dependencies from the File
pip install -r requirements.txt
Set API Keys as Environment Variables
To run the app, you need API credentials. These are used to authenticate requests to OpenAI and ScraperAPI.
export OPENAI_API_KEY=" your key"
export SCRAPERAPI_API_KEY= “your key”
On Windows (PowerShell), use:
$env:OPENAI_API_KEY="your-openai-key"
$env:SCRAPERAPI_API_KEY="your-scraperapi-key"
Step 2: Build the LangChain Agent (Backend Logic)
Import Libraries
Create a new file named price_agent.py. Let’s walk through what each part does.
from langchain_scraperapi.tools import (
    ScraperAPIGoogleSearchTool,
    ScraperAPIAmazonSearchTool,
    ScraperAPITool,
)
from langchain.tools import Tool
from langchain.agents import initialize_agent, AgentType
from langgraph.checkpoint.memory import MemorySaver
from typing import List
import json
from datetime import datetime
These imports bring in:
- LangChain + OpenAI tools with modern LangGraph architecture
- Prebuilt scraping tools from ScraperAPI
- A checkpoint memory system
- Core Python modules for storing data and formatting timestamps
Define Helper Functions
def _norm(s: str) -> str:
    """Normalize strings for consistent storage keys"""
    return re.sub(r"\s+", " ", s.strip().lower())
This normalizes product names to prevent duplicate entries for variations like “AirPods Pro” vs “airpods pro”.
Define the Agent Class
class AutonomousPriceAgent:
This wraps all our logic in a reusable object.
Agent Initialization
def __init__(self):
    self.model = ChatOpenAI(model="gpt-4-1106-preview", temperature=0)
    self.memory = MemorySaver()
    self.price_database: Dict[str, List[Dict[str, Any]]] = {}
    self.tools = self._create_tools()
    self.agent = self._create_agent()
This helps you to:
- Loads a GPT-4 model for reasoning
- Initializes memory so the agent can track past tool use
- Set up a type-safe dictionary to store scraped prices
- Calls helper methods to define tools and initialize the agent
Define Tools
def _create_tools(self) -> List[Tool]:
    from langchain_scraperapi.tools import (
        ScraperAPIAmazonSearchTool,
        ScraperAPIGoogleSearchTool,
        ScraperAPITool
    )
    return [
        ScraperAPIAmazonSearchTool(),
        ScraperAPIGoogleSearchTool(),
        ScraperAPITool(),
        Tool(
            name="save_price",
            func=self._save_price,
            description=(
                "Save a price in JSON with keys: "
                "{product (str), price (number or string), source (str), url (str)}"
            ),
        ),
    ]
Tool Functions:
ScraperAPIGoogleSearchTool: Finds product pages using Google SearchScraperAPIAmazonSearchTool: Retrieves structured product data directly from Amazon (like title, price, and URL)ScraperAPITool: Scrapes any webpage with full JavaScript rendering (ideal for Walmart, Best Buy, etc.)save_price: A custom tool that saves the price data in the agent’s internal memory
Save Price Function
Then you’ll create a function to convert a JSON string input into a Python dictionary, organize price info by product name, add timestamps for tracking, and save results in memory for later summary or export.
def _save_price(self, input_str: str) -> str:
    try:
        data = json.loads(input_str)
        required = {"product", "price", "source", "url"}
        if not required.issubset(data):
            return f"Error saving price: missing keys {required - set(data)}"

        # Normalize and parse price from various formats
        raw_price = data["price"]
        if isinstance(raw_price, str):
            # Extract numeric value from strings like "$99.99", "99,50 EUR", etc.
            m = re.search(
                r"(\d+(?:[\.,]\d{2})?)", raw_price.replace(",", ""))
            if m:
                raw_price = float(m.group(1))
            else:
                return f"Error saving price: couldn't parse price '{raw_price}'"
        elif isinstance(raw_price, (int, float)):
            raw_price = float(raw_price)
        else:
            return "Error saving price: price must be string/number"

        # Use normalized product name as key
        key = _norm(data["product"])
        self.price_database.setdefault(key, []).append({
            "product": data["product"],
            "price": raw_price,
            "source": data["source"],
            "url": data["url"],
            "timestamp": datetime.now().isoformat(),
        })
        return f"Saved price for {data['product']} at {data['source']}: ${raw_price:.2f}"
    except Exception as e:
        return f"Error saving price: {str(e)}"
This function:
- Validates all required JSON fields before processing
- Handles various price formats like “$99.99”, “€89,50”, “123.45”
- Uses normalized product names as keys to prevent duplicates
- Provides detailed error messages for debugging
Create the LangChain Agent
Then you’ll create a method that defines your price-monitoring agent’s behavior using LangChain’s modern AgentExecutor setup under the hood.
def _create_agent(self):
    system_prompt = (
        "You are a smart price-finding agent.\n"
        "When given a product name:\n"
        "1) Search Amazon and other major retailers.\n"
        "2) Find actual product pages and extract exact prices.\n"
        "3) Call save_price for each finding as JSON with product, price, source, url.\n"
        "4) When done, summarize the best deal and list all prices found."
    )
    return create_react_agent(
        model=self.model,
        tools=self.tools,
        prompt=system_prompt,
        checkpointer=self.memory,  # Enable conversation memory
    )
This function defines a system prompt that clearly explains what the agent should do: search, extract prices, save results, and summarize the best deal.
Then initializes the agent using create_react_agent(...) from LangGraph, giving it:
- The GPT-4 model for reasoning and decision-making
- Your scraping + saving tools
- The system prompts as instructions
- A check pointer for conversation memory and thread management
This uses the modern LangGraph architecture instead of the deprecated initialize_agent approach. The create_react_agent function creates a ReAct-style agent that can reason about which tools to use and when, while maintaining conversation context through thread-based memory.
This creates a self-directed AI agent that can reason, use tools, track its work across conversation sessions, and maintain context between different product searches through unique thread IDs.
This function defines a system prompt that clearly explains what the agent should do: search, extract prices, save results, and summarize the best deal.
Then initializes the agent using initialize_agent(...), giving it:
- The
OPENAI_FUNCTIONSagent type (which uses OpenAI’s function calling interface) - Your scraping + saving tools
- The GPT-4 model (
llm=self.model) - Memory so it can remember previous actions
This uses the modern LangGraph architecture instead of the deprecated initialize_agent approach. The create_react_agent function creates a ReAct-style agent that can reason about which tools to use and when, while maintaining conversation context through thread-based memory.
This creates a self-directed AI agent that can reason, use tools, and track its work.
Main Method: Search Product
Once your agent is ready, you need to create the human and system prompts for the agent and then pass them to the agent using agent.inoke. This allows you to:
- Sends a natural language instruction to the agent
- Waits for the result and pulls the final summary message
- Returns both the summary and any prices that were saved
def search_product(self, product_name: str, thread_id: Optional[str] = None) -> Dict[str, Any]:
    # Create unique thread ID for this search session
    config: RunnableConfig = {
        "configurable": {"thread_id": thread_id or f"search-{_norm(product_name)}"}
    }

    message = f"Find current prices for: {product_name}. Compare at least 3 retailers. Save what you find."

    try:
        result = self.agent.invoke(
            {"messages": [HumanMessage(content=message)]},
            config=config
        )
        # Extract the final summary from agent messages
        summary = (result.get("messages") or [
                   HumanMessage(content="No summary")])[-1].content
    except Exception as e:
        summary = f"Error during agent run: {e}"

    return {
        "summary": summary,
        "prices": self.price_database.get(_norm(product_name), [])
    }
The method creates a unique conversation thread using RunnableConfig with thread IDs, allowing the agent to maintain context across multiple searches.
It uses HumanMessage objects instead of simple strings for better structured communication with the LangGraph framework.
The _norm() function ensures that “AirPods Pro” and “airpods pro” are treated as the same product for consistent data storage and retrieval. Error handling wraps the entire agent execution to gracefully handle any issues that may arise during web scraping or processing.
Step 3: Run the Agent in a Script
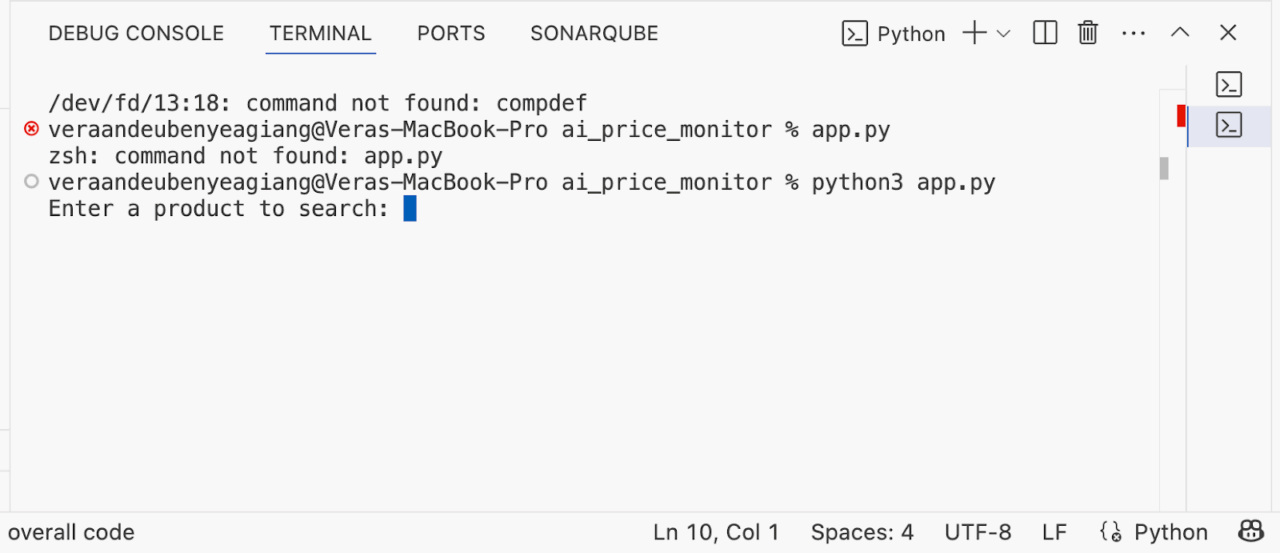
Create an app.py file so we can test the agent to see if it’s working:
from price_agent import AutonomousPriceAgent

if __name__ == "__main__":
    agent = AutonomousPriceAgent()
    product_name = input("Enter a product to search: ")
    result = agent.search_product(product_name)

    print("\n\U0001F4DD Summary:")
    print(result["summary"])

    print("\n\U0001F4E6 Prices Found:")
    for price in result["prices"]:
        print(price)
Result:
Step 4: Add a Streamlit UI
Create a new file called streamlit_app.py. This file allows users to enter product names and visualize price comparisons directly from the browser using a UI.
Create a Streamlit App
The first step is to import streamlit to handle the web interface and AutonomousPriceAgent, the class we defined earlier that contains the price-finding logic.
import streamlit as st
from price_agent import AutonomousPriceAgent
Set the App Title and Input Field
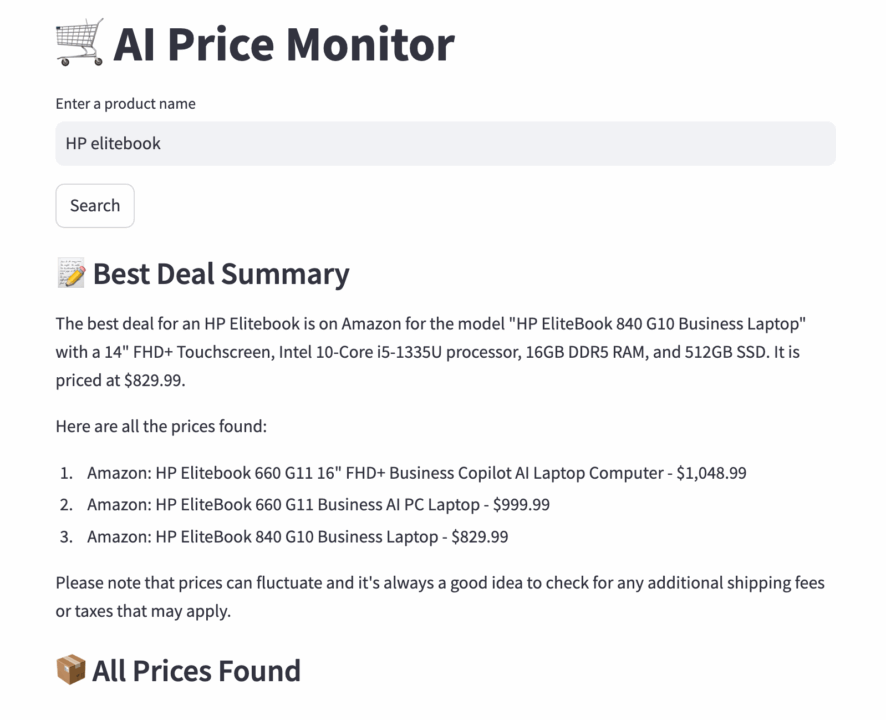
st.title("\U0001F6D2 AI Price Monitor")  # Adds a shopping cart emoji in the title
product = st.text_input("Enter a product name")
st.title(...): Displays the app’s title at the top and st.text_input(...): Lets users type in a product like “AirPods Pro” or “MacBook Air.”
Initialize the Agent Once
if "agent" not in st.session_state:
    st.session_state.agent = AutonomousPriceAgent()
Using st.session_state ensures the agent is only initialized once, not on every rerun. It also makes sure Streamlit reruns the script every time you interact with the UI.
Search and Display Results
if st.button("Search"):
    with st.spinner("Searching the web..."):
        result = st.session_state.agent.search_product(product)
        st.subheader("\U0001F4DD Best Deal Summary")
        st.markdown(result["summary"])
        st.subheader("\U0001F4E6 All Prices Found")
        for p in result["prices"]:
            st.write(p)
Here’s what we’re doing:
st.button(...): Triggers the search when clicked.st.spinner(...): Shows a loading spinner while the agent works.search_product(...): Sends the product query to the agent, which:- Searches Google and Amazon
- Extracts real-time prices
- Saves and returns a summary
st.markdown(...): Renders the best deal summary from the agent.st.write(...): Lists all price entries (source, price, URL, timestamp).
To run the app via Streamlit, you need to export API credentials to the terminal again. These are used to authenticate requests to OpenAI and ScraperAPI.
export OPENAI_API_KEY=" your key"
export SCRAPERAPI_API_KEY= “your key”
On Windows (PowerShell), use:
$env:OPENAI_API_KEY="your-openai-key"
$env:SCRAPERAPI_API_KEY="your-scraperapi-key"
Then you run it:
streamlit run streamlit_app.py
You’ll get an interactive dashboard that lets you type in any product name and instantly get real-time price comparisons and deal summaries.
Why LangChain + ScraperAPI?
This integration empowers you to create AI agents that can think and act independently. It autonomously searches, scrapes, extracts prices, and summarizes the best deals. ScraperAPI also solves the complications of getting real-time data from any public page. Let’s see how it compares to competitors:
| Feature | LangChain + ScraperAPI | Tavily / SerpAPI | HARA AI | Firecrawl |
| Architecture | Python-based agent with real-time search, scraping, and decision-making capabilities | Query-based search result fetcher that primarily accesses Google’s search API | Browser extension that runs locally and monitors specific page elements | API + SDKs (Python, Node, etc.) for scraping, crawling, mapping, and searching |
| Setup Requirements | Requires Python environment, API keys, and basic coding knowledge | Simple API integration with minimal setup | Chrome browser installation and manual element selection | Requires API key, SDK or REST setup, some coding knowledge |
| Data Collection Method | Automated agent scrapes pages across multiple sites | Returns search result links and summaries | User manually selects page elements to monitor | Scrape individual URLs, crawl entire sites, map links, or run searches |
| Output Format | HTML, JSON, Markdown | URLs and text summaries | DOM element snapshots | JSON, Markdown, HTML, screenshots, metadata |
| Web Scraping Capabilities | Full scraping with JS rendering, CAPTCHA solving, IP rotation | No direct scraping – only search API | Browser-based DOM scraping | Full scraping with JS rendering, dynamic content, batch operations |
| Anti-Detection Features | CAPTCHA handling, IP rotation, bot detection bypass | None – relies on Google’s API | Limited, vulnerable to site changes | Stealth mode, rotating proxies, smart waits, anti-bot handling |
| Proxy Support | Automatic IP rotation and proxy management | Not applicable | No proxy support | Built-in proxy and IP rotation |
| JavaScript Handling | Full support for dynamic content | Not applicable | Limited to browser execution | Full rendering with support for clicks, scrolls, and interactions |
| AI Integration | GPT-4 reasoning with memory and tool use | Basic AI for result ranking and summaries | Minimal rule-based triggers | AI-powered schema extraction, natural language extraction, integrates with LLMs |
| Agent Capabilities | Purpose-built for LangChain’s agent framework | Can integrate with agents but needs orchestration | No agent integration | Agent-friendly, integrates with LangChain and similar frameworks |
| Customization Options | Programmable workflows, scoring, scheduling | Prompt engineering and filtering | GUI-based configuration | Customizable crawl depth, selectors, schemas, concurrency, caching |
| Deployment Flexibility | Runs on servers, cloud, or scheduled environments | Requires internet for each query | Requires Chrome running | Hosted API or self-hostable backend |
| Primary Use Cases | Price monitoring, data pipelines, research automation | Quick search analysis, market research | Simple product tracking and alerts | Data extraction for AI, site crawling, change detection, SEO, lead enrichment |
| Technical Expertise Required | Intermediate – Python and API management | Low to intermediate – API knowledge | Beginner – point-and-click | Medium – API usage, JSON handling, endpoint configuration |
| Data Processing | Real-time with contextual analysis | Batch processing of search results | Event-triggered notifications | Real-time scrapes, batch operations, change tracking |
| Scalability | High – multiple products and retailers simultaneously | Medium – limited by API rate limits | Low – manual setup required | High – concurrent requests, large site crawling, scalable architecture |
Next Steps?
You just built an AI-powered price monitor that can:
- Search live product prices across Google, Amazon, and more
- Bypass real-world scraping defenses with ScraperAPI
- Think and act using a LangChain agent
- Optionally show results in a friendly Streamlit UI
You can take it a step further if you’d like. Track prices over time using a database, which should perform daily checks automatically and send an alert for price changes. The sky is your limit. Till next time, happy scraping!


