

Streamlining your data collection and delivery processes can transform your team’s operations. Integrating ScraperAPI with Zapier unlocks powerful workflow automation that reduces manual effort and increases efficiency. This setup allows you to scrape data and channel the results directly into tools like Google Sheets, Slack, or even your CRM without writing complex code for each step.
In this article, I’ll guide you through:
- Setting up ScraperAPI and Zapier
- Automating web scraping workflows to save time and resources
- Real-world examples showcasing practical use cases of this integration
By the end, you’ll have a solid understanding of automating repetitive data tasks, empowering your team to focus on what matters most.
Ready? Let’s get started!
What is Zapier?
Zapier is an automation tool that connects different apps and services, enabling them to work together without requiring any coding knowledge. It operates on a trigger and action workflow called Zaps.
- A Trigger is an event in one app that starts the workflow.
- An Action is the task Zapier performs in response to the trigger.
For example, you can create a Zap to monitor new rows in a Google Sheet (Trigger) and automatically send that data to ScraperAPI for processing (Action).
ScraperAPI enhances this process by acting as the backbone for data extraction in workflows. By connecting ScraperAPI to automation tools like Zapier, you integrate web scraping tasks into your automated workflows without manual intervention.
For instance:
- When a new row is added to a Google Sheet (Trigger), Zapier sends the row’s data, such as a URL or parameters, to ScraperAPI (Action).
- ScraperAPI then processes the request, bypassing bot protections and returning the required data in a structured format.
- This output is sent to another app, such as Slack, GoogleSheet, or a reporting tool, completing the cycle.
By integrating ScraperAPI with Zapier, you can automate repetitive scraping tasks, reduce human error, and focus on data analysis and decision-making instead of manual data collection.
Tools you’ll need [Prerequisites]
To follow along with this tutorial, make sure you have the following:
- Python Installed: Install Python 3.x on your computer if you don’t already have it. You’ll also need a text editor or IDE like VS Code or PyCharm to write and run code.
- Basic Web Scraping Knowledge: A general understanding of web scraping and APIs will help you get the most out of this guide.
During the tutorial, you’ll also set up the following:
- ScraperAPI Account: You’ll create a free ScraperAPI account to handle data scraping.
- Zapier Account: You’ll set up a Zapier account to automate workflows and integrate tools seamlessly.
Once you’re ready, let’s dive in!
Integrating ScraperAPI with Zapier
To show you how easy it is to integrate ScraperAPI with Zapier, we’ll scrape Reddit posts as example.
Step 1: Set Up ScraperAPI
To create a ScraperAPI account:
- Visit the ScraperAPI website and create a free account.
- Once registered, access your API key from the dashboard. You’ll receive 5,000 free API credits for a seven-day trial.
- Confirm your API key and test credits to ensure everything is ready for integration.

With this out of the way, it’s time to write our script.
Step 2: Build the Flask App
We’ll base this guide on the article “How to Scrape Reddit Web Data with Python,” where I used ScraperAPI to scrape Reddit data. This time, let’s take it further by converting the script into a Flask app that returns the scraped data in CSV format.
Note: If you’re not familiar with web scraping, that’s a great resource to get started, by the way 😉
Here’s a straight-to-the-point explanation of the Flask app:
- Route:
/scrape_poststriggers the scraping process. - ScraperAPI Integration: The app fetches data from Reddit using ScraperAPI.
- Data Processing: Extracted posts are parsed with BeautifulSoup and saved as a CSV file.
- Response: The app returns the CSV file to the client.
import os
from flask import Flask, request, jsonify, send_file
import json
import csv
from datetime import datetime
import requests
from bs4 import BeautifulSoup
app = Flask(__name__)
# ScraperAPI Key
scraper_api_key = 'YOUR_API_KEY'
# Route to scrape Reddit posts
@app.route('/scrape_posts', methods=['GET'])
def scrape_posts():
try:
reddit_query = "https://www.reddit.com/t/valheim/"
scraper_api_url = f'https://api.scraperapi.com/?api_key={scraper_api_key}&url={reddit_query}'
response = requests.get(scraper_api_url)
# Parse response content
soup = BeautifulSoup(response.content, 'html.parser')
articles = soup.find_all('article', class_='m-0')
parsed_posts = []
for article in articles:
post = article.find('shreddit-post')
if post:
post_title = post.get('post-title', 'N/A')
post_permalink = post.get('permalink', 'N/A')
content_href = post.get('content-href', 'N/A')
comment_count = post.get('comment-count', 'N/A')
score = post.get('score', 'N/A')
author_id = post.get('author-id', 'N/A')
author_name = post.get('author', 'N/A')
subreddit_id = post.get('subreddit-id', 'N/A')
post_id = post.get('id', 'N/A')
subreddit_name = post.get('subreddit-prefixed-name', 'N/A')
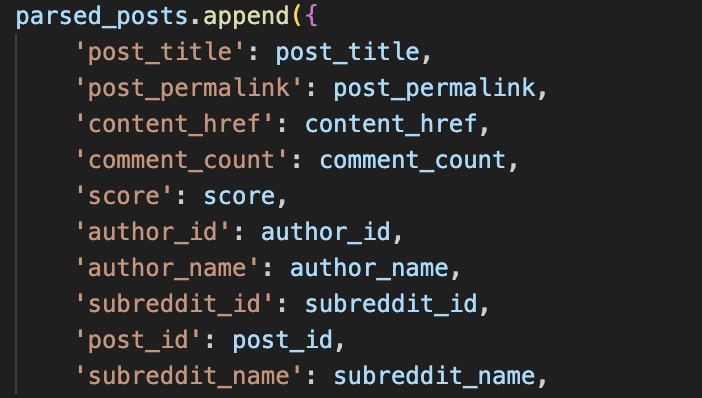
parsed_posts.append({
'post_title': post_title,
'post_permalink': post_permalink,
'content_href': content_href,
'comment_count': comment_count,
'score': score,
'author_id': author_id,
'author_name': author_name,
'subreddit_id': subreddit_id,
'post_id': post_id,
'subreddit_name': subreddit_name,
})
# Save to a CSV file
if parsed_posts:
csv_file_path = os.path.join(os.getcwd(), 'parsed_posts.csv')
# Write the CSV file
with open(csv_file_path, mode='w', newline='', encoding='utf-8') as csv_file:
fieldnames = parsed_posts[0].keys()
csv_writer = csv.DictWriter(csv_file, fieldnames=fieldnames)
csv_writer.writeheader()
csv_writer.writerows(parsed_posts)
# Return the CSV file as a response
return send_file(csv_file_path, mimetype='text/csv', as_attachment=True, download_name='parsed_posts.csv')
else:
return jsonify({"message": "No posts found to save"}), 200
except Exception as e:
return jsonify({"error": str(e)}), 500
if __name__ == '__main__':
app.run(port=5000)
Step 3: Host the Flask App
Zapier requires a publicly accessible URL for the app. Hosting your Flask app ensures it’s always available.
Hosting Options:
- PythonAnywhere: Beginner-friendly with free and paid tiers.
- Heroku: Flexible and supports Python apps.
- Render: Easy setup for Flask applications.
Follow their official guides to deploy your Flask app and obtain the public URL. For the purpose of this article, I used PythonAnywhere.
Copy and save your app’s public URL because you will use it during the integration.
Step 4: Create a Workflow(Zap) in Zapier
To build this workflow, ensure your Python app is working and you have an active Zapier account. Log in to your Zapier account, and let’s begin!!!
1. Choose a Trigger App
- In your Zapier dashboard, click the Create button at the top right corner and select Zap Automated Workflow to start building your workflow.

You should see a dashboard like this:

- Click on the Trigger button and select Webhooks
- Select Catch Hook as your Trigger event
- Click on Continue and test your Trigger
If your Zapier trigger isn’t working, you can manually test it by sending a request from your Python app’s webhook endpoint or running the code anywhere and verifying its receipt in Zapier.
import requests


webhook_url = "Your Zapier Webhook URL"


#Your Column Header
data = {
   "csv_content": "post_title,post_permalink,content_href,comment_count,score  author_id,author_name,subreddit_id,post_id,subreddit_name"
}
response = requests.post(webhook_url, json=data)


print(response.status_code)
print(response.text)
If everything works, you should see success return like this:

Go back and test your Trigger again, and it should work perfectly.
2. Configure ScraperAPI as the Action App
- Click on the Action button and select Webhooks
- Select GET request as your action event
- Click on Configure and enter your hosted Python app URL in the space provided. You can ignore the other parameters or fill them out, as seen in the image below.

- Click on Test and test your action. It should work perfectly, and you’ll see a green tick.

Now that you have triggered your workflow and scraped data with ScraperAPI by calling your action, it’s time to output your data so no developers can easily access it.
You can output your data through various channels, such as Google Sheets, Slack, Notion, etc. For this guide, we will output our scraped data in Google Sheets. You can do this by creating two more steps:
- a Formatter by Zapier to parse the CSV data and
- a Google Sheets action to send the scraped data to your Google Sheets
3. Parse the CSV data
- Click on the plus icon to add an action

- Click on the Action button and select Formatter
- Select Utilities as your action event
- Go to configure and enter your CSV file – To do this, click on the plus icon, select GET, and select the text file, which is your scraped data.

- Click on continue and test your Formatter
4. Select Output App:
It’s time to automatically send the scraped data to Google Sheets for easy accessibility:
- Click on the plus icon to add an action
- Click on the Action button and select Google Sheets
- Select Create ‘Multiple Spreadsheet Rows’ as your action event
- Add your Google Sheets account
- Go to your Google Sheets, create a blank sheet, label accordingly, and put in the header parameters. It should correspond with the number of columns scraped.
- After doing this, return to your Zapier and configure your Google Sheets.
- Map your Spreadsheet to the new Spreadsheet you just created, and select the sheet you want to use
- Map your rows accordingly by clicking on the plus icon on your right. Click on Utilities and map each output to the correct row.

- Click on continue and test your action. Your scraped data should automatically appear in your Google Sheet.
Step 5: Test and Finalize the Workflow
Run the entire Zap workflow to ensure everything works as expected. You can add additional steps as needed, such as sending notifications.
Here is how the extracted data should look in your Google Sheets; this makes data easily accessible to your team.
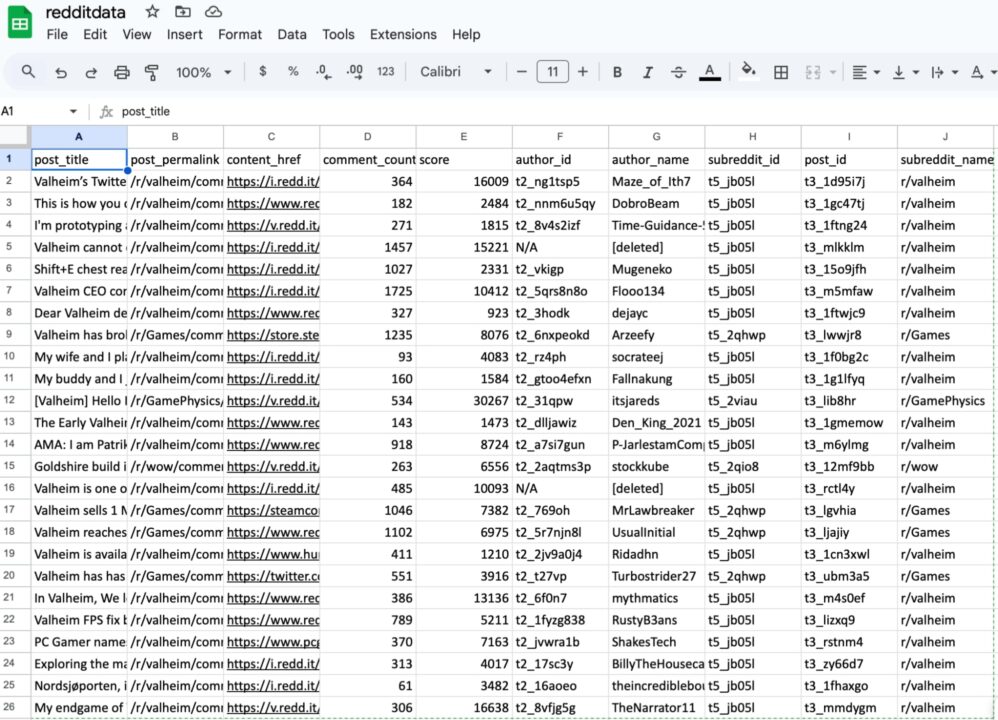
This project demonstrates how ScraperAPI can be integrated with other tools. You can scale it for larger projects and update your data with just a few clicks using Zapier. This approach reduces repetitive tasks and increases data accessibility, allowing data professionals to extract insights and drive better decision-making quickly.
Use cases for ScraperAPI + Zapier integration
Before you leave, here are some potential use cases for this integration to get your ideas flowing:
1. Scraping Reddit posts and sending them to Google Sheets
Objective: Automate the process of collecting valuable Reddit discussions, insights, and leads from specific subreddits and send the extracted data to Google Sheets for tracking, analysis, and collaboration.
How it Works:
1. Data Collection via ScraperAPI
- ScraperAPI extracts Reddit posts from targeted subreddits, collecting details like:
- Post Title — The headline of the Reddit post.
- Post URL — Direct link to the post for easy reference.
- Comment Count — Number of comments on the post.
- Score — The upvotes on the post, which can serve as a popularity indicator.
- Author Info — Username of the person who created the post.
- Subreddit Name — Name of the subreddit where the post was found.
2. Data Transfer via Zapier
- Once ScraperAPI scrapes the data, a Zapier webhook is triggered to send the extracted post data.
- Zapier Formatter parses the CSV or JSON data received from the ScraperAPI webhook.
3. Export to Google Sheets
- Zapier’s Google Sheets Action creates or updates rows in a specified spreadsheet.
- Each row represents a single Reddit post, with columns for Post Title, Post URL, Comment Count, Score, Author, and Subreddit Name.
Benefits:
- Easily view, analyze, and track Reddit data in Google Sheets.
- Automate everything from scraping to exporting without manual data handling.
- Teams can access and use live Google Sheets data for strategy, analysis, and reporting.
- Eliminates the need for manual data scraping and sheet updating.
2. Automatically collecting e-commerce product prices and storing them in Google Sheets
Objective: Monitor competitor pricing or track dynamic product prices from e-commerce platforms like Amazon or Shopify.
How it Works:
- ScraperAPI scrapes product data, including names, prices, availability, and URLs.
- The scraped data is sent to a Zapier webhook.
- Zapier transfers the data into Google Sheets, updating rows in real-time or adding new ones.
Note: You can also create a spreadsheet that sends product URLs to ScraperAPI, dynamically triggering a new scraping cycle.
Benefits:
- Automates price tracking, ensuring up-to-date market insights.
- Eliminates manual data entry.
3. Sending scraped leads to a CRM like HubSpot
Objective: Automate lead generation by scraping business directories, social media, or review platforms (e.g., LinkedIn, Yelp).
How it Works:
- ScraperAPI gathers lead details (e.g., names, emails, company details, and websites).
- Data is sent to Zapier, which creates or updates contacts in HubSpot.
Benefits:
- Enables seamless lead nurturing by pre-populating CRM data.
- Reduces manual effort in importing and sorting leads.
4. Alerting teams via Slack about new scraped insights
Objective: Deliver critical scraped data to teams in real time.
How it Works:
- ScraperAPI extracts data like customer feedback, market trends, or competitor updates.
- Zapier sends notifications to specific Slack channels.
Benefits:
- Ensures teams are alerted about time-sensitive insights without delays.
- Centralizes communication and collaboration.
Wrapping Up
This guide provided a step-by-step walkthrough on integrating ScraperAPI with Zapier to automate data collection and workflow processes. Here’s what we covered:
- Setting up the integration: Configuring ScraperAPI and Zapier to work seamlessly.
- Building workflows: Scraping data from websites and routing it directly into tools like Google Sheets, Slack, or CRMs.
- Real-world use cases: We explored practical applications that make your operations more efficient, from price tracking to lead generation and team notifications.
As we conclude this journey into workflow automation, we hope you’re inspired to use the power of ScraperAPI and Zapier to simplify repetitive tasks, save time, and improve productivity.
Remember, automation is not just a tool, it’s a strategy for scaling success.
Until next time, happy automating!

