

eBay price trackers are great tools to uncover unique insights from historical and current data, helping you build pricing and product strategies based on facts instead of guesswork.
In this article, we’ll show you how to build your eBay price checker in 6 steps and store the product price to build a historical dataset to help you make better marketing and business decisions.
Building an eBay Price Monitor in 6 Steps
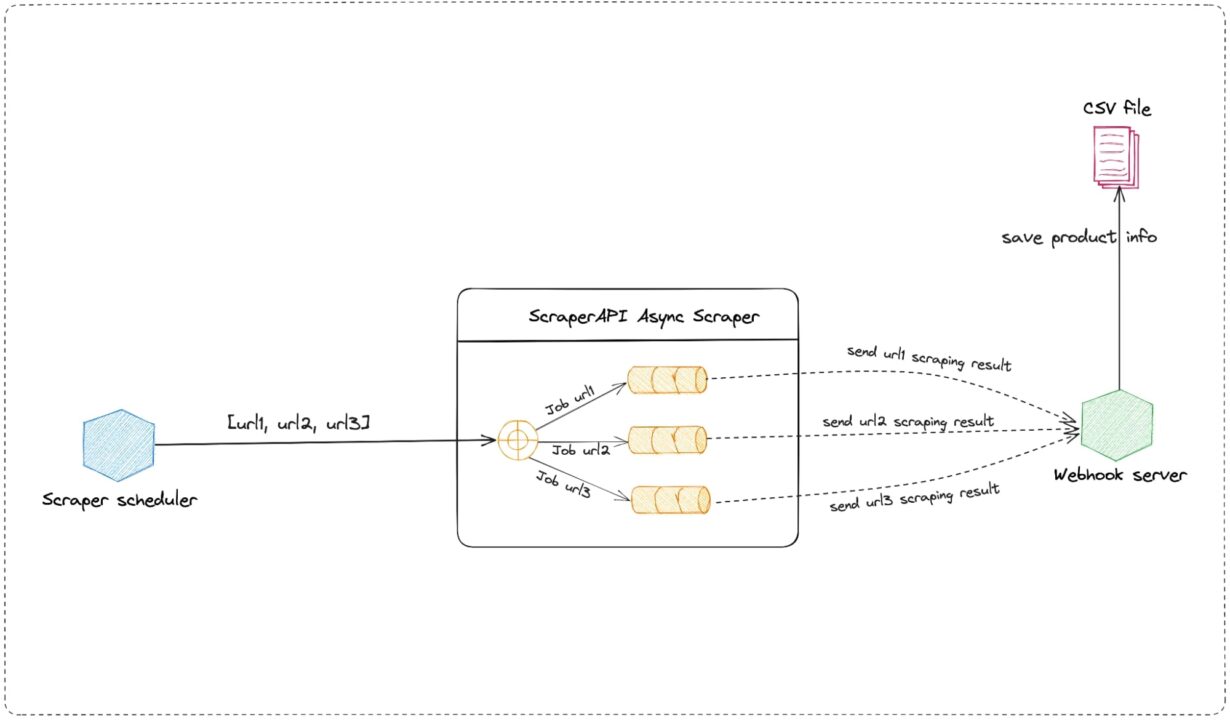
The project consists of two applications:
- The scraper scheduler – runs every hour to scrape a list of eBay products using ScraperAPI’s Asynchronous Scraper</a >.
- The webhook server – receives the Async Scraper response, parses the HTML page to extract the product price, and stores it in a CSV file.
The CSV file contains the following columns:
- Product eBay ID
- Product name
- Product price
- Recording date
The picture below describes the system architecture:
Prerequisites
You must have these tools installed on your computer to follow this tutorial.
- Node.js 18+ and NPM – Download link
- Knowledge of JavaScript and Node.js API
- A ScraperAPI account – Create an account and get 5,000 free API credits to get started</a >
Step 1: Set Up the Project
The two services will be held in the same project, so let’s create the folder and initialize a new Node.js project:
	mkdir ebay-price-checker

	cd ebay-price-checker

	npm init -y
The above last command will create a package.json file in the folder.
Step 2: Build the Scraper Scheduler
At this step, we’ll create a new file containing a list of URLs pointing to eBay product pages to monitor the price. This list is going to be sent to the Async Scraper</a > to perform the Web scraping asynchronously, so you don’t have to wait for the response.
In other words, the Async Scraper allows you to submit thousands of scraping jobs asynchronously and handle all complexities (like IP rotation, CAPTCHA solving, rate limiting, etc.) for you.
The function calling the Async Scraper is executed hourly.
To send the request through ScraperAPI’s servers, let’s use Axios:
npm install axios
Create the file scraper-scheduler.js and add the code below:
  const axios = require('axios');

  const pageURLs = [
     'https://www.ebay.com/p/26056267398?iid=314520138765',
     'https://www.ebay.com/p/10059052247?iid=325787830280',
     'https://www.ebay.com/p/3056929579?iid=266442214768'
  ];

  const apiKey = ''; // <-- enter your API_Key here
  const apiUrl = 'https://async.scraperapi.com/batchjobs';
  const callbackUrl = '';

  const requestData = {
     apiKey: apiKey,
     urls: pageURLs,
     callback: {
         type: 'webhook',
         url: callbackUrl,
     },
  };

  const runScraper = () => {
     axios.post(apiUrl, requestData)
         .then(response => {
             console.log(response.data);
         })
         .catch(error => {
             console.error(error);
         });
  };


  (() => {
     runScraper();
     setInterval(() => {
         runScraper();
     }, 3600000);
  })();
The variable callbackUrl stores the webhook’s URL to send the response to.
I used the online webhook service webhook.site to generate one.
Note: Remember to add your API key. You can find it in your ScraperAPI dashboard.
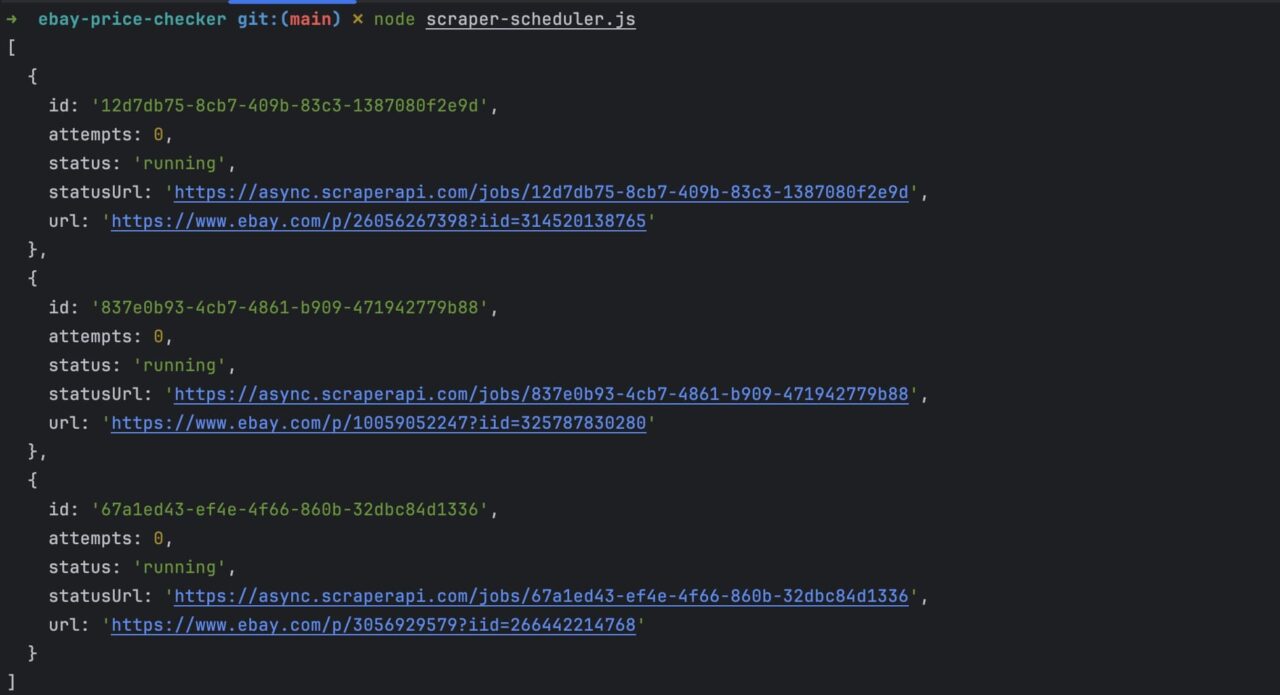
Run the command node scraper-scheduler.js to launch the service. You will get the following response.
Wait for a few seconds and browse your online webhook page; you can see you received three API calls.
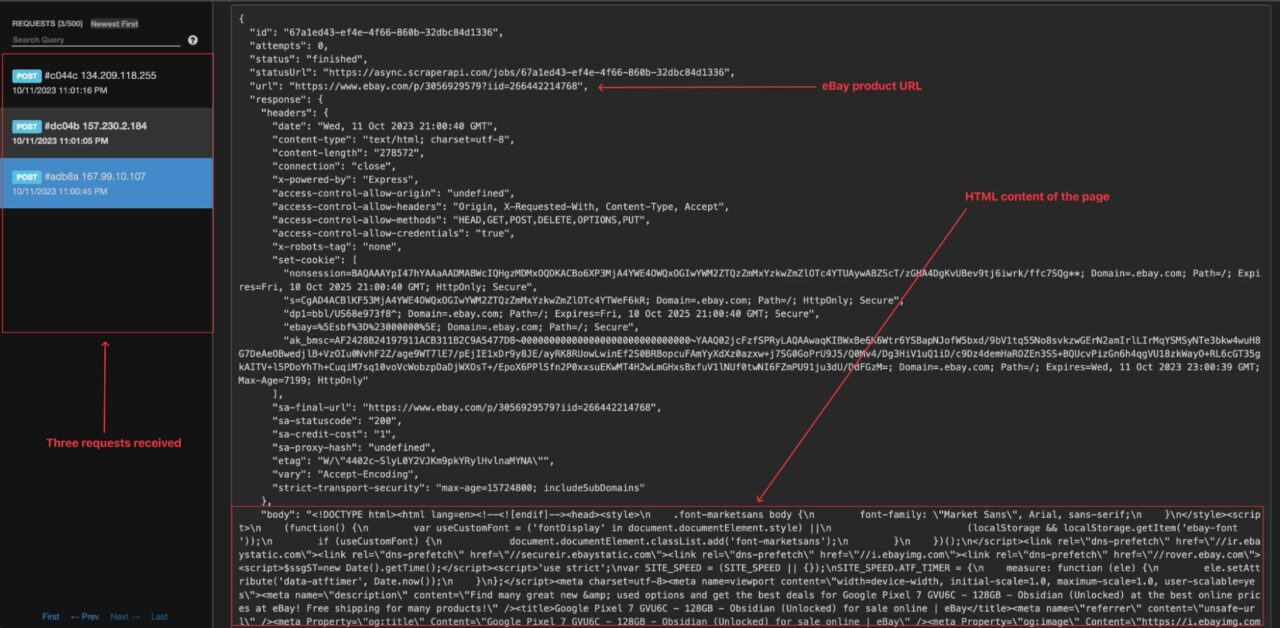
Now that we can see the webhook is triggered, we need to build our own webhook to extract the price from the page and save the information in the CSV file.
Step 3: Write Utilities Function to Manipulate a CSV File
To manipulate a CSV file, we need a function to:
- Verify if the CSV file exists
- Create an empty CSV file – if it doesn’t exist
- Read the content of the CSV file
- Add a line in the CSV file
We need two libraries to read and write in a CSV file respectively, so let’s install them:
npm install csv-parse csv-writer
Create a file csv-utils.js and add the code below:
  const path = require('path');
  const fs = require('fs');
  const csvWriter = require('csv-writer');
  const { parse } = require('csv-parse');

  const CSV_HEADER = [
     { id: 'id', title: 'Ebay product ID' },
     { id: 'name', title: 'Product Name' },
     { id: 'date', title: 'Date' },
     { id: 'price', title: 'Price (USD)' },
  ];

  const isCsvFileExists = (filename) => {
   return fs.existsSync(path.resolve(__dirname, filename));
  }

  const createCsvFile = async (filename) => {
     const writer = csvWriter.createObjectCsvWriter({
         path: path.resolve(__dirname, filename),
         header: CSV_HEADER,
     });

     await writer.writeRecords([]);
  };

  const retrieveCsvContent = (filename) => {
     const csvFilePath = path.resolve(__dirname, filename);

     const headers = ['id', 'name', 'date', 'price'];

     return new Promise((resolve, reject) => {
         const fileContent = fs.readFileSync(csvFilePath, { encoding: 'utf-8' });

         parse(fileContent, {
             delimiter: ',',
             columns: headers,
             fromLine: 2,
             skipEmptyLines: true
         }, (error, result) => {
             if (error) {
                 console.error(error);
                 reject(error);
             }

             resolve(result);
         });
     });
  }

  const addLineInCsvFile = async (filename, data) => {
     // TODO perform fields validation in data

     const fileContent = await retrieveCsvContent(filename);

     const contentUpdated = fileContent.concat([data]);

     const writer = csvWriter.createObjectCsvWriter({
         path: path.resolve(__dirname, filename),
         header: CSV_HEADER,
     });

     await writer.writeRecords(contentUpdated);
  };

  module.exports = {
     isCsvFileExists,
     createCsvFile,
     addLineInCsvFile,
  }
The CSV_HEADER variable contains an array of objects mapping the CSV column header to a product’s property.
Step 4: Identify the Information to Retrieve on the eBay Product Page
To extract the product’s name, price, and ID from the page, we must identify which DOM selector we can use to target its HTML tag.
Here’s what we mean:
The picture below shows the location of the product’s name and price in the DOM.
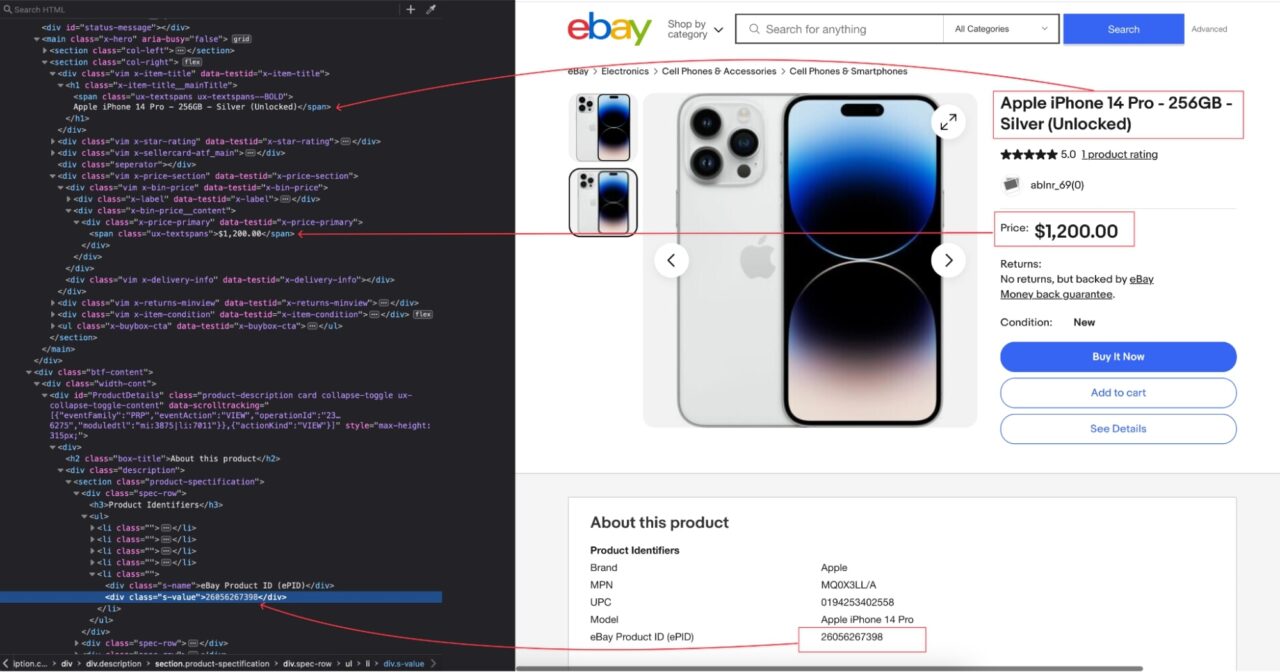
Here’s a table that enumerates the DOM selectors for each product information:
| Information | DOM Selector | Description |
| Product’s eBay ID | .product-spectification .spec-row:first-child ul li:last-child .s-value |
The product unique eBay ID |
| Product’s name | .x-item-title__mainTitle > span |
The name of the product |
| Product’s price | .x-price-primary |
The price of the product |
To extract the information above, we’ll use Cheerio, so let’s install it:
npm install cheerio
Note: Cheerio will allow us to parse the raw HTML and traverse the DOM using CSS selectors.
Step 5: Build the Webhook Server
This application runs a web server, exposing the endpoint that will be triggered by the Async Scraper.
To set up the Web server, let’s install the Express library:
npm install express
Create a file webhook-server.js and add the code below:
  const express = require('express');
  const cheerio = require('cheerio');
  const { createCsvFile, isCsvFileExists, addLineInCsvFile} = require("./csv-utils");

  const PORT = 5001;
  const CSV_FILENAME = 'ebay-products.csv';

  const app = express();

  app.use(express.urlencoded({ extended: true }));
  app.use(express.json({ limit: "10mb", extended: true }));

  app.post('/ebay-product', async (req, res) => {
     console.log('New request received!', req.body.id);

     if (req.body.response?.body) {
         console.log("Extract product information!");

         const $ = cheerio.load(req.body.response.body);

         const nameElement = $('.x-item-title__mainTitle > span');
         const priceElement = $('.x-price-primary');
         const ebayIdElement = $('.product-spectification .spec-row:first-child ul li:last-child .s-value');

         const currentDate = new Date();

         const product = {
           id: ebayIdElement.text(),
           name: nameElement.text(),
           price: priceElement.text().trim().replace('$', '').replace(',', ''),
           date: `${currentDate.getMonth() + 1}/${currentDate.getDate()}/${currentDate.getFullYear()}`
         };

         await addLineInCsvFile(CSV_FILENAME, product);

         console.log(`Product "${product.name}" added in the CSV file successfully!`);

         return res.json({ data: product });
     }


     return res.json({ data: {} });
  });

  app.listen(PORT, async () => {
     if (!isCsvFileExists(CSV_FILENAME)) {
         await createCsvFile(CSV_FILENAME);
     }

     console.log(`Application started on URL http://localhost:${PORT} 🎉`);
  });
At the application launch, the empty CSV file is created if it doesn’t exist.
When the server receives a POST request on the route /ebay-product, the product information is extracted from the HTML content and added to the CSV file by calling the function addLineInCsvFile().
Step 6: Test the Implementation
Launch the Webhook server with the command below:
Tnode webhook-server.js
The application will start on port 5001.
To make it accessible through the internet, so the Async Scraper can call it, we will use a tunneling service like Ngrok.
- Run the command below to install Ngrok and create a tunnel to the port 5001
	npm install -g ngrok
	ngrok http 5001
- Copy the Ngrok URL
- Open the file scraper-scheduler.js
- Update the variable
callbackUrl - CLastly, append the route /ebay/product
Once that’s done, run the command below to start the scraper scheduler:
node scraper-scheduler.js
Wait for a few seconds and open the CSV file generated; you will see three lines representing each product scraped.
As you can see in this demo, three lines have been added to the CSV file, where each line represents a product with its price for the current hour. Every hour, three new lines will be added.
Note: the function addLineInCsvFile() is not concurrency prone at scale, and handling it in this tutorial wasn’t relevant. Remember to rewrite this function to avoid inconsistent data in the CSV file when monitoring thousands of eBay products.
Why Build Your Own eBay Price Tracker?
For businesses, building your own price tracker gives you a competitive advantage against your competitors.
You are not using the same data from eBay price tracker providers as your competitors are, so you will not have the same interpretation of the data and potentially apply the same strategies.
Here are a few advantages you gain from building your own eBay price tracker:
- Data ownership – you own the data of your product prices history and enrich them throughout time
- Flexibility – you can monitor as many products and at the frequency as you want. You can implement additional features such as notification alerts, dynamic pricing, and more
- Forecasting – by enriching your dataset, you’re able to create unique price predictions others can’t access
- Competitiveness – by scraping eBay product prices frequently, you can quickly identify price drops or increases and update your price accordingly.
- Cost Control – it can be cost-effective compared to paying for premium third-party eBay price trackers in the long run
Best 3 Off-The-Shelf eBay Price Trackers
Not ready to build your own eBay price checker yet? Here are the most popular off-the-shelf eBay price checkers you can try:
- TERAPEAK – It is a market research tool that helps sellers gather insights to make business decisions. It provides historical data on eBay sales and pricing trends; one of its best features is identifying the best times to list a specific product to maximize visibility and sales.
- AVERAGE FINDER – It is an eBay price tracking tool that helps buyers find and compare average selling prices for specific products, making it a great buyer-centric tool.
- MARK SIGHT – Similar to TERAPEAK, it assists eBay sellers in monitoring their listings and competitors’ listings. Price tracking and competitor analysis are among the most interesting features that help sellers in their pricing strategies.