


Glassdoor.com hosts over 100 million job vacancies, salary data, company reviews, and other employment information, making it one of the most comprehensive job intelligence platforms available. This vast amount of structured data provides invaluable insights into hiring trends, salary benchmarks, and competitive analysis – insights that would be impossible to gather manually.
Due to the volume and dynamic nature of Glassdoor’s data, effective analysis requires a scalable Glassdoor web scraping implementation. Whether you’re tracking emerging job skills, monitoring competitor hiring strategies, building a custom job aggregator, or performing in-depth market research, programmatic data collection offers a significant edge.
This tutorial presents two practical approaches to achieving this: extracting job data using JavaScript and Python. We’ll guide you through setting up scrapers that avoid common pitfalls, such as getting blocked by Glassdoor or failing to extract dynamically loaded content, while also ensuring ethical and legal compliance. Before diving into code, we’ll address important considerations regarding Glassdoor’s Terms of Use, responsible scraping practices that respect website resources, and legal principles.
JavaScript (Node.js): Building a Scalable Glassdoor Job Listing Extractor
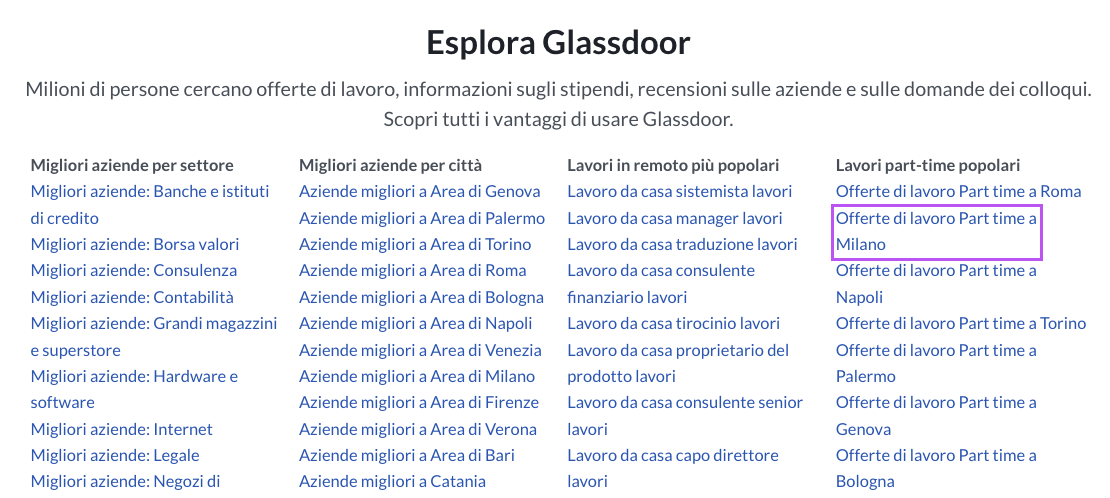
For this Glassdoor web scraping tutorial, we will extract Glassdoor’s part-time job opportunities in Milan to collect the job title, company hiring, and the link to the job posting at scale.
These category pages are publicly available (they’re not behind any kind of log-in or paywall), so we’re doing this 100% white hat.
Before You Scrape: Essential Tools & Prerequisites for Glassdoor
Although we’ll explain every step of the process, we assume you have the basic knowledge covered.
However, if you ever feel lost or confused, here are a few easier web scraping projects you can use to build up your skills gradually:
- Web Scraping with Node.JS for Beginners
- Scraping LinkedIn Job Data with Cheerio
- Using Async and Await for Web scraping in Node.JS
With this out of the way, let’s start by setting up the project.
1. Setting Up Your Development Environment for Glassdoor Scraping
To get everything up and running, you’ll need to create a new folder for your project (we named our folder glassdoor-scraper) and open it on VS Code or your favorite IDE.
Once inside the folder, open a terminal and initiate Node.JS like this:
npm init -y
It’ll create two necessary JSON files inside your project.
Note: If you haven’t, download and install Node.JS and NPM before running any commands.
Then, we’ll install our favorite three dependencies:
npm install axios cheerio objects-to-csv
From there, create a new file name glassdoorScraper.js, and import the dependencies at the top:
const axios = require("axios");
const cheerio = require("cheerio");
const ObjectsToCsv = require("objects-to-csv");
For the next step, let’s explore Glassdoor website to understand how to access each data point we’re looking for.
2. Understanding Glassdoor’s Structure: Mapping the DOM for Efficient Extractionges
When clicking on the link “Offerte di lavoro Part time a Milano.”
The website will take you to a webpage list of job listings in the form of cards on the left and more details on the right. Each card represents a job and contains all the information we’re looking for: company name, job title, and a link to the job post.
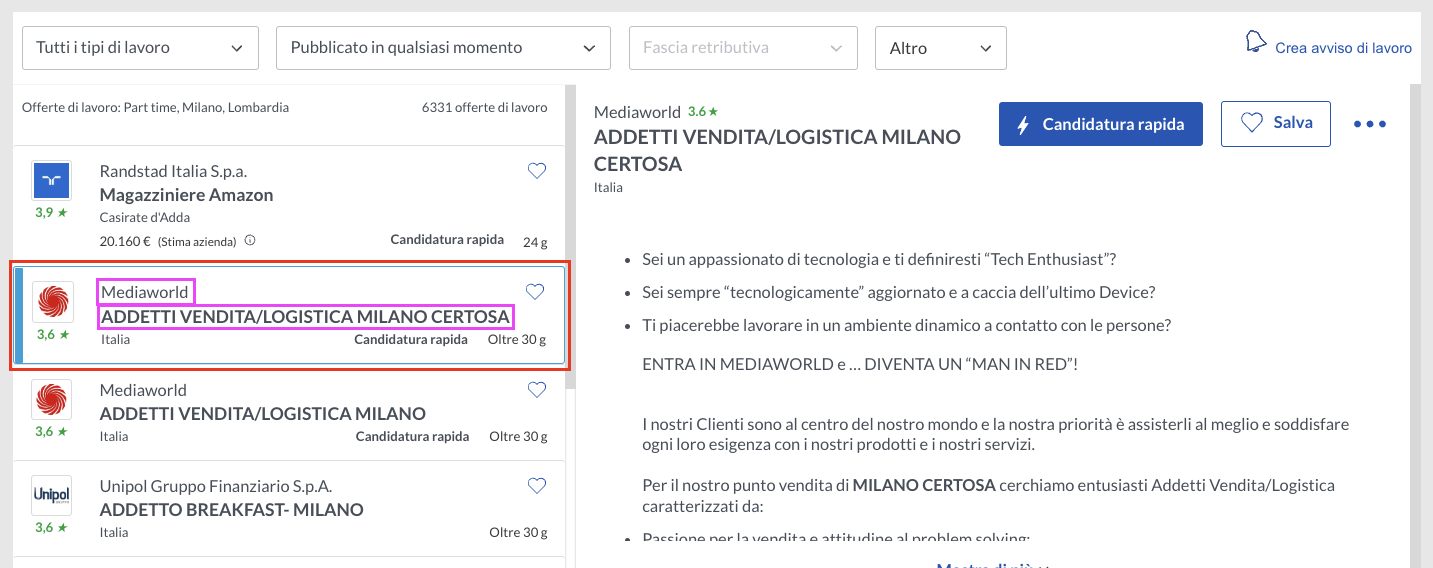
But we’re not interested in the visual rendering, are we? To find our CSS targets, let’s inspect the page and see how these cards are structured.
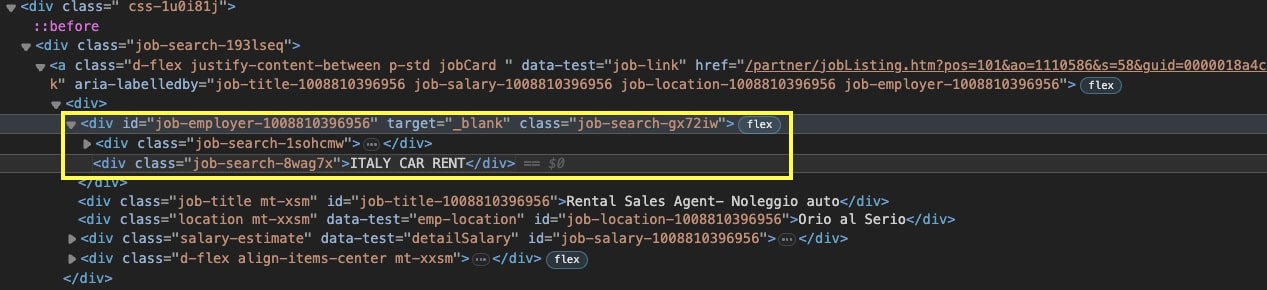
The first element on the card is the company’s name, which is five levels down inside its container: <div class="job-search-8wag7x"></div>.
Understanding where this element sits within the structure is important because if we try to target it directly, our script won’t be able to find it.
Instead, we need to find the element above first, and the move down to get the company name.
The selector for the company’s name would look something like “div.job-search-gx72iw > div.job-search-8wag7x”.
If you do the same process for the rest of the elements, it will look something like this:
- For the Job Title: “div.job-title.mt-xsm”
- For the Job Title: “div.job-title.mt-xsm”

But how can we tell if these are going to work? Well, we could build the scraper and try out the selectors on the first page, but if it doesn’t work, will we just keep sending request after request?
No! Before we put our IP in danger, it’s better to use the Browser’s console to try out these selectors.
3. Testing CSS Selectors: Browser Console Techniques for Validationrowser’s Console
Right from where you are, click on the Console tab. You’ll see a lot of information printed there.
To get rid of it, press CTRL + L in your keyword to clear the console.
With a clean slate, let’s pass the first selector to the querySelectorAll() function and see what gets returned:
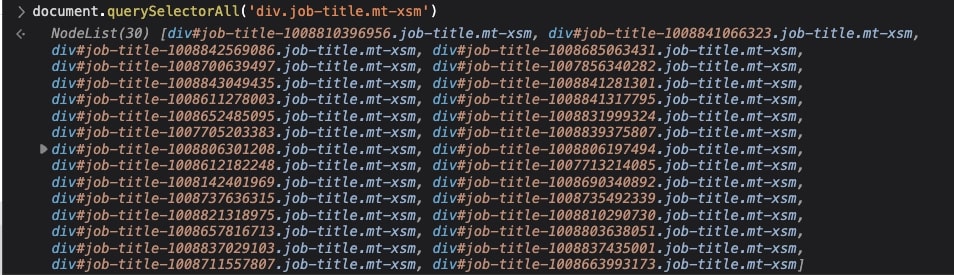
Nice, that worked! As you can see, it returns a total of 30 nodes, and as we hover over them, they highlight the company’s name on each card. Plus, now we know there are 30 jobs per page 😉.
Try testing the rest of the selectors to see the process yourself. When you’re ready, let’s go back to VS Code.
4. Axios HTTP Requests: Communicating with Glassdoor’s Servers
You know what you want to extract, and now you know where to find it. It’s time to send our scraper out to the wild.
In our glasssdoorScraper.js file, let’s create a new async function and initialize Axios by passing the URL we’re targeting.
(async function () {
const page = await axios("");
})();
Oh! But we haven’t chosen an URL yet, have we? Going back to the current page, the URL looks something like this:
https://www.glassdoor.it/Lavoro/milano-part-time-lavori-SRCH_IL.0,6_IC2802090_KO7,16.htm
But you should never take the first URL without first evaluating if there’s a better variant.
Case in point, if we navigate the rest of the URLs in the paginated series, here’s a common trend from page to page:
Page 2:
https://www.glassdoor.it/Lavoro/milano-part-time-lavori-SRCH_IL.0,6_IC2802090_KO7,16_IP2.htm?includeNoSalaryJobs=true&pgc=AB4AAYEAHgAAAAAAAAAAAAAAAeJsfSYASAEBAQ0BkGkLZy7wZR4%2F2Zo9gFfJc%2BaGfJR2hsdPG88aYkQEq%2BZCuA1D8cX0auxYd5YLWXw4PlrFLs6CbF64VTKidMy%2FVVlQewAA
Page 3:
https://www.glassdoor.it/Lavoro/milano-part-time-lavori-SRCH_IL.0,6_IC2802090_KO7,16_IP3.htm?includeNoSalaryJobs=true&pgc=AB4AAoEAPAAAAAAAAAAAAAAAAeJsfSYAfQEBARIBKE7V5yzSCE8JHGVBEGqz7wAzuNK9l7EpYDY04B%2FezXcfXZMYR5YqLcFzc7zLnpGx2RjtMQTOQD7v9%2FdGuWhCorhxKDvn80HEk9RcGxMTa110BNJz2wVS1VEBfbcw0u1rpBWrMhZMF1T%2BAHtTQq8aCnkr9ztDMcmkAAA%3D
There’s a lot of noise in these URLs, but take a closer look at the base of the URL highlighted in yellow.
If we use just that part, we’re getting the same results as if we were moving through the pagination. So let’s use that structure from now on.
(async function () {
const page = await axios(
"https://www.glassdoor.it/Lavoro/milano-part-time-lavori-SRCH_IL.0,6_IC2802090_KO7,16_IP1.htm?includeNoSalaryJobs=true"
);

console.log(page.status);
})();
And we’re console logging for good measure.

Awesome, a 200 successful code! However, before we continue, we’ll need to do one more thing to make our scraper more resilient once we scale our project to more requests.
5. IP Block Prevention: ScraperAPI Proxy Rotation for Reliable Data
Something to consider while scraping high-traffic or data-heavy websites is that most of them don’t like to be scraped, so they have several tricks on their sleeves to block your scripts from accessing their servers.
To go around this, you’ll need to code different behaviors that convenience servers that your scraper is actually a real human interacting with the page, like:
- Dealing with CAPTCHAs
- Rotating your IP address
- Creating and maintaining a pool of IP addresses to rotate from
- Sending the right headers
- Changing your IP location for accessing geo-sensitive data.
Or we can use a simple API to handle all of this for us.
ScraperAPI’s job board scraping solution uses machine learning, years of statistical analysis, and huge browser farms to prevent your scraping bots from getting flagged and blocked.
First, let’s create a free ScraperAPI account to generate an API key – which you’ll find in your dashboard.
And we’ll use the following structure to modify our initial request:
http://api.scraperapi.com?api_key={yourApiKey}&url=https://www.glassdoor.it/Lavoro/milano-part-time-lavori-SRCH_IL.0,6_IC2802090_KO7,16_IP1.htm?includeNoSalaryJobs=true
Now, our request will be sent from ScraperAPI’s servers, rotating our IP address in every request and handling all complexities and anti-scraping systems our scraper encounters.
6. Cheerio DOM Parsing: Efficiently Extracting Data by Navigating Glassdoor’s HTML
The fun part begins!
The first step toward extracting our desired data is to parse the response so we can navigate through the nodes and pick the elements using the previously built selectors.
const html = page.data;
const $ = cheerio.load(html);
What you’ve done right now is storing the response’s data (which is HTML data) into a variable you then passed to Cheerio for parsing.
Cheerio will transform every element in the HTML file into Node objects we can traverse using XPath or, in our case, CSS selectors.
Still, there’s one selector we haven’t discussed yet: the main container.
On the page, every job listing is represented by a card, and each card contains the data we want.
To make it easier for our scraper to find the information – and reduce the likelihood of useless data leaking into our project – we first need to pick all the cards and then loop through them to extract the data points.
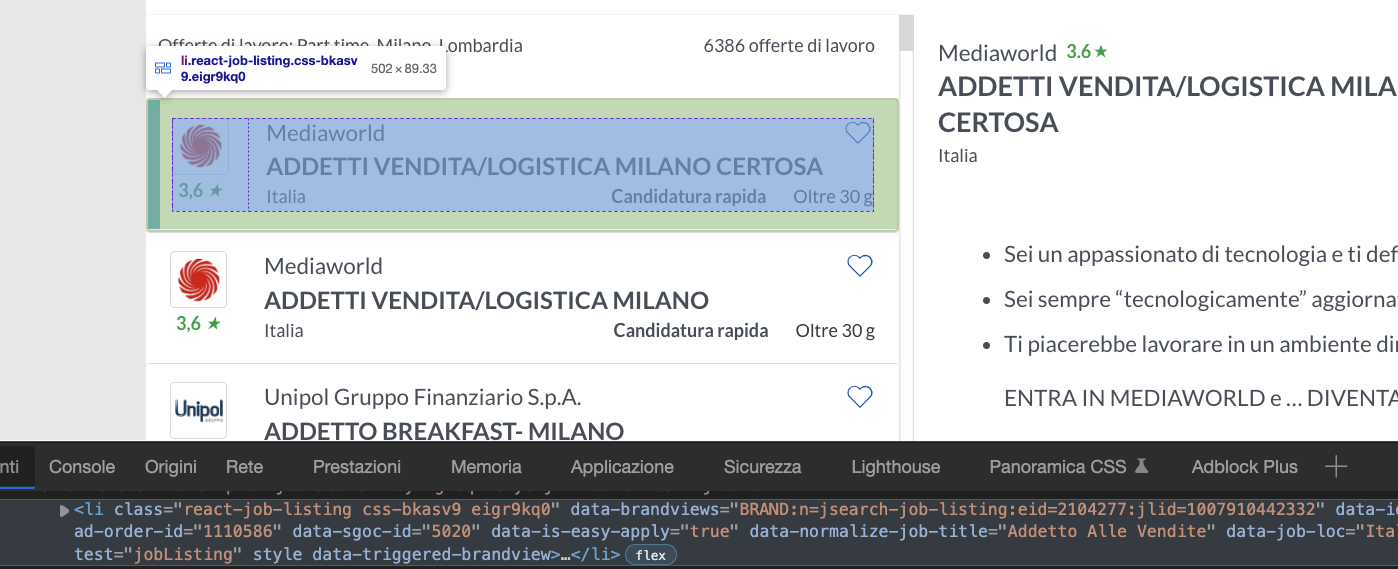
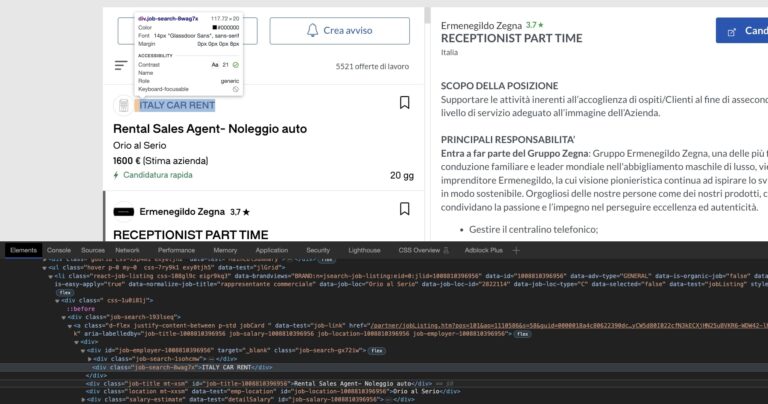
Every card is a <li> element, and we can pick them using the [data-test="jobListing"] attribute.
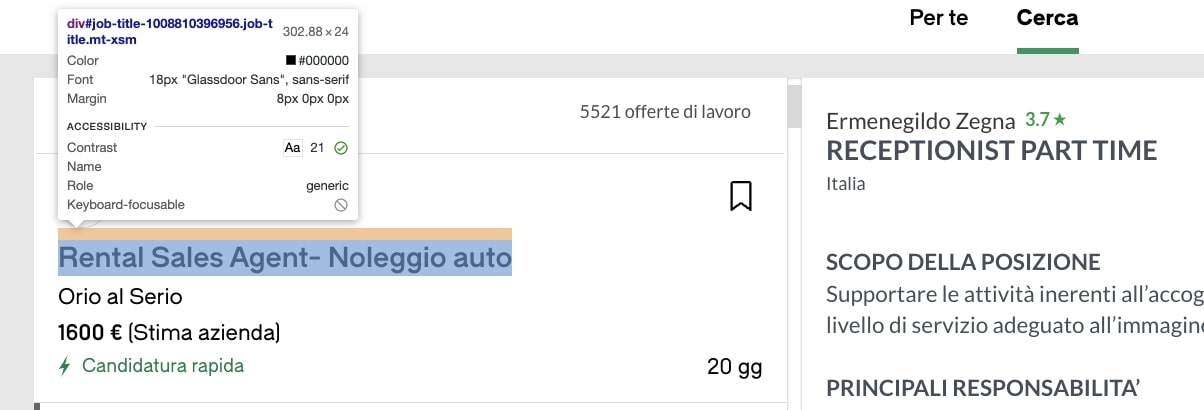
Note: You can’t see it on the image because of the cut in the screenshot, but you’ll be able to find the attribute on the page.
So here’s how we can write the entire parser:
let allJobs = $('[data-test="jobListing"]');
allJobs.each((index, element) => {
const jobTitle = $(element).find("div.job-title.mt-xsm").text();
const company = $(element)
.find("div.job-search-gx72iw > div.job-search-8wag7x")
.text();
const jobLink = $(element).find("a[data-test='job-link']").attr("href");
});
Notice the .text() method at the end of the string? As you probably figured out, the method extracts the text data from the element. Without it, it would return the markup and text, which is not very helpful.
On the other hand, when we want to extract the value of an attribute within an element, we can use the .attr() method and pass the attribute from which we want the value.
If we ran our script now, nothing would actually happen because the script is not doing anything with the data it’s picking.
We can go ahead and log the data to the terminal, but it will all be very confusing to see. So, before we log it, let’s format it using an array.
7. Cheerio DOM Parsing: Efficiently Extracting Data by Navigating Glassdoor’s HTMLa to an Empty Array
Outside of the main async function, create an empty array like so:
let jobListings = [];
To add the scraped data inside, all we need to use is the .push() on the array:
jobListings.push({
"Job Title": jobTitle,
"Hiring Company": company,
"Job Link": "https://www.glassdoor.it" + jobLink,
});
Did you catch that? We’re pushing a string before the returned value from jobLink. But why?
This is exactly why web scraping is about the details. Let’s go back to the page and see the href value:
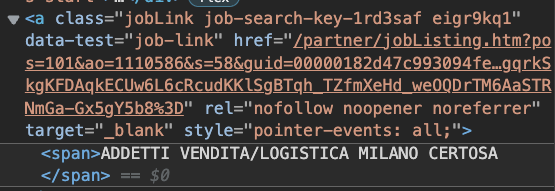
There’s a lot of information there, but there’s a piece missing from the URL: “https://www.glassdoor.it.” This is a clever way to protect the URL from scrapers like us.
We’re concatenating the two into one string by passing this missing information as a string alongside jobLink’s value. Thus, making it useful again.
With this out of the way, let’s test our code by console logging the resulting array:

Excellent work so far; you’ve built the hardest part!
Let’s take that data out of the terminal, shall we?
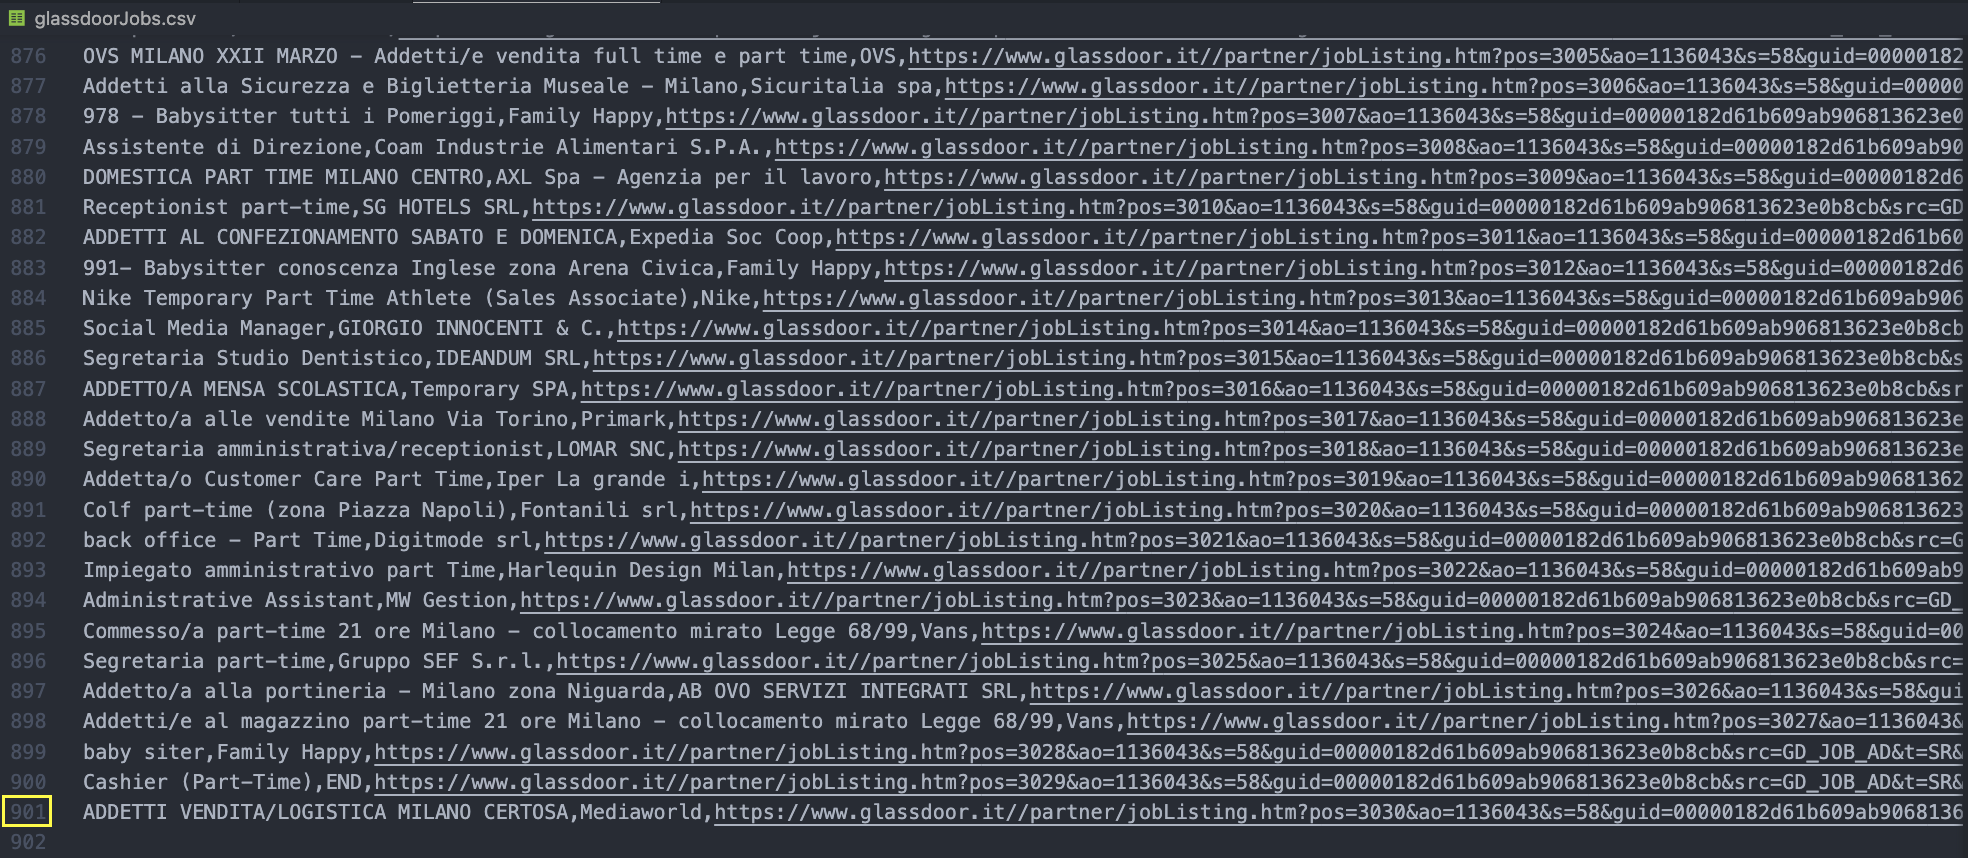
8. CSV Export: Structuring & Saving Your Scraped Glassdoor Data
Exporting the scraped information to a CSV file is actually quite simple, thanks to the ObjectsToCsv package. All you’ll need to do is add the following snippet outside the .each() method:
const csv = new ObjectsToCsv(jobListings);
await csv.toDisk("./glassdoorJobs.csv", { append: true });
console.log("Save to CSV");
It’s important that we set append to true, so if we don’t overwrite the file every time we use it.
We’ve tested this before, so don’t run your code yet. We still want to do one more thing before.
9. Scraping All Pages: Mastering Glassdoor’s Pagination
We have already figured out how the URL structure changes from page to page within the paginated series. With that intel, we can create a for loop to increase the IP{x} number until we reach the last page in the pagination:
for (let pageNumber = 1; pageNumber < 31; pageNumber += 1){}
Also, we’ll need to add this number dynamically in the axios() request:
const page = await axios(
'https://api.scraperapi.com?api_key={yourApiKey}&url=https://www.glassdoor.it/Lavoro/milano-part-time-lavori-SRCH_IL.0,6_IC2802090_KO7,16_IP${pageNumber}.htm?includeNoSalaryJobs=true'
);
Finally, we move the entire code inside the for loop – leaving the CSV part out of the loop for simplicity’s sake.
10. Complete Node.js Implementation: Testing Your Glassdoor Scraper
If you’ve been following along (if you came directly to this section: Hi ) your code base should look like this:
const axios = require("axios");
const cheerio = require("cheerio");
const ObjectsToCsv = require("objects-to-csv");

let jobListings = [];

(async function () {
for (let pageNumber = 1; pageNumber < 31; pageNumber += 1) {
   const page = await axios(
     'https://api.scraperapi.com?api_key=51e43be283e4db2a5afb62660fc6ee44&url=https://www.glassdoor.it/Lavoro/milano-part-time-lavori-SRCH_IL.0,6_IC2802090_KO7,16_IP${pageNumber}.htm?includeNoSalaryJobs=true'
   );
   const html = await page.data;
   const $ = cheerio.load(html);

   let allJobs = $('[data-test="jobListing"]');
   allJobs.each((index, element) => {
const jobTitle = $(element).find("div.job-title.mt-xsm").text();
const company = $(element).find("div.job-search-gx72iw > div.job-search-8wag7x").text();
const jobLink = $(element).find("a[data-test='job-link']").attr("href");
jobListings.push({
"Job Title": jobTitle,
"Hiring Company": company,
"Job Link": "https://www.glassdoor.it/" + jobLink,
});
});

console.log(pageNumber + " Done!");
}

const csv = new ObjectsToCsv(jobListings);
await csv.toDisk("./glassdoorJobs.csv");
console.log("Save to CSV");
console.log(jobListings);
})();
After running your code, a new CSV file will be created inside your folder.
Note: For this to work, remember that you need to add your ScraperAPI key to the script, replacing the {yourApiKey} placeholder.
We made a few changes:
- First, we added a
console.log(pageNumber + " Done!")line to give visual feedback while the script runs. - Second, we delete the
{ append: true }argument from the.toDisk()method; as it is no longer inside thefor loop, we won’t be adding (appending) any more data to it.
Congratulations, you built your first Glassdoor scraper in JavaScript!
You can use the same principles to scrape basically every page on Glassdoor, and using the same logic, you can translate this script to other languages.
Let’s create a Python script to do the same thing as a demonstration.
Python (Scrapy/BS4): Robust & Ethical Glassdoor Data Extraction
When writing a Glassdoor scraper in Python, you might be inclined to use a tool like Selenium. However, just like with JavaScript, we don’t need to use any kind of headless browser.
Instead, we’ll use Requests and Beautiful Soup to build a loop to access and parse the HTML of the paginated pages, extracting the data as we did above.
1. Python Environment: Installing Required Libraries for Glassdoor Scraping
Inside your project folder, create a new glassdoor-python-scraper directory, add a glassdoor_scraper.py file, and pip install Requests and Beautiful Soup from the terminal:
pip install requests beautifulsoup4
Finally, import both dependencies to the top of the file:
import requests
from bs4 import BeautifulSoup
Just like that, we’re ready for the next step.
2. Pagination Automation: Using Python Requests in a Loop Structure
For good measure, send the initial request to the server and print the status code.
response = requests.get(
"https://www.glassdoor.it/Lavoro/milano-part-time-lavori-SRCH_IL.0,6_IC2802090_KO7,16_IP1.htm?includeNoSalaryJobs=true")

print(response.status_code)
Note: Remember that you’ll need to CD to the new folder before being able to run your Python script.

It’s working so far! Now, let’s put this into a for loop and try to access the first three pages in the pagination.
Create a range from 1 – 4 (it won’t include 4 in the range) and add an {x} variable to the string:
for x in range(1, 4):
response = requests.get(
"https://www.glassdoor.it/Lavoro/milano-part-time-lavori-SRCH_IL.0,6_IC2802090_KO7,16_IP{x}.htm?includeNoSalaryJobs=true")

print(response.status_code)

With this simple for loop, our scraper will be able to move through the pagination without any issue.
3. Beautiful Soup Extraction: Parsing Glassdoor’s HTML in Python
For testing purposes, we don’t want our scraper to fail on three different pages, let’s reduce the range to 1 – 2; it’ll only scrape page one.
As before, we’ll pick all the job cards using the [data-test="jobListing"] attribute selector:
all_jobs = soup.select("[data-test='jobListing']")
With all cards stored inside the all_jobs variable, we can loop through them to extract the target data points:
for job in all_jobs:
job_title = job.find('div', class_='job-title mt-xsm').text
company = job.select_one(
'div.job-search-gx72iw > div.job-search-8wag7x').text
job_link = job.find("a", attrs={"data-test": "job-link"})["href"]
Note: For some reason, when using .find() to extract the company name, it wasn’t working, so we decided to use the select_one() method instead.
4. JSON Data Storage: Formatting and Saving Extracted Glassdoor Data
We went into more detail about handling JSON files on our scraping tabular data with Python tutorial. Still, for a brief explanation, we’ll add the data to an empty array and use the json.dump() method to store the array into a JSON file:
glassdoor_jobs.append({
    "Job Title": job_title,
    "Company": company,
    "Job Link": "https://www.glassdoor.it" + job_link
})
Note: You’ll need to import json at the top of the file and create a new glassdoor_jobs = [] empty array outside the loop for this to work.
With the array ready with our data in a nice format, we’ll dump the data into a JSON file with the next snippet:
with open('glassdoor_jobs.json', 'w') as json_file:
json.dump(glassdoor_jobs, json_file, indent=2)
One last thing to do: test it!
5. Complete Python Implementation: Running Your Glassdoor ScraperGlassdoor Python Scraper
Without more preamble, here’s the full Python script to scrape Glassdoor job data:
import requests
from bs4 import BeautifulSoup
import json

glassdoor_jobs = []

for x in range(1, 31):
    response = requests.get(
        "https://api.scraperapi.com?api_key={your_api_key}&url=https://www.glassdoor.it/Lavoro/milano-part-time-lavori-SRCH_IL.0,6_IC2802090_KO7,16_IP{x}.htm?includeNoSalaryJobs=true")
    soup = BeautifulSoup(response.content, "html.parser")

    all_jobs = soup.select("[data-test='jobListing']")
    for job in all_jobs:
        job_title = job.find('div', class_='job-title mt-xsm').text
        company = job.select_one(
            'div.job-search-gx72iw > div.job-search-8wag7x').text
        job_link = job.find("a", attrs={"data-test": "job-link"})["href"]
        glassdoor_jobs.append({
        "Job Title": job_title,
        "Company": company,
        "Job Link": "https://www.glassdoor.it" + job_link
        })
    print("Page " + str(x) + " is done")

with open('glassdoor_jobs', 'w') as json_file:
    json.dump(glassdoor_jobs, json_file, indent=2)
A few changes we’ve made:
- We changed the range from 1 – 2 to 1 – 31. The script will stop at page 30 (as 31 is not included), which is the last page in the paginated series.
- We added a
print("Page: " + str(x) + " is done")statement for visual feedback as the code runs. It converts our x variable from an integer to a string so that we can concatenate the entire phrase. - To protect our IP and handle any anti-scraping technique thrown at us, we’ll send our requests through ScraperAPI’s servers. You can see the new string in the initial URL and learn more about ScraperAPI functionalities with our documentation.
Here’s the end result:
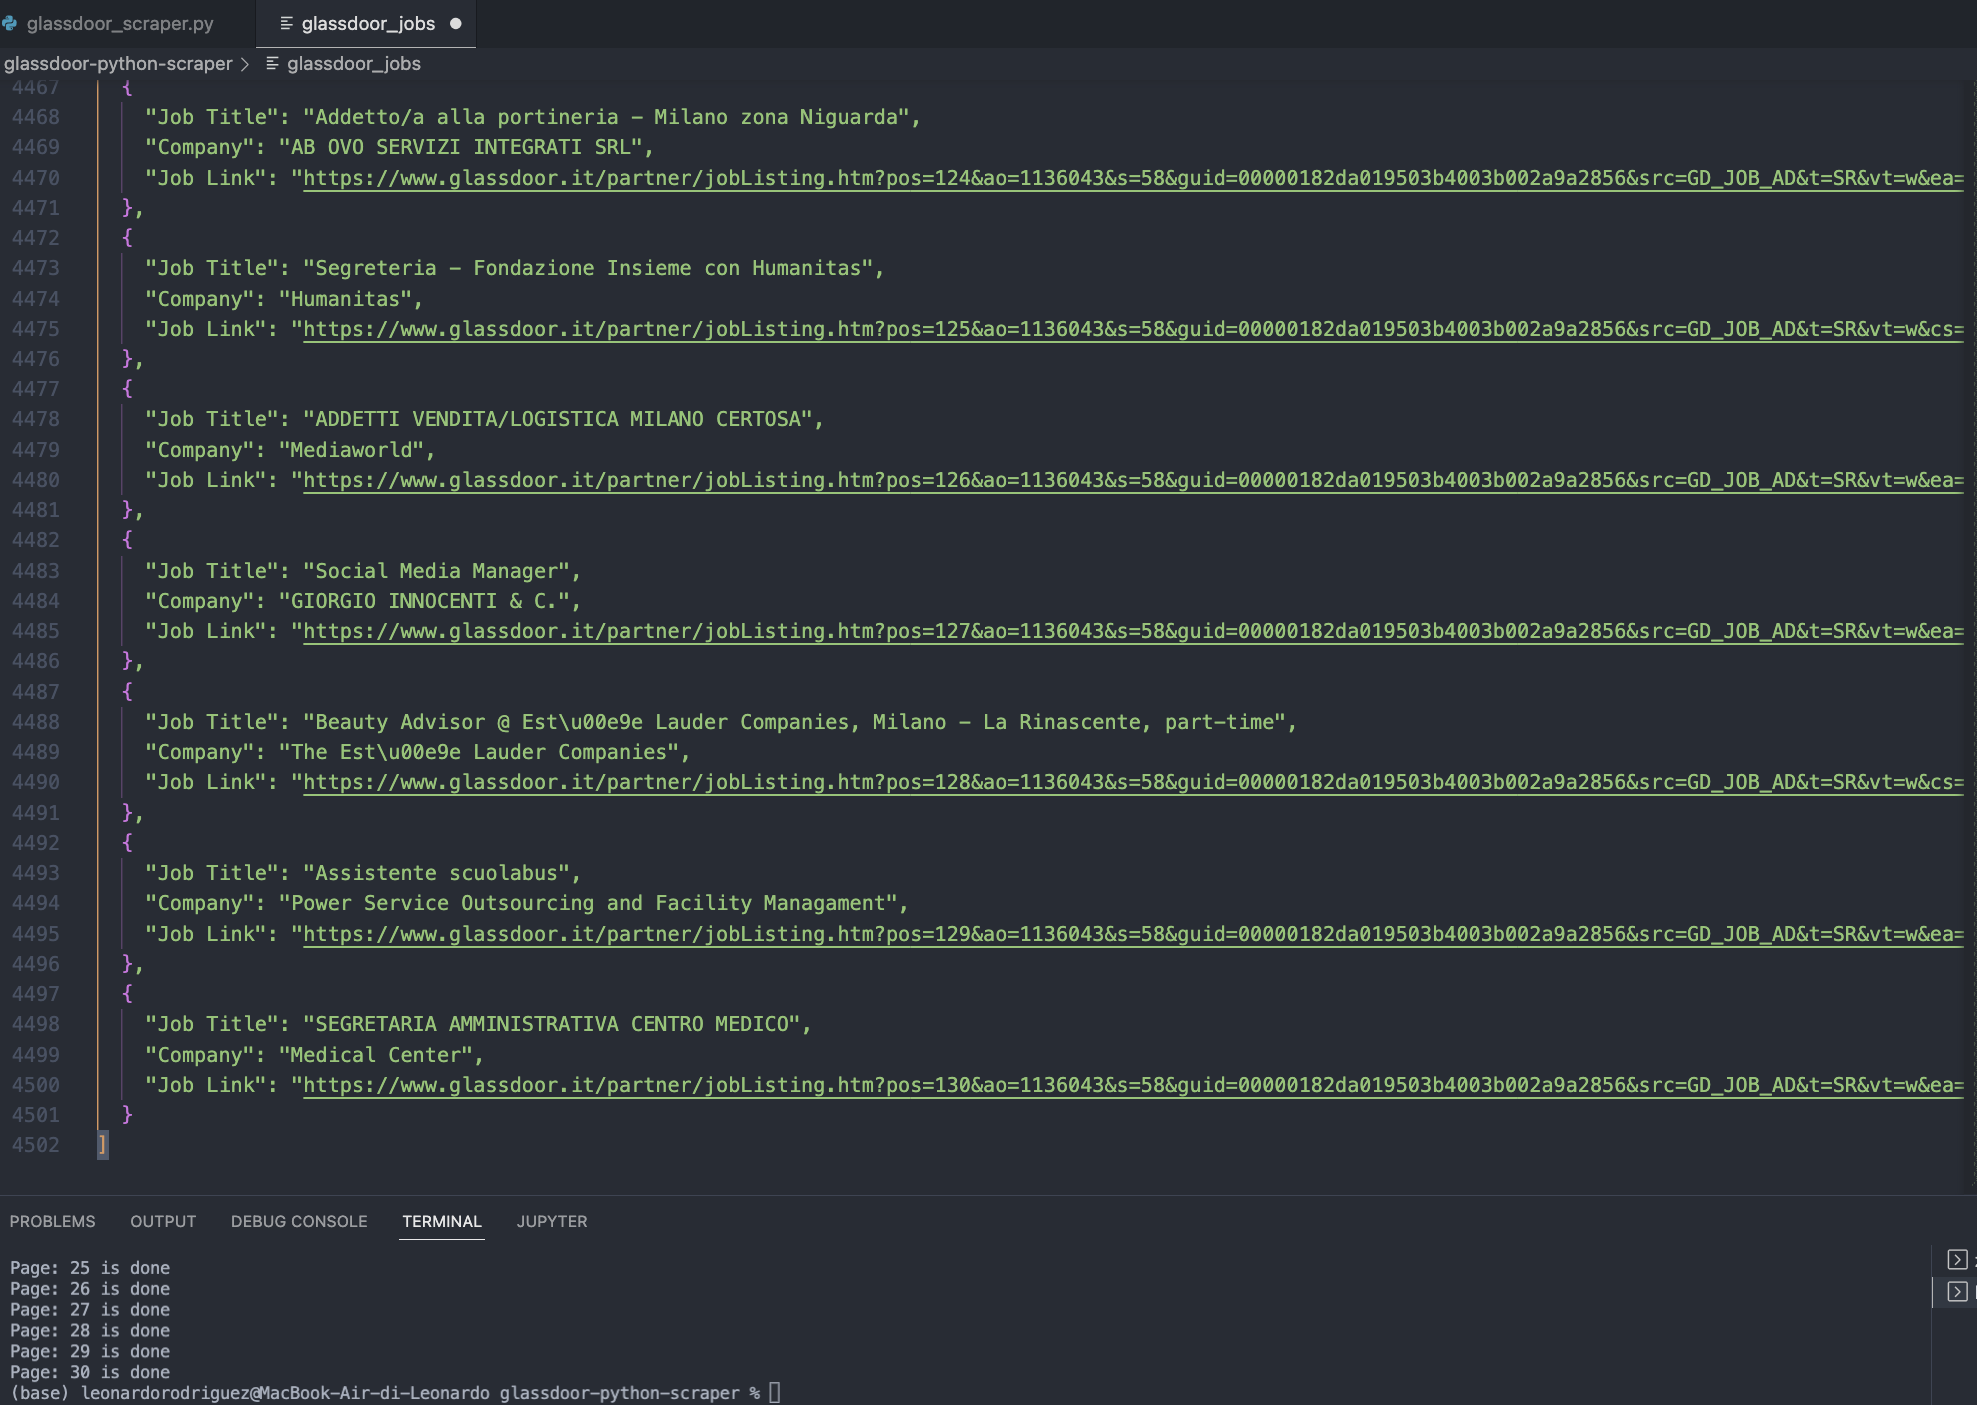
30 pages scraped, and all data formatted into a reusable JSON file.
Legal & Ethical Scraping: Your Guide to Responsible Glassdoor Data
One of the most common questions we get asked is, “Is it legal to scrape Glassdoor data?”
The straightforward answer to Glassdoor web scraping legality is yes; scraping Glassdoor is legal as long as you don’t break some essential rules. This includes extracting the job listings, company information, and interview reviews, as well as salary and benefits information from the job board website.
That said, Glassdoor generally discourages web scraping, as outlined in its Terms of Use. However, the legality of scraping can vary depending on specific circumstances.
If you’ve created an account and agreed to Glassdoor’s terms, scraping web data behind the login wall would be considered a violation. However, publicly accessible pages without a login requirement are generally fair game for scraping.
To ensure ethical and respectful web scraping practices, we recommend following web scraping best practices and avoiding actions that could harm Glassdoor or its users.
For a deeper dive, check out our comprehensive guide on web scraping legality.
How to Turn Glassdoor Pages into LLM-Ready Data
Scraping raw data from a website like Glassdoor is just the beginning. If you plan to feed that data into a large language model (LLM) like Gemini or GPT, structure matters much more than you think. LLMs thrive on clean, readable formats like plain text or Markdown.
In this section, I’ll show you how to use ScraperAPI with the output_format=markdown parameter to fetch Glassdoor job listings in a format perfect for LLM processing. Then, we’ll feed that into Google Gemini to summarize and extract key job insights.
Step 1: Get Your API Keys
Before proceeding, ensure you have a ScraperAPI key and a Google Gemini API key. If you already have them, you can skip ahead. Otherwise:
- Get your ScraperAPI Key: Sign up here for a free API key with 5,000 API credits.
- Get your Gemini API Key:
- Visit Google AI Studio
- Sign in with your Google account
- Click Create API Key and follow the prompts.
Step 2: Extract Glassdoor Search Results as Clean Markdown
ScraperAPI lets you request the page in Markdown format using the output_format=markdown parameter. This gives you cleaner, structured output that’s easier for an LLM to understand and work with.
Here’s how to fetch it:
import requests

API_KEY = "YOUR_SCRAPER_API_KEY"
url = "https://www.glassdoor.com/Job/part-time-jobs-SRCH_KO0,9.htm"

payload = {
    "api_key": API_KEY,
    "output_format": "markdown",
    "country": "us",
    "url": url
}

response = requests.get("https://api.scraperapi.com", params=payload)
markdown_data = response.text
print(markdown_data)
This returns a full Markdown-rendered version of the search results page, including job titles, company names, locations, salary estimates, and basic job descriptions.
A sample of the Markdown output might look like this:
* Hounsome Painting
[Part-Time Door to Door Sales Representative](https://www.glassdoor.ca/job-listing/part-time-door-to-door-sales-representative-hounsome-painting-JV%5FIC4033371%5FKO0,43%5FKE44,61.htm?jl=1009614184484)
Mill Bay
$25.00 - $27.00 Per hour (Employer Est.)
Easy Apply
Own a vehicle to get to various neighborhoods in your area. Are responsible with your time. Up to 20 hours a week...
**Skills:** Sales, Customer service, Account management

* FedEx
[Flex Driver-1](https://www.glassdoor.ca/job-listing/flex-driver-1-fedex-JV%5FIC2299428%5FKO0,13%5FKE14,19.htm?jl=1009714739320)
Chicoutimi
$20.38 Per hour (Employer Est.)
Must have a valid full G license / Class 5 driver's license...
**Skills:** Bilingual, French, Heavy lifting, Customer service, English  ....
The full Markdown output will include multiple jobs like this. Without extra cleaning, you can feed markdown_data directly into a large language model (LLM), which we will do next.
Step 3: Summarize the Results with Gemini
Now that we have clean, Markdown-based listings from Glassdoor, it’s time to analyse and summarise them.
We’ll use Google’s Gemini LLM to extract meaningful insights such as job titles, companies, salaries, and unique highlights from the roles.
First, install the Gemini SDK (if you haven’t yet):
pip install google-generativeai
Next, configure Gemini and pass the markdown data:
import google.generativeai as genai

# Initialize Gemini
genai.configure(api_key="YOUR_GEMINI_API_KEY")

model = genai.GenerativeModel(model_name="gemini-2.0-flash")

prompt = f"""
Below is a snippet of a Glassdoor part-time job search results page.

Your task is to extract the first 3 job listings and summarise:
- Job Title
- Company Name
- Location
- Salary (if available)
- Key Responsibilities
- What makes the role stand out

Here is the data:
{markdown_data}
"""

response = model.generate_content(prompt)
print(response.text)
The real strength of this setup isn’t just that it works — it’s that it’s easy to adapt. Because the prompt is structured, you can tweak it depending on what insights you want from the job listings.
Want Gemini to pull out only remote roles? Add that as a condition. Interested in comparing salaries across cities? Modify the prompt to group listings by location.
Since the input is already clean Markdown, all you need to do is adjust the instructions — no need to change the scraper or reformat the data.
You should see a response that looks like this with the original script (your actual results may vary depending on the search and region):
**Job Listing 1**

*   **Job Title:** Part-Time Door to Door Sales Representative
*   **Company Name:** Hounsome Painting
*   **Location:** Mill Bay
*   **Salary:** $25.00 - $27.00 Per hour (Employer Est.)
*   **Key Responsibilities:** Offering complimentary estimates to residents in need of painting, engaging in conversations with local community members. Walking for 3-4 hours in safe neighborhoods.
*   **What Makes the Role Stand Out:**  Outdoor work in scenic neighborhoods, building team skills, bonus pay and evening shift schedule.

**Job Listing 2**

*   **Job Title:** Flex Driver-1
*   **Company Name:** FedEx
*   **Location:** Chicoutimi
*   **Salary:** $20.38 Per hour (Employer Est.)
*   **Key Responsibilities:** Not clearly defined in the provided snippet, but requires a valid full G license / Class 5 driver's license.
*   **What Makes the Role Stand Out:** Not clear.

**Job Listing 3**

*   **Job Title:** Instacart Shopper - Choose Your Own Schedule and Start Earning
*   **Company Name:** Instacart Shoppers
*   **Location:** Lloydminster
*   **Salary:** Not specified
*   **Key Responsibilities:** Accept incoming orders through the Instacart Shopper app and shop for customers.
*   **What Makes the Role Stand Out:** Flexible schedule where you can choose your own hours.
This gives you a clear, easy-to-skim snapshot of the top job listings — perfect for feeding into a job board, integrating into an internal tool, or quickly understanding what roles are out there without digging through the whole page.
Seamless Data Extraction: Leveraging ScraperAPI for Glassdoor Scraping
By scaling this Glassdoor web scraping project, you can scrape more pages and get even more data points.
You can also scrape specific jobs by filtering the information, like only jobs with a certain title, location, or value (i.e., jobs that show salary), and build a curated job board or job opportunity newsletter.
Still, it’s dangerous to go alone! So don’t forget to integrate ScraperAPI with your codebase to avoid getting blocked and banned from the platform – potentially – forever.
Create a free ScraperAPI account and get 5,000 free API credits and access to all our tools, including DataPipeline, our low-code solution for building and automating scraping projects in minutes without writing a single line of code.
Planning to scrape job data from Google? This Google job listing web scraping guide may interest you.
Until next time, happy scraping!
Check out Scraper API’s other web scraping tutorials:
