
![How to Scrape HTML Tables in Golang Using Colly [Quick Guide]](https://www.scraperapi.com/wp-content/uploads/colly-scrape-html-tables-thumbnail.jpg)
Scraping tabular data is different from scraping text-based data. It can be tricky, but it doesn’t mean you can’t master it.
In this web scraping guide, we’ll show you how you can scrape HTML tables in Golang (Go) using Colly in just a few minutes without getting blocked. Plus, it teaches you how to export all the scraped information to a JSON file so you can further use it directly.
1. Getting Your Table Web Scraper Project Ready
For this HTML web scraping project, you’ll need to have basic experience with Colly, a web scraping framework for Golang, and a clear understanding of Go basics. If this is your first time using Go, we recommend that you read our Golang web scraping basics guide. Still, we’ll keep this tutorial as accessible as possible.
With that out of the way, let’s start by initiating our Go project.
- Open Visual Studio (or your IDE of preference) and open a new directory. We’ve called ours html-golang-scraper for simplicity.
- To initiate a new project, open a terminal and enter the command: go mod init html-golang-scraper.
- Without closing the terminal, create a new html-table-scraper.go file using: touch jack-scraper.go.
- Lastly, install Colly with the following command: go get -u github.com/gocolly/colly/…
Now that we have our starting files (go.mod, go.sum, html-table-scraper.go), we can add the skeleton code to make sure that the installation worked:
package main
import "fmt"
func main() {
   fmt.Println("This is working")
}
If everything goes well, you should get the following output when running go run html-table-scraper.go:

2. Adding Callbacks for Testing
Colly’s collector object makes it easy to handle requests, callbacks, and the scraping process.
c := colly.NewCollector()
Although there’s no particular order you need to follow, we’d like to start by adding a few callbacks on top of the c object.
Tip: keep these callbacks saved on a file so you can copy them to your projects as boilerplate code.
The first callback will print the URL Colly is visiting, giving us visual feedback on what’s happening when scraping multiple pages:
   c.OnRequest(func(r *colly.Request) {
       fmt.Println("Scraping:", r.URL)
   })
The second one will print the status code, letting us know whether or not the request was successful:
  c.OnResponse(func(r *colly.Response) {
       fmt.Println("Status:", r.StatusCode)
   })
Lastly, we’ll add an error handler for good measure:
   c.OnError(func(r *colly.Response, err error) {
       fmt.Println("Request URL:", r.Request.URL, "failed with response:", r, "\nError:", err)
   })
The collector object will call upon each of these functions (callbacks) at the right stage of the web scraping job so we can focus on what matters: the data!
3. Sending the HTTP Request
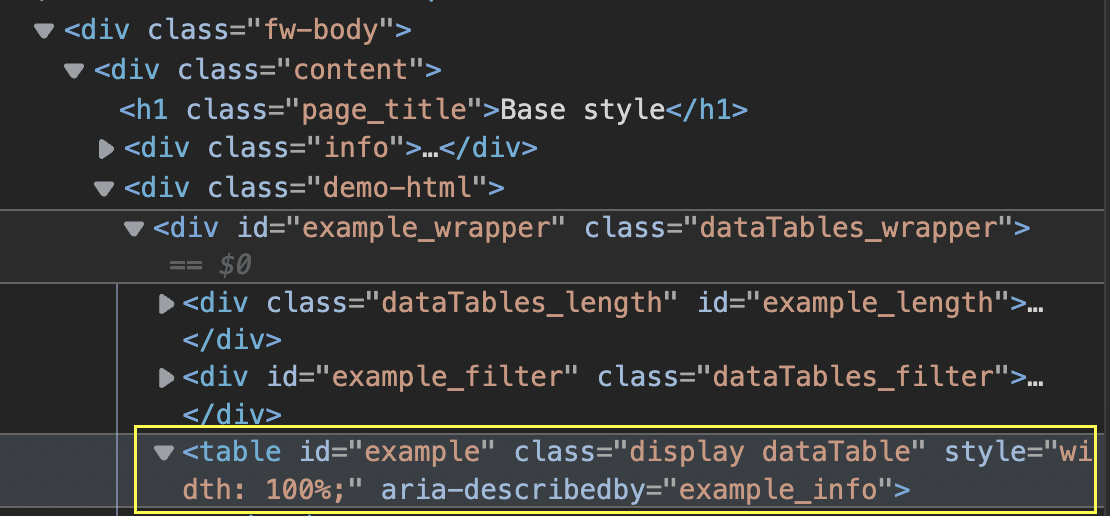
From here, sending our request is as simple as using the Visit() method on the collector to send the HTTP request. To keep the tutorial simple, we’ll scrape the table found at https://datatables.net/examples/styling/display.html.
c.Visit("https://datatables.net/examples/styling/display.html")
Let’s do a test run to see if it works:

If your code didn’t work, you might have forgotten to import Colly into your project like we did:
import (
   "fmt"
   "github.com/gocolly/colly"
)
Don’t you love the little details? 
4. Integrating ScraperAPI to Your Golang Web Scraper
Of course, sending one HTTP request shouldn’t represent any risk, but once you scale your project up and start scraping thousands to millions of pages, your IP address and web scraper will certainly be flagged and blocked, which can very well be a permanent penalty.
To avoid these issues, let’s send our request through ScraperAPI servers using their endpoint in the URL we’re passing to the .Visit() method.For starters, create a free ScraperAPI account to generate your API key and receive 5,000 API credits for free. Then, we’ll add the following string to the beginning of the target URL:
http://api.scraperapi.com?api_key={your-api-key}&url={target-url}
The result will look something like this:
c.Visit("http://api.scraperapi.com?api_key={your-api-key}&url=https://datatables.net/examples/styling/display.html")
Run the scraper again for testing and…

It works! However, depending on your connection speed, there’s a chance the request failed because of a timeout problem. This issue happens because ScraperAPI is set to 60 seconds by default. If it takes longer than that to return a value, it fails.
To solve this issue, you can set your timeout using the following code snippet:
c.WithTransport(&http.Transport{
   DialContext: (&net.Dialer{
		Timeout: 90 * time.Second,
		KeepAlive: 30 * time.Second,
		DualStack: true,
   }).DialContext,
   MaxIdleConns: 100,
   IdleConnTimeout: 90 * time.Second,
   TLSHandshakeTimeout: 10 * time.Second,
   ExpectContinueTimeout: 1 * time.Second,
   })
Another solution is using our new Async Scraper service. This asynchronous solution will submit a scraping job to ScraperAPI, and once all jobs are completed, it’ll return JSON data containing the raw HTML.
At this point, ScraperAPI will use machine learning and years of statistical analysis to decide which combination of headers and IP addresses is most effective to access the page, it will automatically rotate your IP address for every request to mimic organic traffic and handle any CAPTCHA it might encounter.
With just a single line of code, you’re saving hours of work and avoiding any risk on your end.
5. Selecting the HTML Table
Now that we are able to access the page, it’s time to navigate to it in your browser and see what you’re working with.
On the page, we only have this HTML table – a table whose data is in the HTML file – showing 10 entries out of 57.
To verify that it is, in fact, an HTML table, let’s view the source code of the page and look for some of the names we’re seeing.

A table is the combination of columns and rows, and when we translate this to HTML we get a structure like the one we see above. Every <tr> element is a row and every <td> element is a cell. These two combined form the rows and columns. Lastly, everything is wrapped by <table> tags.
In terms of our project, we can code our scraper following this logic:
- Grab the table using it’s ID
- Within the table, grab all rows and loop through them
- Extract the data within each cell
Conveniently, Colly’s collector has a method for that too: the .OnHTML() method. With this method, we can pass an HTML element and pick it based on an attribute like ID or Class, and apply any function we want on top of it.
In our case, we’ll go back to the browser to test our selectors using document.querySelectorAll().
Testing CSS Selectors on the Browser’s Console
On the page, set the table to display up to 100 entries. This will make it easier to ensure we’re grabbing all the information we need.

Next, inspect the table to find it within the HTML and take note of its attributes.
For testing, we can pass “table#example” to .querySelectorAll() in the console and see what it returns.
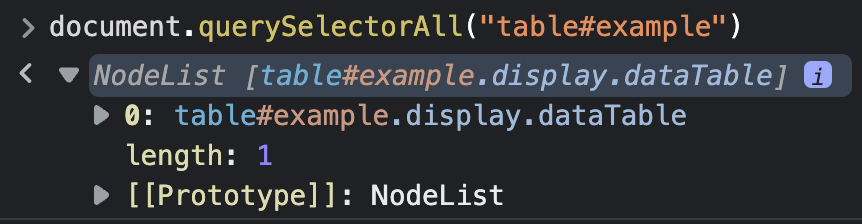
Note: If you don’t add the table’s ID, it’ll return a total of four tables. That’s because even though we can’t see them, there are other elements on the page using a table structure.
Additionally, working with this selector alone will also add the two heading rows from the top and bottom, which we don’t really need.
Inspecting the table further tells us that the information we actually need is wrapped between <tbody> tags, which we can use to add more specificity to the selector.
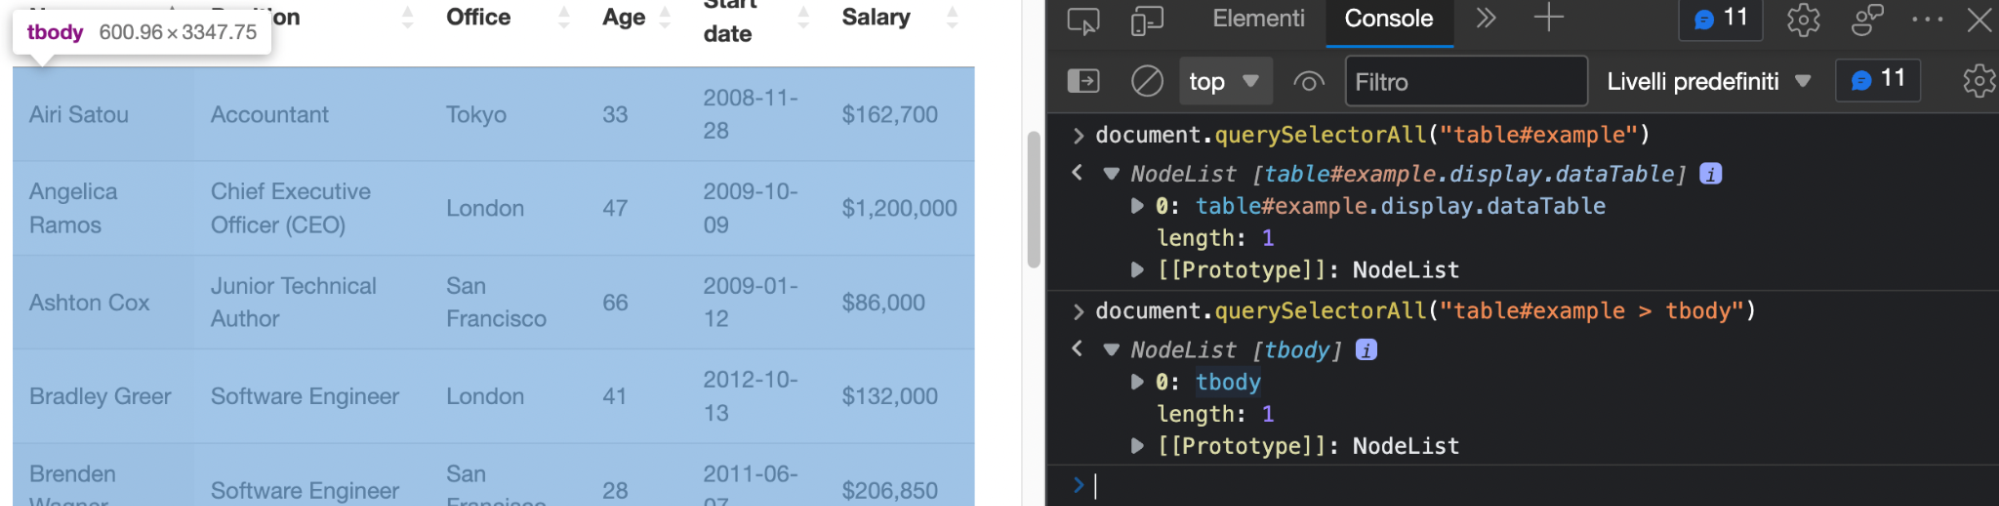
Hovering over the NodeList returns highlights only the section of the table we need and ignores the rest. Perfect!
Using the .OnHTML() Method
Translating this into Colly, it should look like this:
   c.OnHTML("table#example > tbody", func(h *colly.HTMLElement) {

   })
6. Looping Through the Rows
So, within our function, we’ve stored the HTML data inside an h object. Now, we can use other methods on that object to manipulate it further.The next method will be very familiar if you’ve worked with other programming languages before: .ForEach().
h.ForEach("tr", func(_ int, el *colly.HTMLElement) {
       })
Just as its name suggests, we’ll tell our scraper that for each element within a list (in this case, for each row in h), it must perform an action (in this case, scrape data).
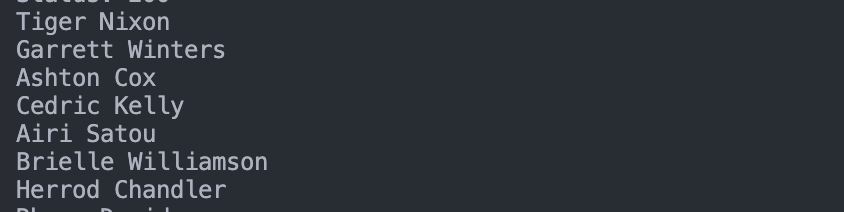
Of course, before extracting all elements, let’s try to grab the names first and print them on the terminal.
   c.OnHTML("table#example > tbody", func(h *colly.HTMLElement) {
       h.ForEach("tr", func(_ int, el *colly.HTMLElement) {
           fmt.Println(el.ChildText("td:nth-child(1)"))
       })
   })
Notice the (1) at the end of the selector? That’s because cells don’t (usually) have any kind of attributes that distinguish them from one another. Instead, we rely on their position within the index. In this case, we’re picking the first <td> within each <tr>, which is now represented by the el object.
The result? 57 names printed on the terminal:
7. Structuring Our Data
Having all this data printed on the terminal is cool but not really useful. Before we can export all this information to a JSON file, we’ll need to give it a structure, and this is actually super easy with Go.
Outside of the main function, let’s add the following code:
type tableData struct {
   Name, Position, Office, Age, StartDate, Salary string
}
Because all data uses the same data type, we can just group all of them and set them to string within the same line.
Next, let’s make a quick change to our h.ForEach() function:
c.OnHTML("table#example > tbody", func(h *colly.HTMLElement) {
h.ForEach("tr", func(_ int, el *colly.HTMLElement) {
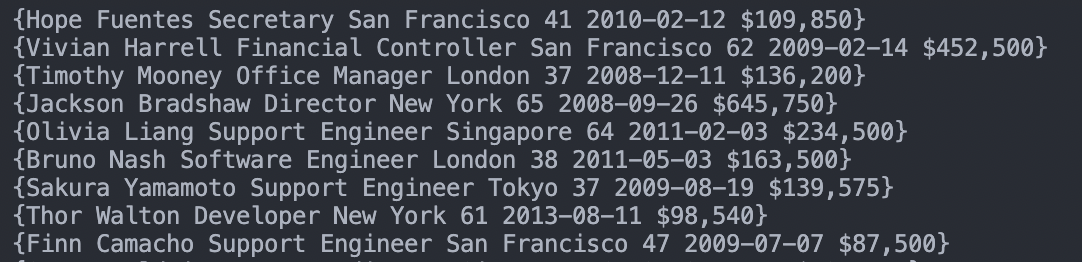
tableData := tableData{
Name: el.ChildText("td:nth-child(1)"),
Position: el.ChildText("td:nth-child(2)"),
Office: el.ChildText("td:nth-child(3)"),
Age: el.ChildText("td:nth-child(4)"),
StartDate: el.ChildText("td:nth-child(5)"),
Salary: el.ChildText("td:nth-child(6)"),
}
fmt.Println(tableData)
})
})
Here’s what you’ll get after printing this structure:
We’re getting closer to the finish line!
8. Sending Data to an Empty Slice
With our structure holding the data, we’ll next send all of it to an empty Slice to create a list of items we’ll then export to the JSON file.
To collect the empty slice, add this code after the collector initiation code:
var employeeData []tableData
Within the .OnHTML() function, instead of printing our structure, let’s append all the items inside data points to the Slice.
employeeData = append(employeeData, tableData)
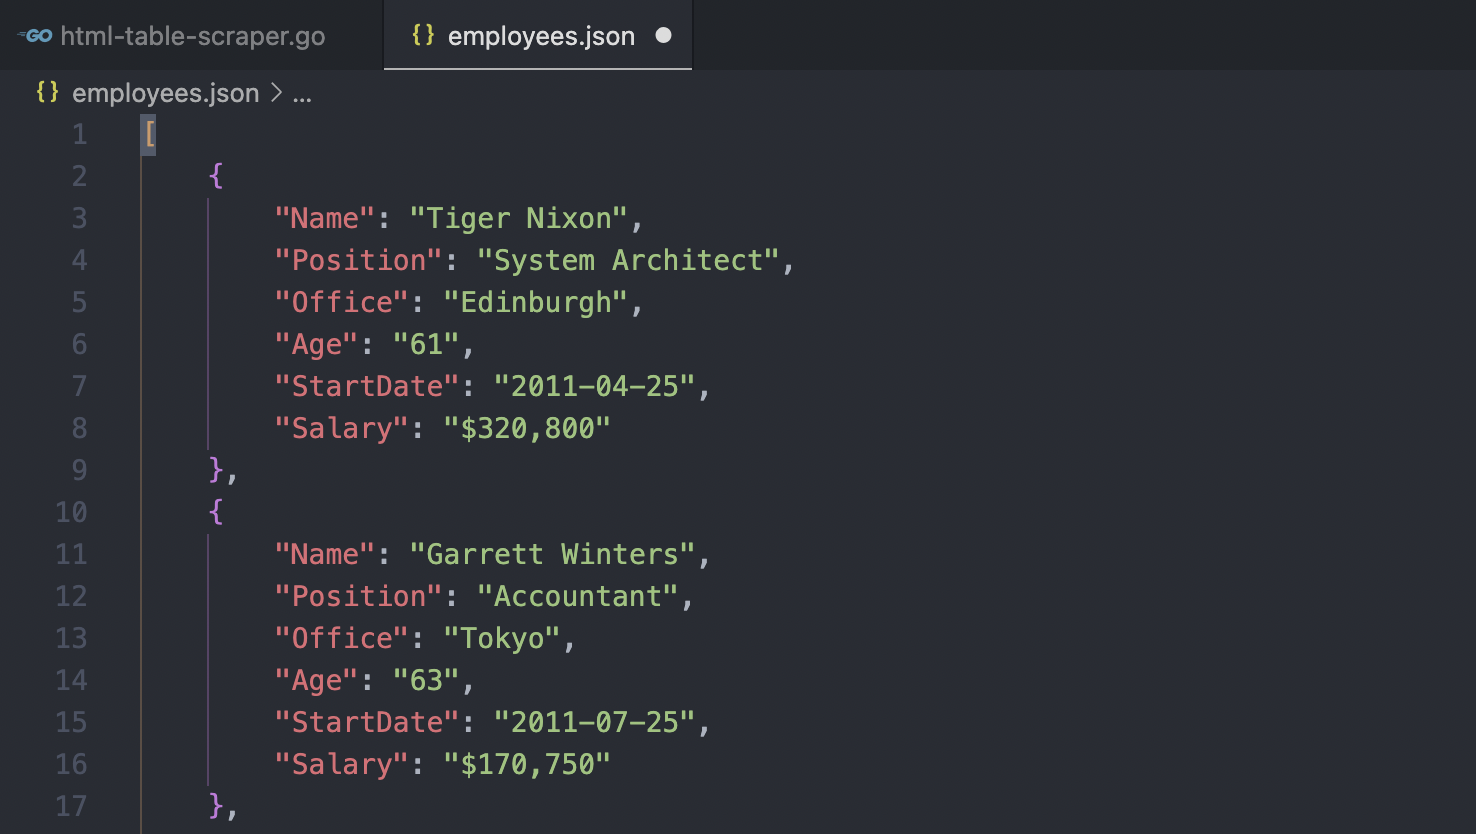
If you run your scraper at this point, you’ll see that every set of data is inside curly branches ({…}) while the entire slice is inside brackets ([…]).
9. Importing Tabular Data to a JSON File
Once all the data is inside the Slice, Golang has a very easy-to-use JSON module named “encoding/json”. This module will write the file for us using the data inside the Slice.
content, err := json.Marshal(employeeData)
   if err != nil {
       fmt.Println(err.Error())
   }
   os.WriteFile("employees.json", content, 0644)
   fmt.Println("Total employees: ", len(employeeData))
Also, we’re printing employeeData’s length to make sure we’re getting the 57 entries we’re after.
Note: For a more detailed description of the JSON module, check our Golang web scraping basics article.
10. Test Run and the Go Web Scraper Full Code
At this point your code base should look like this:
package main

import (
   "encoding/json"
   "fmt"
   "net"
   "net/http"
   "os"
   "time"
   "github.com/gocolly/colly"
)

type tableData struct {
   Name, Position, Office, Age, StartDate, Salary string
}

func main() {
   c := colly.NewCollector()

   c.WithTransport(&http.Transport{
       DialContext: (&net.Dialer{
           Timeout:   90 * time.Second,
           KeepAlive: 60 * time.Second,
           DualStack: true,
       }).DialContext,
       MaxIdleConns:          100,
       IdleConnTimeout:       90 * time.Second,
       TLSHandshakeTimeout:   10 * time.Second,
       ExpectContinueTimeout: 1 * time.Second,
   })

   var employeeData []tableData

   c.OnRequest(func(r *colly.Request) {
       fmt.Println("Scraping:", r.URL)
   })

   c.OnResponse(func(r *colly.Response) {
       fmt.Println("Status:", r.StatusCode)
   })

   c.OnHTML("table#example > tbody", func(h *colly.HTMLElement) {
       h.ForEach("tr", func(_ int, el *colly.HTMLElement) {
           tableData := tableData{
               Name:      el.ChildText("td:nth-child(1)"),
               Position:  el.ChildText("td:nth-child(2)"),
               Office:    el.ChildText("td:nth-child(3)"),
               Age:       el.ChildText("td:nth-child(4)"),
               StartDate: el.ChildText("td:nth-child(5)"),
               Salary:    el.ChildText("td:nth-child(6)"),
           }
           employeeData = append(employeeData, tableData)
       })
   })

   c.OnError(func(r *colly.Response, err error) {
       fmt.Println("Request URL:", r.Request.URL, "failed with response:", r, "\nError:", err)
   })

   c.Visit("https://api.scraperapi.com?api_key={your-api-key}>url=https://datatables.net/examples/styling/display.html")

   content, err := json.Marshal(employeeData)
   if err != nil {
       fmt.Println(err.Error())
   }
   os.WriteFile("employees.json", content, 0644)
   fmt.Println("Total employees: ", len(employeeData))
}
Note: We added a custom timeout as an example, but if you don’t need it, you can just ignore it. Also, you’ll need to use your own API key within the .Visit() method to make it work through ScraperAPI, otherwise, just send the HTTP request directly to “https://datatables.net/examples/styling/display.html”.If we run our Go web scraper now, it’ll go to the target website, extract all tabular data from the main table on the page, and write it in an employees.json file.
Use ScraperAPI to Support Your Table Web Scraping Projects
Scraping tabular data is crucial for many web scraping applications, and Go alongside Colly makes it a relatively simple process. As you can see, the code is very descriptive and a lot of complexity is handled by the framework.
You can now take this code and customize it to scrape other websites and pages, collecting essential data that can help you make better decisions, find interesting trends or build databases you can later use in other applications.
For scalability, you might want to build a function to navigate through paginated pages as we showed in our beginner series article. Of course, for scraping multiple pages, keep in mind that using ScraperAPI will ensure you get a higher success rate with lower risk of your scraper getting blocked.
If you want to learn more, check out our documentation and see if ScraperAPI is the right solution.
Try out ScraperAPI for FREE for 7 days. Sign up here to get started.
Until next time, happy scraping!