

Forex, also known as foreign exchange, is an international market where people trade different currencies electronically over the counter (OTC) – with the particularity of not having a central marketplace.
It’s a bit like exchanging money when you go on vacation, except (in the forex market) people buy and sell currencies to profit from changes in their value.
People from all over the globe trade currencies around the clock, five days a week, making it one of the biggest financial markets in the world. And as with any financial decision, having the right data will help you make accurate and profitable investments.
The Forex market fluctuates heavily, so predicting potential upward or downward movements will give you an unfair advantage, achieving the results you’re looking for.
In this article, we’ll extract currency data from Yahoo Finance using Python’s Requests and Beautiful Soup and export it to a CSV file using Pandas.
TL;DR on Scraping Forex Data with Beautiful Soup (BS4)
For those with experience, here’s the complete codebase:
</p>
import requests
from bs4 import BeautifulSoup
import pandas as pd

forex_data = []

payload = {
   'api_key': 'YOUR_API_KEY',
   'country_code': 'us',
   'url': 'https://finance.yahoo.com/currencies'
}

response = requests.get('https://api.scraperapi.com', params=payload)
soup = BeautifulSoup(response.content, 'html.parser')

table = soup.find('tbody')
all_currencies = table.select('tr')
for currency in all_currencies:
   name =  currency.find('td', attrs={'aria-label': 'Name'}).text
   last_price = currency.select_one('td[aria-label="Last Price"]').text
   change = currency.find('td', attrs={'aria-label': 'Change'}).text
   percentage = currency.select_one('td[aria-label="% Change"] > fin-streamer > span').text
   forex_data.append({
       'Currency': name,
       'Last Price': last_price,
       'Change': change,
       '% Change': percentage
   })

df = pd.DataFrame(forex_data)
df.to_csv('forex.csv', index=False)
<p>
To learn how we built it and the thought process behind it, please continue reading.
1. Understanding Yahoo Finance HTML Structure
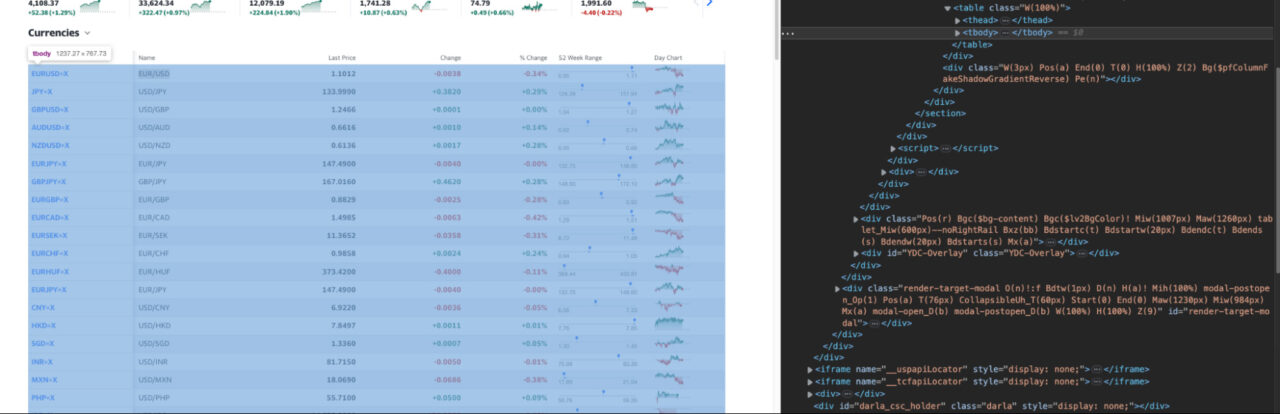
Before starting to code, let’s first take a look at Yahoo’s currencies page to understand what we’re dealing with.
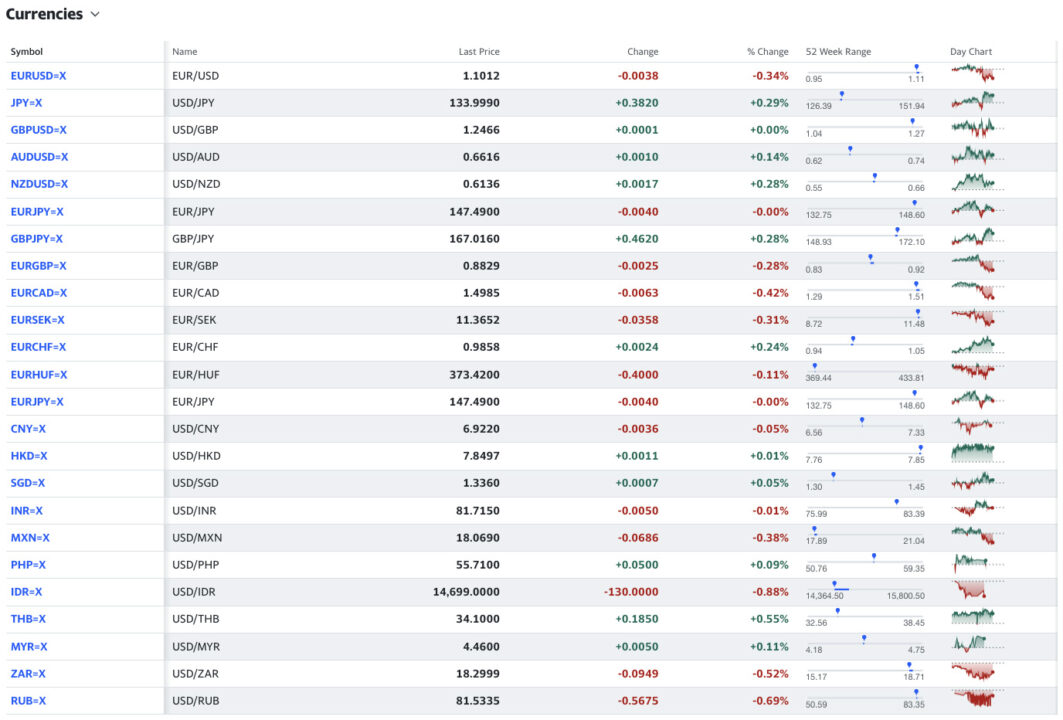
The available currencies on the page seem to be displayed in a table format, at least visually.
At this point, we need to check two things:
- Ensure we can get access this data from the raw HTML file – in other words, that the content is not being injected through AJAX.
- Verify the HTML is also structured as a table.
To take care of number one, copy one of the currency names, and right-click on the page > view page source.
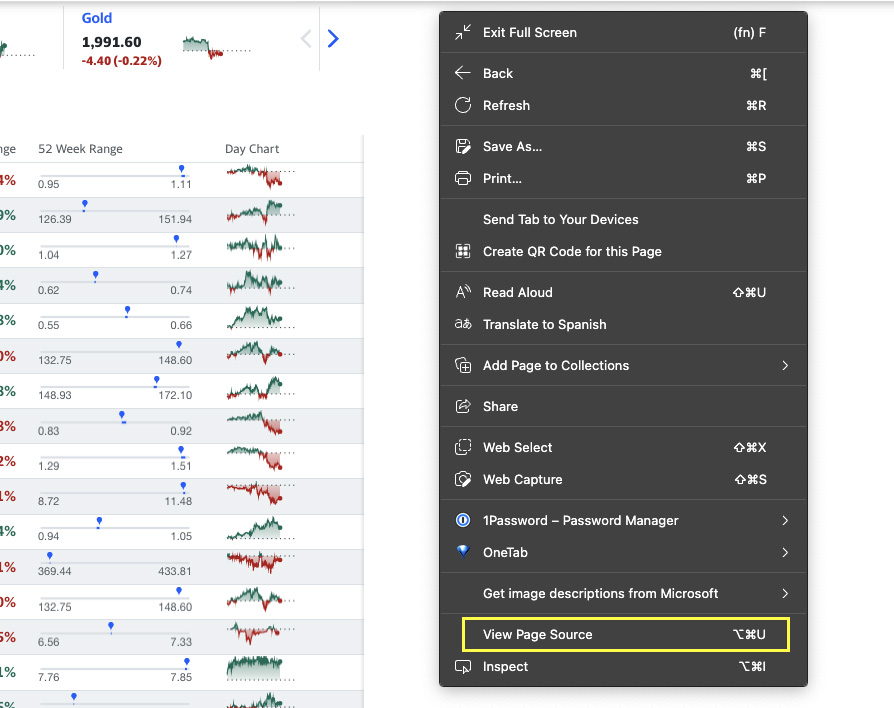
Now, we’ll look for the text we copied. If it appears in the source code, we’ll be able to extract the data using a simple request.

Great, we found it! This check is important because if the content is being injected through JavaScript, we’ll need to choose a different approach. For example, we could target the “hidden API” from where the page is getting the data as we did to scrape this dynamic table, or we could also use a headless browser like Selenium or Puppeteer (Node.js option).
Now, for the second check, you’d be surprised how many times websites display tables without the traditional table > thead > tbody > tr > td structure, so whenever you find a table like this, always check the HTML on the browser before celebrating.
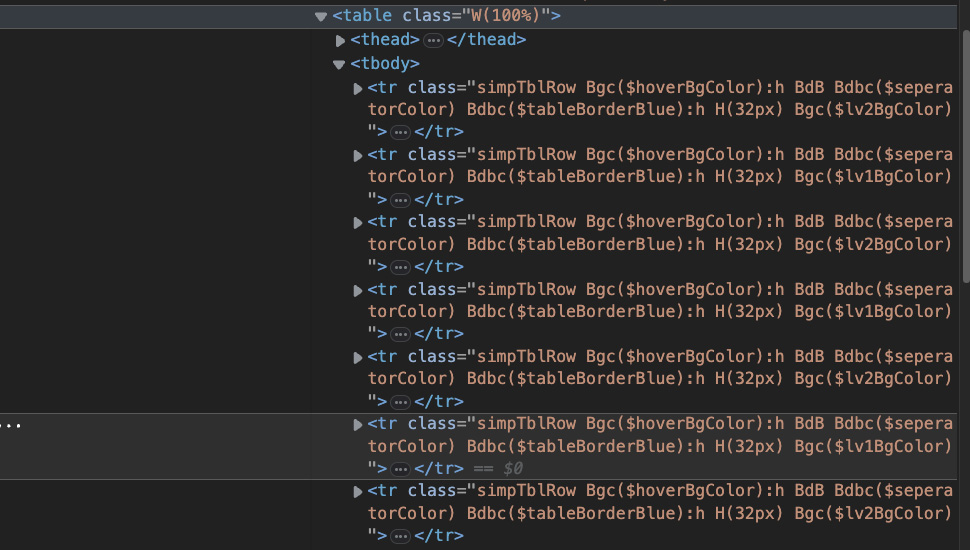
More great news! Having the data in a well-structured table makes the entire process easier, and we could even extract the entire table using Pandas. However, in this tutorial, we’ll be using BS4 to parse the table and use Pandas only to export the results.
Moving on. Every tr tag represents a row in the table – which you can visually see by hovering over them.

Every cell is represented by a td tag…
… and all rows are inside the tbody tag.
Knowing this. A good plan would be to target the tbody and then store all rows inside a variable. Then, we can loop through the list of rows, extracting the name, last price, change, and percentage change of every currency.
Now that we have our game plan, let’s code our scraper!
2. Getting the Forex Data Extraction Project Started
For starters, let’s create a new directory for our project and Python file. We’ve named ours forex_scraper.py – very original, right?
Next, let’s import all the necessary dependencies:
- Requests – pip install requests
- Beautiful Soup – pip install beautifulsoup4
- Pandas – pip install pandas
</p>
import requests
from bs4 import BeautifulSoup
import pandas as pd
<p>
With our dependencies ready, it’s time to send our initial get() request. However, although Yahoo Finance has a lot of public data, it doesn’t mean they won’t try to block your scripts. If you send your request directly from your computer, it can result in your IP getting banned temporarily or even permanently.
To avoid this issue, we’ll use ScraperAPI to bypass any anti-scraping mechanism we find and guarantee we’ll receive a successful response from the server. Don’t worry about pricing at this point because the free plan provides you with 5,000 API credits for the first 7 days and 1k API credits per month.
Just create a free ScraperAPI account and copy your API key, and we’ll pass the key and our target URL through a payload, which will add as params to ScraperAPI’s endpoint:
</p>
payload = {
   'api_key': 'YOUR_API_KEY',
   'country_code': 'us',
   'url': 'https://finance.yahoo.com/currencies'
}

response = requests.get('https://api.scraperapi.com', params=payload)
<p>
Also, we’re using the country_code parameter to tell ScraperAPI always to use US proxies when sending our requests.
To ensure a 99.99% success rate, ScraperAPI will use machine learning and years of statistical analysis to choose the best IP + headers combination and handle any extra complexities that might arrive.
With nothing else to add, let’s send the request and print() the status code to verify it’s working by:
</p>
print(response.status_code)
<p>
After running the script, you should see a 200 in your terminal.
3. Accessing Data From the First Cell
If you’re following along, at this point, the script is returning the entire raw HTML – you can see it if you print(response) instead of the status_code – so we need to parse it with Beautiful Soup to turn it into a parsed tree, which will allow us to traverse the different nodes and extract the data.
</p>
soup = BeautifulSoup(response.content, 'html.parser'
<p>
Now all the nodes are inside a soup object on which we can use the .find() and .select() methods to target specific elements. Following the plan, we’ll now pick the body of the table, which is wrapped between <tbody> tags.
</p>
table = soup.find('tbody')
<p>
.find() returns the first element that it founds, and because there’s only one tbody element, it’ll work just fine for us.
In the case of the rows, we want our script to return a list with all tr elements and not just the first, so we’ll use .select() – which returns a list of all elements that match the criteria we pass it – on our table variable.
</p>
all_currencies = table.select('tr')
<p>
Note: we could also use the .find_all() method, but we want to show how to use both.
Now that we have our list of rows, we can loop through and extract data from each cell. That said, each cell is a td element, so how will we tell our scraper from which cells to extract the data?
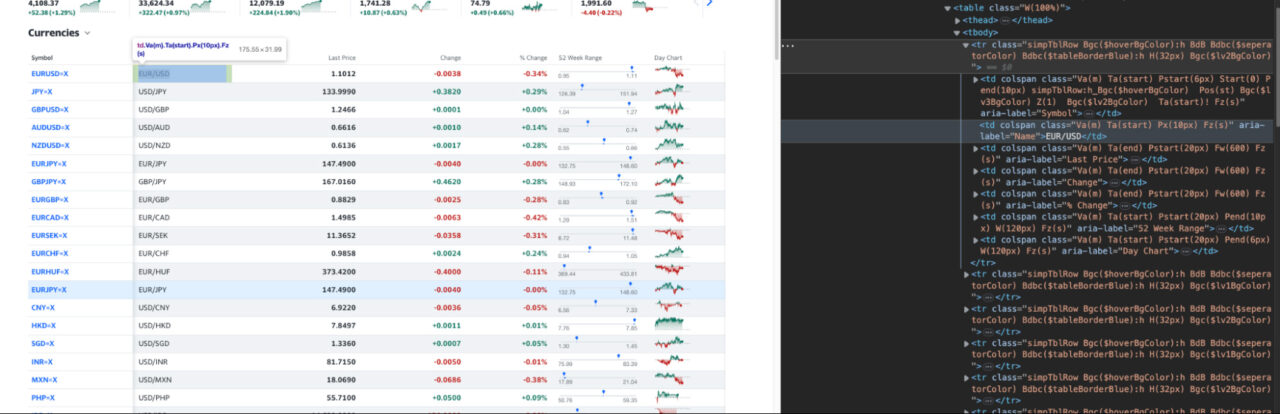
If you understood the structure correctly, every <tr> has a series of <td> tags. So we can imagine each row like this:

Each rectangle is a td element, and the list starts at 0. In theory, you could target all td tags inside the row and then choose each column by its position in the index.
Lucky for us, inspecting the elements closer reveals an easier way. All elements inside the rows have an aria-label attribute with a very descriptive value.
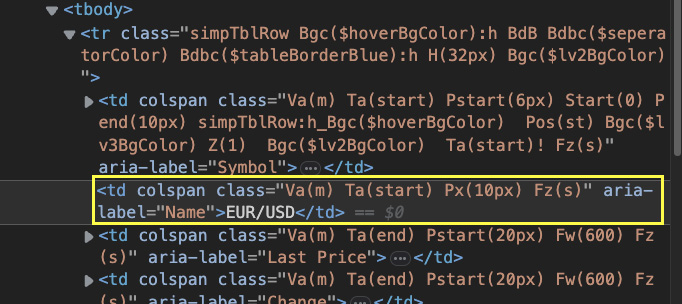
For example, the currency pair has the value “Name” and the last price, underneath, has the value “Last Price”. To target the name of each currency, we can build a loop like this:
</p>
for currency in all_currencies:
   name =  currency.find('td', attrs={'aria-label': 'Name'}).text
   print(name)
<p>
You’ll get a list of 24 currencies printed on your terminal, meaning our script is working so far!
4. Adding All Data to an Array
Targeting the rest of the data points follows a very similar process but with some minor modifications.
Unlike the currency name, Last Price cells have their text inside another – weird-looking – element within the td.
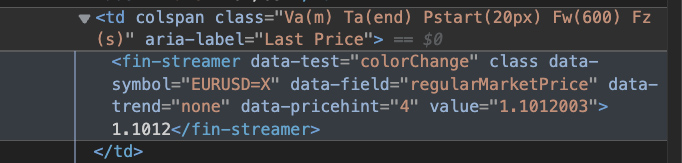
When using the .find() method, it returned the element, but we couldn’t extract the data with .text. Instead, we used the select_one() method, which uses a slightly different syntax to target a single element, and it worked:
</p>
   last_price = currency.select_one('td[aria-label="Last Price"]').text
<p>
For the “change” column, we used the same method as for “name”:
</p>
   change = currency.find('td', attrs={'aria-label': 'Change'}).text
<p>
And finally, in the case of the percentage change, we had to get a little more creative to target the span element where the text is being served without having to write a bunch of .find() methods:
</p>
   percentage = currency.select_one('td[aria-label="% Change"] > fin-streamer > span').text
<p>
Note: Pay attention to the differences between the
find()andselect()methods, as they are your main tool to extract data easily using CSS selectors.
As all data is getting pulled by our parser, let’s add an empty array before the payload…
</p>
forex_data = []
<p>
… and use the .append() method to format and store all data inside the forex_data:
</p>
   forex_data.append({
       'Currency': name,
       'Last Price': last_price,
       'Change': change,
       '% Change': percentage
   })
<p>
This last snippet goes inside the for loop after the last element is extracted. Basically, our script is extracting each element and then appending them to the array, where each element has a name and the whole forms a single item.
Here’s what we get after printing the array:
</p>
[
   {
      "Currency":"EUR/USD",
      "Last Price":"1.1031",
      "Change":"-0.0018",
      "% Change":"-0.17%"
   },

   {
      "Currency":"USD/JPY",
      "Last Price":"133.9490",
      "Change":"+0.3320",
      "% Change":"+0.25%"
   },

   {
      "Currency":"USD/GBP",
      "Last Price":"1.2495",
      "Change":"+0.0030",
      "% Change":"+0.24%"
   },

   {
      "Currency":"USD/AUD",
      "Last Price":"0.6630",
      "Change":"+0.0024",
      "% Change":"+0.36%"
   },

   {
      "Currency":"USD/NZD",
      "Last Price":"0.6148",
      "Change":"+0.0029",
      "% Change":"+0.48%"
   },

   {
      "Currency":"EUR/JPY",
      "Last Price":"147.6980",
      "Change":"+0.2040",
      "% Change":"+0.14%"
   },

   {
      "Currency":"GBP/JPY",
      "Last Price":"167.3310",
      "Change":"+0.7770",
      "% Change":"+0.47%"
   },

   {
      "Currency":"EUR/GBP",
      "Last Price":"0.8826",
      "Change":"-0.0027",
      "% Change":"-0.31%"
   },

   {
      "Currency":"EUR/CAD",
      "Last Price":"1.4996",
      "Change":"-0.0051",
      "% Change":"-0.34%"
   },

   {
      "Currency":"EUR/SEK",
      "Last Price":"11.3484",
      "Change":"-0.0526",
      "% Change":"-0.46%"
   },

   {
      "Currency":"EUR/CHF",
      "Last Price":"0.9858",
      "Change":"+0.0024",
      "% Change":"+0.24%"
   },

   {
      "Currency":"EUR/HUF",
      "Last Price":"373.0700",
      "Change":"-0.7500",
      "% Change":"-0.20%"
   },

   {
      "Currency":"EUR/JPY",
      "Last Price":"147.6980",
      "Change":"+0.2040",
      "% Change":"+0.14%"
   },

   {
      "Currency":"USD/CNY",
      "Last Price":"6.9215",
      "Change":"-0.0041",
      "% Change":"-0.06%"
   },

   {
      "Currency":"USD/HKD",
      "Last Price":"7.8495",
      "Change":"+0.0009",
      "% Change":"+0.01%"
   },

   {
      "Currency":"USD/SGD",
      "Last Price":"1.3348",
      "Change":"-0.0005",
      "% Change":"-0.03%"
   },

   {
      "Currency":"USD/INR",
      "Last Price":"81.6850",
      "Change":"-0.0350",
      "% Change":"-0.04%"
   },

   {
      "Currency":"USD/MXN",
      "Last Price":"18.0482",
      "Change":"-0.0895",
      "% Change":"-0.49%"
   },

   {
      "Currency":"USD/PHP",
      "Last Price":"55.7100",
      "Change":"+0.0500",
      "% Change":"+0.09%"
   },

   {
      "Currency":"USD/IDR",
      "Last Price":"14,699.0000",
      "Change":"-130.0000",
      "% Change":"-0.88%"
   },

   {
      "Currency":"USD/THB",
      "Last Price":"34.0600",
      "Change":"+0.1450",
      "% Change":"+0.43%"
   },

   {
      "Currency":"USD/MYR",
      "Last Price":"4.4600",
      "Change":"+0.0050",
      "% Change":"+0.11%"
   },

   {
      "Currency":"USD/ZAR",
      "Last Price":"18.2845",
      "Change":"-0.1103",
      "% Change":"-0.60%"
   },

   {
      "Currency":"USD/RUB",
      "Last Price":"80.5300",
      "Change":"-1.5710",
      "% Change":"-1.91%"
   }

]
<p>
Note: We used a JSON formatter to visually organized the result, as it won’t look like this printed out in your terminal. Still, the name:value organization is what matters.
5. Exporting the Scraped Forex Financial Data Into a CSV File
Here’s where our initiative to store the data into an array will payoff! Because we already have the order set and all information inside forex_data, we can just create a dataframe using Pandas:
</p>
df = pd.DataFrame(forex_data)
<p>
The names will become the columns and each data point will be under the one we already specified.
For the last touch, let’s use the .to_csv() method to create the file inside our project’s directory:
</p>
df.to_csv('forex.csv', index=False)
<p>
If you’ve followed along, your project should look like this:
</p>
import requests
from bs4 import BeautifulSoup
import pandas as pd
forex_data = []
payload = {
'api_key': 'YOUR_API_KEY',
'country_code': 'us',
'url': 'https://finance.yahoo.com/currencies'
}
response = requests.get('https://api.scraperapi.com', params=payload)
soup = BeautifulSoup(response.content, 'html.parser')
table = soup.find('tbody')
all_currencies = table.select('tr')
for currency in all_currencies:
name = currency.find('td', attrs={'aria-label': 'Name'}).text
last_price = currency.select_one('td[aria-label="Last Price"]').text
change = currency.find('td', attrs={'aria-label': 'Change'}).text
percentage = currency.select_one('td[aria-label="% Change"] > fin-streamer > span').text
forex_data.append({
'Currency': name,
'Last Price': last_price,
'Change': change,
'% Change': percentage
})
df = pd.DataFrame(forex_data)
df.to_csv('forex.csv', index=False)
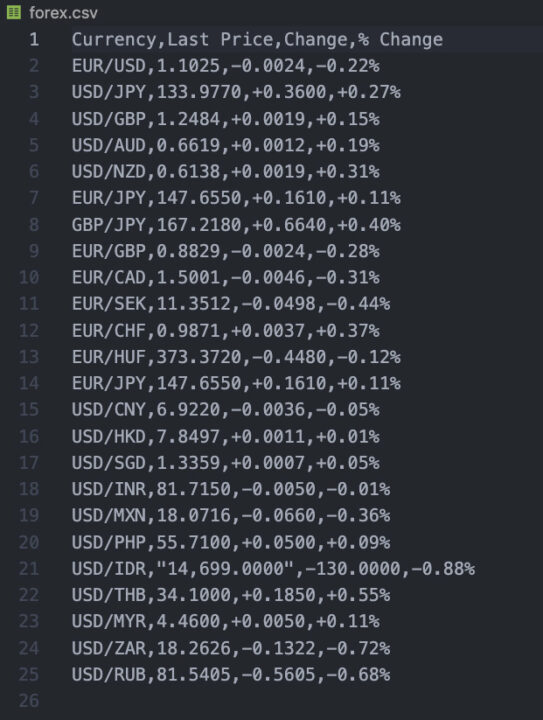
<p>After running this script, you’ll find the following CSV file:
Collect Forex Financial Data Automatically with ScraperAPI
Congratulations, you’ve built your first Forex scraper! We hope you enjoyed this web scraping tutorial as much as we loved writing it. Of course, this is just the beginning.
If you paid attention to the both times we showed you the results, the values are all different for every currency pair. That’s because Yahoo Finance is constantly updating the prices on the page, so you’ll get a slightly different value between every request.
In other words, the next step on this journey is to set a web scraping scheduler so that the script runs automatically a few times a day or week. This will allow you to start building historical data that you can feed to your trading algorithms.
Your web scraping solution doesn’t offer an automatic scraping feature? Check out ScraperAPI. With our DataPipeline solution, you can collect up to 10k URLs on schedule and get notifications when the jobs are done. Sign up to ScraperAPI here to test it out.
Additionally, you can also contrast this information by scraping other sources of Forex data like TradingView. Remember, the more data you have, the best predictions you can make, so start building now.
Until next time, happy scraping!