

Not all scraped web data is clean and ready for direct use. If your parser isn’t configured correctly, your web scraper can return large amounts of unnecessary, “dirty” data. To build a robust parser, you need to use and configure the right CSS selectors.
With various types of CSS selectors available, choosing the right one can be challenging. This CSS selector cheat sheet aims to help you select the appropriate CSS selectors for your data extraction needs. Additionally, we’ve included examples of how to build HTML parsers using different CSS selectors in programming languages like Scrapy and Node.JS to provide a practical understanding of their implementation.
CSS Selectors Cheat Sheet for Web Scraping
Note: If you’re not familiar with cascading style sheets (CSS), we recommend reading the basics of CSS and how we can use it for web scraping at the bottom of this blog.
Although there are a lot of CSS selectors, we don’t really need to know all of them for web scraping (unless you’re also interested in learning front-end development. That’s not our goal at this time).
So, our CSS selectors cheat sheet only lists those that can help us build an efficient web scraper. For a more complete CSS Selectors cheat sheet, head over to W3Schools’ CSS Selector Reference Page.
| Selector | Example | Use Case Scenario |
| * | * | This is a universal selector that picks all elements within a page. It’s not that different from a page. Not much use for it but still good to know |
| .class | .card-title | The simplest CSS selector is targeting the class attribute. If only your target element is using it, then it might be sufficient. |
| .class1.class2 | .card-heading.card-title | There are elements with a class like class=“card-heading card-title”. When we see a space, it is because the element is using several classes. However, there’s no one fixed way of selecting the element. Try keeping the space, if that doesn’t work, then replace the space with a dot. |
| #id | #card-description | What if the class is used in too many elements or if the element doesn’t have a class? Picking the ID selector can be the next best thing. The only problem is that ID attributes are unique per element. So won’t cut to scrape several elements at once. |
| element | h4 | To pick an element, all we need to add to our parser is the HTML tag name. |
| element.class | h4.card-title | This is the most common we’ll be using in our projects. |
| parentElement > childElement (first-child, nth-child, nth-of-type, nth-last-child, only-of-type, only-child, last-of-type, first-of-type) | div > h4 | Using these pseudo-class selectors, we can tell our scraper to extract an element (eg first element)inside another. In this example, we want it to find the h4 element whose parent element is a div. |
| parentElement.class > childElement | div.card-body > h4 | We can combine the previous logic to specify a parent element and extract a specific CSS child element using the child selector. This is super useful when the data we want doesn’t have any class or ID but is inside a parent element with a unique class/ID. |
| [attribute] | [href] | Another great way to target an element with no clear class to choose from. Your scraper will extract all elements containing the specific attribute. In this case, it will take all <a> tags which are the most common element to contain an href attribute. |
| [attribute=value] | [target=_blank] | We can tell our scraper to extract only the elements with a specific value inside its attribute. |
| element[attribute=value] | a[rel=next] | This is the selector we used to add a crawling feature to our Scrapy script: next_page = response.css(‘a[rel=next]’).attrib[‘href’] The target website was using the same class for all its pagination links so we had to come up with a different solution. |
| [attribute~=value] | [title~=rating] |
This selector will pick all the elements containing the word ‘rating’ inside its title attribute. |
| element + element | h4 + p | The adjacent sibling combinator targets an element directly following another. |
| element ~ element | h4 ~ p | The general sibling combinator selector targets all siblings following an element. |
| element, element | h4, p | The comma combinator selector targets multiple elements at once. |
| :first-letter | p:first-letter | The pseudo-element :first-letter targets the first letter of a text element. |
| div p | div p | The descendant selector targets all <p> elements inside a <div>. |
For most projects, these selectors will be more than enough to extract the data we’re looking for.
Note: If you’d like to learn more about CSS selectors in general, Mozilla has a great page that explains how CSS selectors work for web development. With that said, it’s time to move to something more practical.
How to Build an HTML Parser with CSS Selectors [Code Examples]
Every web scraper, no matter how it was built, needs a parser. This is the method our script will use to filter the data from the HTML code and extract only the bits of information we need. Because every programming language manages it differently, here are four HTML parsers built using CSS for different libraries:
Building an HTML Parser with Scrapy CSS Selectors
Scrapy is an open-source framework designed to make web scraping with Python easy and scalable. For this project, we were targeting a wine supplier’s website (https://www.wine-selection.com/) to gather the name, prince, and link of all the wines.
</p>
def parse(self, response):
	for wines in response.css('div.txt-wrap'):
		yield {
			'name': wines.css('a::text').get(),
			'price': wines.css('strong.price::text').get().replace('$ ',''),
			'link': wines.css('a').attrib['href'],
		}
<p>
There are two things to notice from this parse method:
- All prices had the dollar sign ($). However, adding it to our database was going to produce some noise. Instead, we added a replace function to get rid of it.
- After selecting the <a> tag, we can use .attrib to select the attribute value.
Note: We’re using the response from the initial request. Without a response to parse, then there’s no point for this method to be defined.
You can read the full Scrapy tutorial here
Building an HTML Parser with Rvest CSS Selectors
Rvest is for R and Scrapy framework is for Python. This (Rvest) is a highly efficient and resourceful library for web scraping designed for R, that stands out for how easy it makes to manipulate data and create beautiful visualizations.
For this project, we wanted to build a repository of movies from IMDb and grab the movie title, year, rating, and synopsis.
</p>
titles = page > html_nodes(".lister-item-header a") > html_text()
movie_url = page > html_nodes(".lister-item-header a") > html_attr("href") > paste("https://www.imdb.com", ., sep)
year = page > html_nodes(".text-muted.unbold") > html_text()
rating = page > html_nodes(".ratings-imdb-rating strong") > html_text()
synopsis = page > html_nodes(".ratings-bar+ .text-muted") > html_text()
<p>
In Rvest we don’t really need to define a method to parse the downloaded HTML. All we needed to do is to send a request and store the response in the page variable.
Then we can use > to navigate the DOM and extract the data we’re looking for.
A few things to notice about this parser:
- We use html_text() at the end of the string to tell our script to only grab the text inside the node.
- Because the URL inside the href attribute was fragmented (<a href=”/title/tt6334354/?ref_=adv_li_tt”>The Suicide Squad</a>) we added a paste() function so the final URL can actually be clickable.
This one was a really fun exercise and we had to build a loop for our scraper to move through the pagination.
You can read the full Rvest scraper tutorial here
Building an HTML Parser with C# ScrapySharp CSS Selectors
Just like with any other programming language, we could use C# alone to build our scraper. However, it would just take us more time to create an inferior script – a lot of lines of codes to do simple tasks.
Instead, we can use ScrapySharp which is a library specifically designed for web scraping in C#.
Although we did a fairly small project, you can apply the same logic to build a bigger, more complex parser into your project.
</p>
HtmlWeb web = new HtmlWeb();
HtmlDocument doc = web.Load("https://blog.hubspot.com/topic-learning-path/customer-retention");
var Headers = doc.DocumentNode.CssSelect("h3.blog-card__content-title > a")
<p>
Notice that this time we use element.class > element to build our CSS selector.
We did this way because there was no class name inside the <a> tag containing the title of the articles in the Hubspot blog.
You can read the full C# web scraping tutorial here
Building an HTML Parser with Node.JS Cheerio CSS Selectors
Node.JS is a runtime environment that allows us to use JavaScript on the backend.
Thanks to its versatility, we can do a lot of things using Node.JS. For example, we could use a library called Puppeteer to write a web scraper that interacts with websites to access data behind triggers and events.
However, for static pages, the best solution is to use Cheerio to parse the downloaded HTML.
Again, this is just a simple example but you can use the same syntax to extract more elements as long as you know the right CSS selectors (this is where the CSS selectors cheat sheet above comes in handy).
For this example, we sent the request using Axios (promise-based HTTP client for Node.js) and then used Cheerio to select the price element within the DOM.
</p>
axios(url)
.then(response => {
const html = response.data;
const $ = cheerio.load(html)
const salePrice = $('.sale-price').text()
console.log(salePrice);
})
<p>
You can read the full Node.js web scraper tutorial here
Web Scraping Using CSS Selectors
Now, if you just started your journey in web scraping, let’s find out more about CSS, its role in web scraping, and how we can use it for parsing HTML.
Alongside HTML and JavaScript, CSS is one of the building blocks of any website and web application. It uses selectors/attribute selectors to pick HTML elements based on classes, IDs, attributes, and pseudo-classes and then apply styles tothem, telling the browser how to display the element on a visual level.
By using the same logic, we can use CSS selectors to tell our scraper where to find the data we want it to collect.
We can imagine the process like this:
- First, we make our script send a request to the server. As a response, the server will send it the HTML source code.
- Then, we build a parser using CSS to filter the HTML and only pick the elements we need.
Building a parser using CSS can be really powerful as we can use a single line of code to retrieve a specific set of elements.
For example, we can target a listing of products and extract product names, descriptions, and prices, and fill a spreadsheet with all these data for further analysis.
However, before we can do that, we’ll need to understand the structure of our target website to find the right target.
How to Inspect a Page to Pick the Right CSS Selector
There are several ways to find the right property we need to target when building a parser with CSS.
The most common one is by inspecting the site with the browser’s developer tool (dev tool).
Let’s go to ScraperAPI’s blog, right-click and hit on inspect.
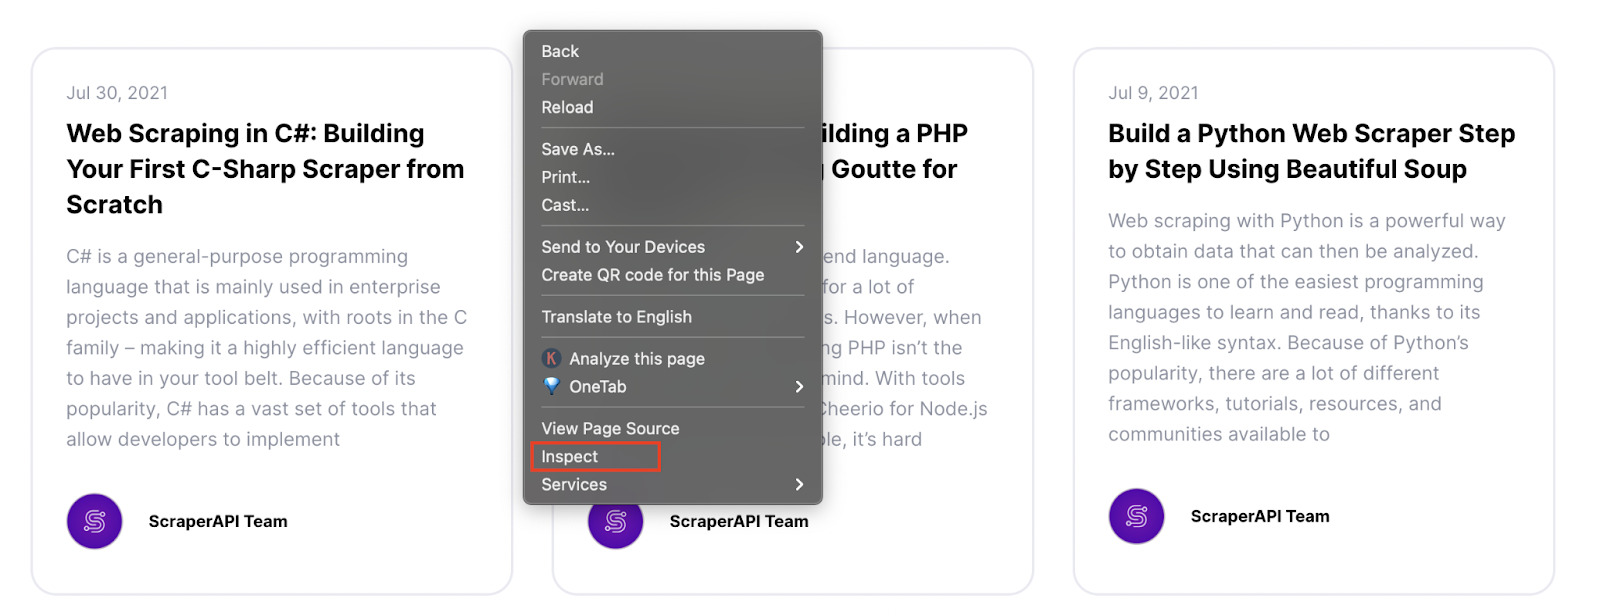
It will open the ‘inspector dev tool’, letting us see the HTML structure of the page.
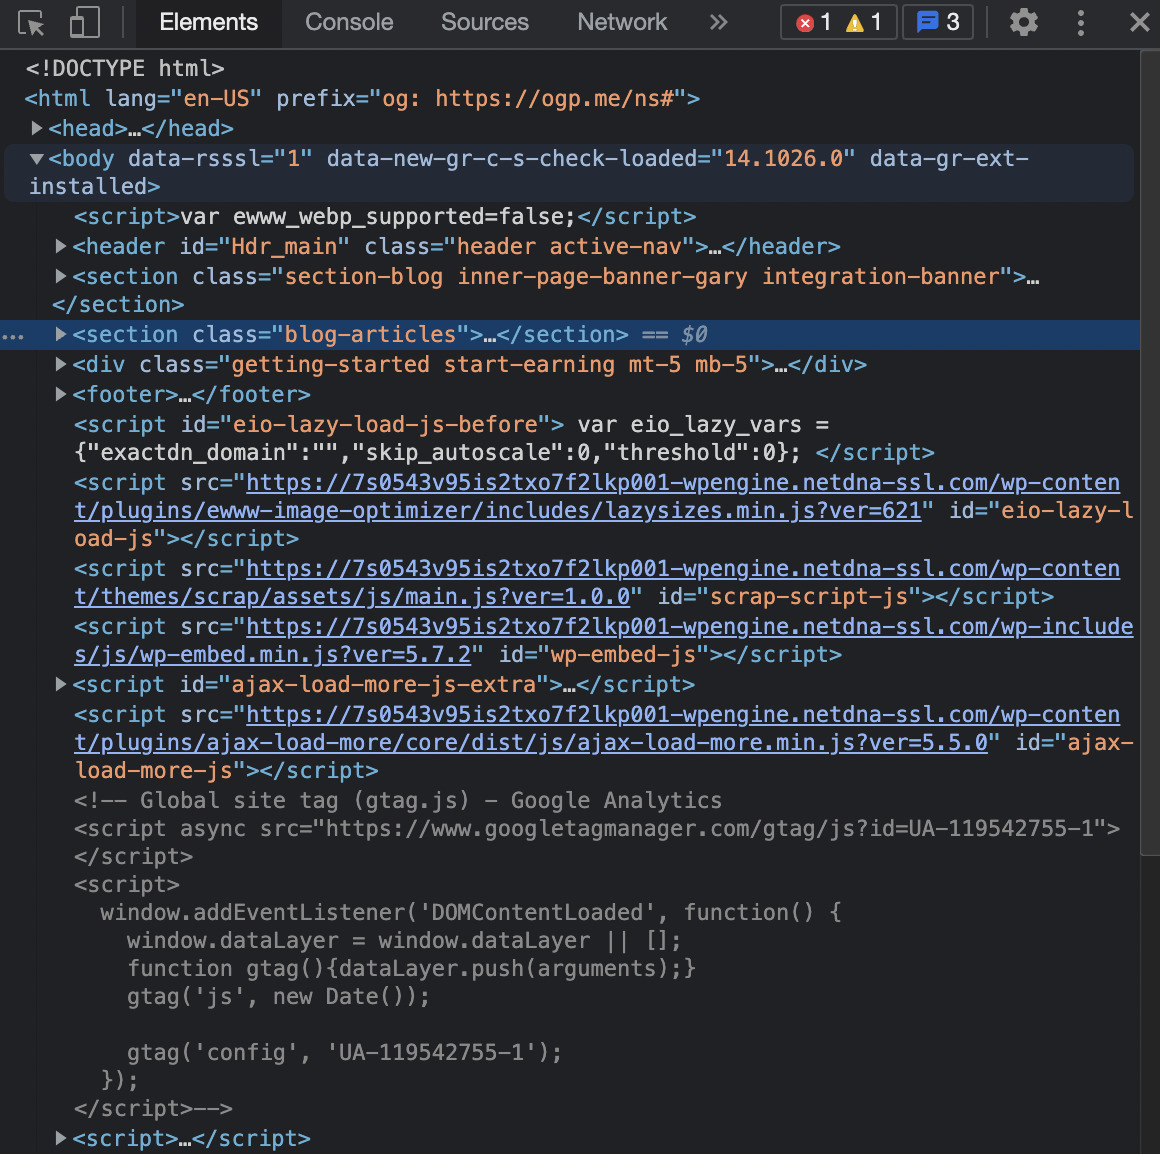
For this page, we want to get the title of every article, so we need to see how is the title being served in the HTML.
We can do this by using the ‘inspector tool’ and clicking on the title.
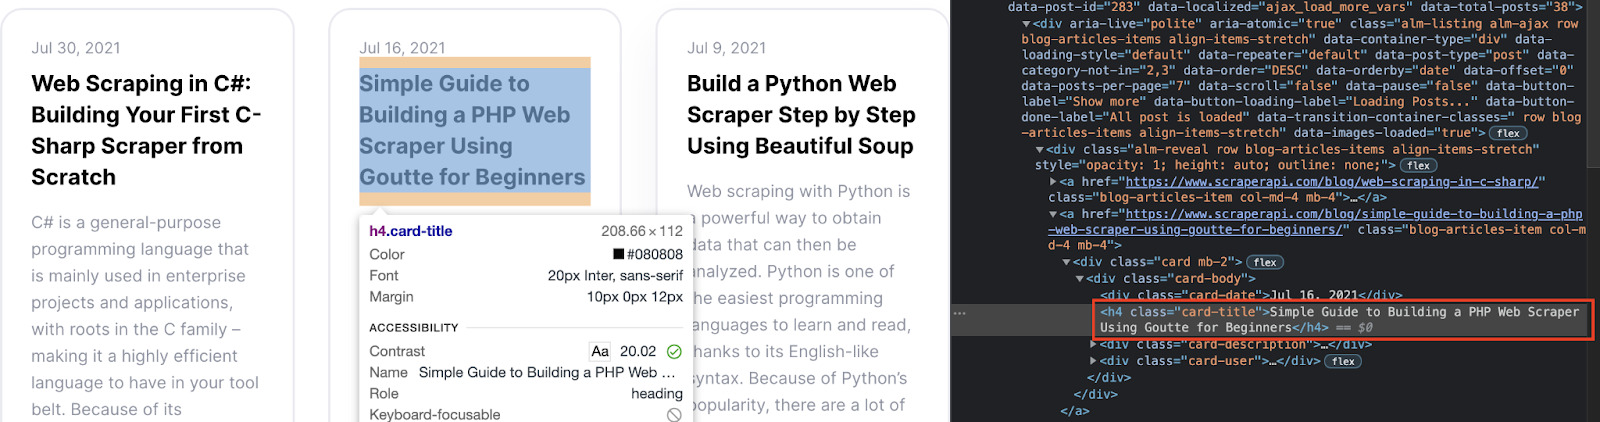
Alright, we can see that our title is inside a <div>, wrapped inside <h4> tags. With this information, we could tell our scraper to find all <h4> tags and add them to our spreadsheet.
These tags are only being used for titles, so that would be enough for this page.
However, in most websites, we’ll find <h2> to <h4> tags being used for many different pseudo-elements, which would make our scraper return a lot of noise.
Another scenario when a tag won’t cut it is when trying to get specific URLs.
URLs are – almost – always inside an <a> element within its href attribute. For that reason, if we just ask our script to extract all <a> tags, it will bring navigation links, footer links, and any other type of link on the page.
Not very useful, right?
That’s when CSS selectors come into play.
After closer inspection, we can notice two things:
- The main <div> where we can find the title has the class name called‘card-body’
- While the title itself is an <h4> with the class name called ‘card-title’

With this new information, we can build a method to parse the downloaded HTML code and extract just the elements that match our filter.
If we were to write this method with Scrapy, it would look like this:
</p>
def parse(self, response):
	for articles in response.css('div.card-body'):
		yield {
			'title': articles.css('h4.card-title::text').get(),
		}
<p>
Of course, every programming language would be a little different. In Scrappy we use: ‘:text’ to specify that we only want the text inside the tags instead of the whole element.
However, the logic behind the CSS selector stays relatively the same.
Something to remember is that our target page has a really simple structure. Other websites can be way more complex, so it’s vital to keep a CSS cheat sheet at hand to help us figure out the best way to code our parser.
The Right CSS Selectors Create Robust HTML Parsers
As you can see, if you understand the syntax to build CSS selectors, you can extract almost any element from a website – including dynamic pages.
It’s all about finding the right logic to target and understanding the basis of the programming language you want to build your web scraper with.
So far, our two preferred languages are Python with Scrapy and R with Rvest. Their syntax is easy to comprehend, and with just a few lines of code, you can extract a huge amount of data.
In addition, making your script follow paginations is much easier with Python and R than with C# or Node.js.
Still, if you already have a lot of experience with the latter, then it’s ok to go for it. As long as you’re getting the right data and you can code faster, the rest is up to you.
If you want a more complete CSS cheat sheet, check out this one from W3Schools. Do you want to learn more about web scraping? Check out these web scraping resources from the ScraperAPI blog:
- Building a Web Scraper Using PHP and Goutte
- Step-by-step to Build a Python Web Scraper Using Beautiful Soup
- How to Scrape Amazon Product Data
- Web Scraping Best Practices and ScraperAPI Cheat Sheet
Until next time, happy scraping!