


Pyppeteer is an unofficial Python version of Puppeteer, the widely-used JavaScript library for automating Chrome or Chromium browsers. Unlike traditional browser automation tools like Selenium, Pyppeteer uses a headless browser, which offers a modern alternative for automation and web scraping tasks.
In this guide, we will explore how to leverage Pyppeteer’s capabilities effectively. Here’s what we’ll cover:
- Use Pyppeteer to extract web data from dynamic pages
- A simple-to-use cheat sheet for Pyppeteer’s browser actions
- Integrate Pyppeteer with ScraperAPI to bypass advanced anti-bot detection
Ready to explore the power of browser automation with Pyppeteer? Let’s get started!
TL;DR: Pyppeteer Overview
For those who know a bit about web scraping or automating tasks in Python, Pyppeteer is a great tool for managing web browsers without needing to see them (headless browsers).
Here’s how to get started with Pyppeteer for web scraping:
- Install Pyppeteer:
- First, make sure you have Python and Pip installed. You can check this by running
python --versionandpip --version- Use pip to install Pyppeteer:
pip install pyppeteer- Set Up Your Scraper:
- Import
pyppeteerand other needed libraries likeBeautifulSoup- Write an asynchronous function to open a browser, go to a website, and get the website’s content
- Scrape a Website:
- Use Pyppeteer to open a browser and go to the website you want to scrape
- Grab the page’s HTML and use BeautifulSoup to pull the needed data, like the page title
Here’s a simple code snippet using Pyppeteer and BeautifulSoup to extract a page’s Title:
import asyncio
from pyppeteer import launch
from bs4 import BeautifulSoup

async def main():
    browser = await launch()
    page = await browser.newPage()
    await page.goto('https://books.toscrape.com/')
    html = await page.content()
    await browser.close()

    soup = BeautifulSoup(html, 'html.parser')
    title = soup.find('h1').text
    print('Title:', title)

title = asyncio.get_event_loop().run_until_complete(main())
TL;DR: Pyppeteer Overview
This code initiates a headless browser session, navigates to https://books.toscrape.com/, retrieves the page content, and extracts the webpage title using BeautifulSoup.
To use this snippet in your scraping project, simply update the URL and the elements you wish to extract based on your scraping needs.
Pyppeteer: Using Pyppeteer with Python
How to Install Pyppeteer
Installing Pyppeteer is a straightforward process that you can complete with just a few steps using Python’s package manager, pip.
Follow these instructions to get Pyppeteer up and running on your machine:
1. Ensure Python and pip are Installed: Pyppeteer requires Python. You can check if Python and pip are installed by running the following commands in your terminal (Linux or macOS) or command prompt (Windows):For Python:
For Python:
python --version
For pip:
pip --version
If these commands don’t return version numbers, you’ll need to install Python, which you can install here. Ensure pip is installed along with Python.
2. Install Pyppeteer: Execute the following command to install Pyppeteer:
pip install pyppeteer
Now, let’s create a script that combines Pyppeteer with BeautifulSoup to open a web page, scrape content, and parse it.
Step 1: Importing Necessary Libraries
After installing pyppeteer, let’s import some essential libraries into our script. We’ll include asyncio for handling asynchronous tasks, pyppeteer for the browser control, and BeautifulSoup from the bs4 package for parsing HTML content.
import asyncio
from pyppeteer import launch
from bs4 import BeautifulSoup
Step 2: Define the Asynchronous Web Scraping Function
Next, let’s define an asynchronous function called main() that will handle our scraping:
async def main():
    # Start the browser and open a new page
    browser = await launch()
    page = await browser.newPage()
    await page.goto('https://books.toscrape.com/')  # Enter the URL of the website you want to scrape

    # Retrieve HTML and close the browser
    html = await page.content()
    await browser.close()

    # Use BeautifulSoup to parse HTML
    soup = BeautifulSoup(html, "html.parser")
    title = soup.find('h1').text  # Extract the text of the first
<h1>tag found return title</h1>
Let’s break down how it works:
- Launching the Browser: We initiate a headless browser instance to interact with web pages invisibly. To see the GUI of the browser, you can set
headlesstofalsewithin the launch function like this:
browser = await launch(headless=False)
- Navigating to the Website: Our script directs the browser to the desired URL, where our data resides.
- Extracting HTML Content: Once on the page, we capture its HTML content for further analysis.
- Parsing with BeautifulSoup: This is where BeautifulSoup shines. It parses the HTML content, making it easy to locate and extract specific elements, such as the webpage title.
- Retrieving the Title: Using the parsed HTML, we locate the title element and extract its text, representing the webpage’s title.
- Closing the Browser: With our mission accomplished, we close the browser to conclude the scraping session.
Step 3: Execute the Function and Print Results
Finally, to see the result of our scraping effort, we execute the main function using asyncio's event loop, which handles running the async functions:
title = asyncio.get_event_loop().run_until_complete(main())
print('Title:', title)
Note: The first time you use Pyppeteer, it may need to download Chromium (about 150MB) if it’s not already installed on your system. This initial setup can slightly delay your script.
To manually download Chromium beforehand and avoid the wait during your first run, execute this statement in your command prompt or terminal:
pyppeteer-install
This command ensures Chromium is ready on your machine, making your script’s execution easier when you’re prepared to run it.
You can manually install it from here if you encounter an error with your Chromium download directly with pyppeteer.
After installing it, add the path to your Chromium.exe when you launch the browser like this:
browser = await launch(executablePath='/path/to/your/chromium')
Pyppeteer Cheat Sheet
In this section, we’ll explore a variety of actions you can perform with Pyppeteer, complete with ready-to-use code snippets to help you incorporate these functionalities smoothly into your projects.
How To Wait For The Page To Load With Pyppeteer
For effective web scraping or browser automation using Pyppeteer, ensuring the entire page content has loaded before proceeding might be needed. Here are some practical methods to achieve this:
1. Wait Specific Amount of Time
To pause your script for a specific amount of time, use the page.waitFor() function. For example, adding page.waitFor(5000) will make the script wait 5 seconds before continuing.
Here’s how to use it:
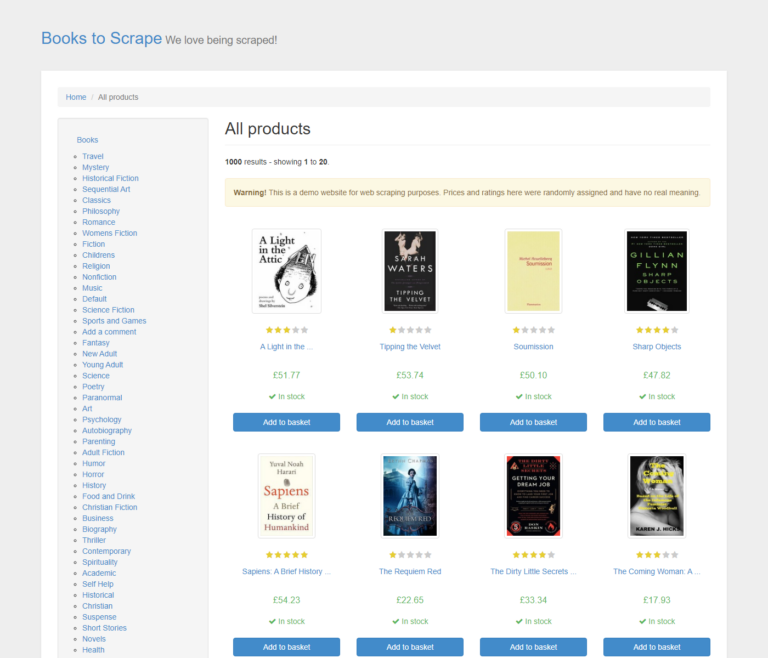
await page.goto('https://books.toscrape.com/')
await page.waitFor(5000)  # Wait for 5000 milliseconds (5 seconds)
2. Wait for a Specific Selector
Another method is to pause until a specific page element becomes visible before proceeding.
You can do this using the waitForSelector() function. In this example, we tell the browser to wait until an element with the .thumbnail class appears before doing anything else.
Here’s how you can use it:
await page.goto('https://books.toscrape.com/')
await page.waitForSelector('.thumbnail')
How To Take Screenshots With Pyppeteer
Capturing screenshots is a powerful feature in Pyppeteer that can be used for debugging, archiving snapshots of web pages, or verifying UI elements.
To capture the entire page length as it appears in the viewport, use the screenshot() method.
- First, navigate to your target web page using the
goto()method - After reaching the page, capture a screenshot using the
screenshot()function and specify the file name:
await page.goto('https://books.toscrape.com/')
await page.screenshot({'path': 'example.png'})
The screenshot will be saved in your project folder. It captures the visible area of the page according to the default viewport settings.

To capture a screenshot with specific dimensions, you can set the viewport before navigating to the page using the setViewport() method:
await page.setViewport({"width": 1400, "height": 1200})
await page.goto('https://books.toscrape.com/')
await page.screenshot({'path': 'example.png'})
The screenshot will be taken using the dimensions you specified.
For a full-page screenshot, which captures from the top of the page to the bottom regardless of the current viewport, set fullPage to true after specifying the path of the image in the screenshot() method:
await page.goto('https://books.toscrape.com/')
await page.screenshot({'path': 'example.png', 'fullPage':True})
How To Click on Buttons With Pyppeteer
Clicking a button or any other interactive element on a webpage with Pyppeteer is straightforward.
First, you need to identify the element by its selector and then tell Pyppeteer to click on it. In our example, we’re interested in clicking the link to the book “A Light in the Attic” on the “Books to Scrape” website.
We can find the exact element and the href attribute we need to identify using the developer tools.
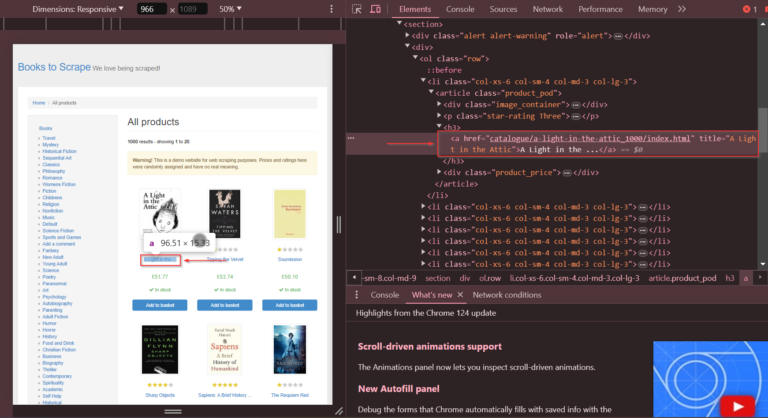
Now that we have the element, we’ll use the click() function to click on it and use the waitForSelector() function to tell the browser to wait for the element before we click on it.
import asyncio
from pyppeteer import launch

async def click_link():
    browser = await launch(headless=False)  # Launches a visible browser for demonstration
    page = await browser.newPage()

    # Navigate to the webpage
    await page.goto('https://books.toscrape.com/')

    # Wait for the link to be clickable and click it
    await page.waitForSelector('a[href="catalogue/a-light-in-the-attic_1000/index.html"]')
    await page.click('a[href="catalogue/a-light-in-the-attic_1000/index.html"]')
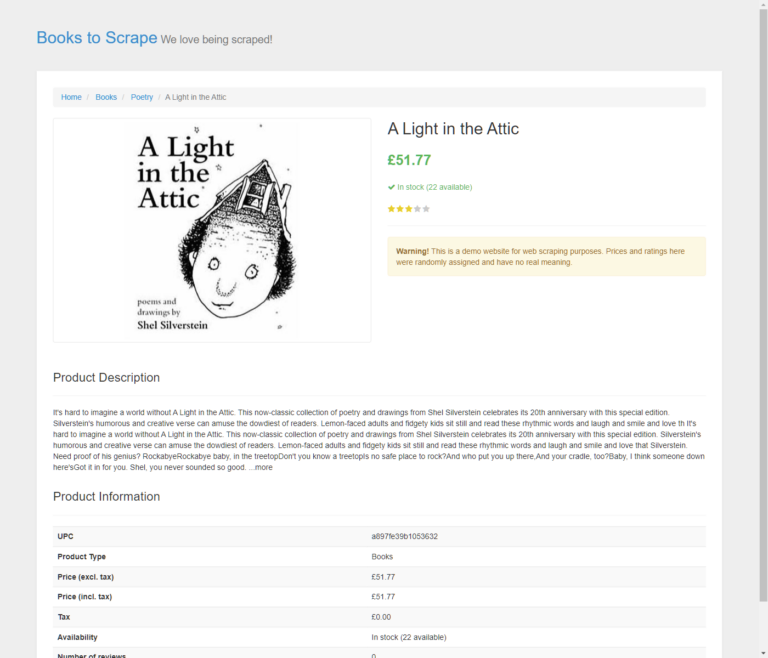
After clicking the link, the script will navigate to the book’s detail page.
To confirm that the navigation was successful and that the click led to the correct page, we’ll take a screenshot of the page.
# Wait for the page to load fully
    await page.waitFor(10000)  # Wait for 10 seconds to ensure the page has fully loaded
    await page.setViewport({"width": 1400, "height": 1200})  # Set the dimensions for the screenshot
    await page.screenshot({'path': 'example.png'})  # Save the screenshot

    await browser.close()  # Close the browser after the screenshot

asyncio.get_event_loop().run_until_complete(click_link())
And it worked!
Here’s the screenshot saved as example.png. It shows the detailed page of “A Light in the Attic,” confirming that our script was executed successfully.
How to Scroll a Webpage with Pyppeteer
Scrolling through pages automatically is essential when dealing with websites where content loads dynamically as you scroll down. Pyppeteer makes this easy by using its evaluate() function to execute Python code directly in the browser context. Here’s a straightforward example:
import asyncio
from pyppeteer import launch

async def simple_scroll():
    browser = await launch(headless=False)  # Launches a browser with a visible UI
    page = await browser.newPage()
    await page.setViewport({'width': 1280, 'height': 720})  # Sets the size of the viewport
    await page.goto('https://books.toscrape.com')  # Navigate to the website

    # Scroll to the bottom of the page
    await page.evaluate('window.scrollBy(0, document.body.scrollHeight);')

    # Wait for additional content to load
    await page.waitFor(5000)

    await browser.close()

asyncio.get_event_loop().run_until_complete(simple_scroll())
This Pyppeteer script navigates to the webpage and scrolls to the bottom using window.scrollBy(), waits for a few seconds to ensure all dynamic content has loaded and then closes the browser.
How To Use a Proxy with Pyppeteer
When scraping websites, using proxies is essential to avoid being blocked by the target sites. Regularly sending a high volume of requests from the same IP address can lead to your IP being blocked.
Proxies are intermediaries between your scraper and the website, providing different IP addresses for your requests, which helps to mask your scraping activities, making them appear as if they’re coming from multiple users instead of a single source.
Resource: If you want to learn more about proxies and how they work, check out this article on how to use and rotate proxies in Python.
To use a proxy with Pyppeteer, you can specify it when launching the browser.
Here’s how you can do it, including handling authentication if your proxy requires it:
import asyncio
from pyppeteer import launch

async def use_proxy():
    browser = await launch({
        'args': ['--proxy-server=your_proxy_address:port']
    })
    page = await browser.newPage()
    await page.authenticate({'username': 'your_username', 'password': 'your_password'})

    await page.goto('https://books.toscrape.com')

    await browser.close()

asyncio.get_event_loop().run_until_complete(use_proxy())
If your proxy is protected, use the authenticate() method to provide the necessary credentials.
How to Integrate ScraperAPI with Pyppeteer
While Pyppeteer brilliantly handles browser automation, it doesn’t manage proxies directly. ScraperAPI fills this gap by providing robust proxy management, essential for bypassing IP-based blocking and rate limiting by target websites.
In addition, ScraperAPI can render JavaScript-heavy pages, reducing the complexity of your scripts and enhancing success rates when scraping dynamic content.
By leaving the proxy management and CAPTCHA solving to ScraperAPI, your scraping scripts become simpler and more focused on data extraction logic rather than on navigating anti-scraping measures
Here’s how you can integrate ScraperAPI with your Pyppeteer scripts:
Step 1: Setting Up Your Browser with ScraperAPI
First, we need to configure Pyppeteer to use ScraperAPI as a proxy. This will not only manage our connections through various IPs but also handle potential web security measures that could block or slow down our scraping:
browser = await launch({
    'ignoreHTTPSErrors': True,
    'args': ['--proxy-server=proxy-server.scraperapi.com:8001'],
})
This proxy setup directs all browser traffic through ScraperAPI, leveraging its ability to bypass site restrictions and rate limits. We’re also telling the browser to ignore any HTTPS errors to avoid any interruptions due to SSL/TLS issues
Note: Check ScraperAPI’s documentation for more detailed information.
Step 2: Authenticating with ScraperAPI
Next, authenticate with ScraperAPI to ensure that your requests are recognized and managed correctly:
await page.authenticate({
    'username': 'scraperapi',
    'password': 'YOUR_SCRAPERAPI_KEY'  # Use your actual ScraperAPI key here
})
Note: Need a Scraper API Key? Create a free ScraperAPI account to get an API key and 5,000 API credits.
Step 3: Navigate to Your Target Website
Now, let’s direct our browser to the website from which we want to scrape data:
await page.goto(target_url)
content = await page.content()
print(content)
Here’s the full code:
import asyncio
from pyppeteer import launch

async def scrape_with_scraperapi():
    target_url = 'https://example.com'

    browser = await launch({
        'ignoreHTTPSErrors': True,
        'args': [
            '--proxy-server=proxy-server.scraperapi.com:8001',
        ]
    })

    page = await browser.newPage()
    await page.authenticate({
        'username': 'scraperapi',
        'password': 'YOUR_SCRAPERAPI_KEY'
    })

    await page.goto(target_url)

    content = await page.content()
    print(content)

    await browser.close()

asyncio.get_event_loop().run_until_complete(scrape_with_scraperapi())
Integrating ScraperAPI with your Pyppeteer scraping projects allows you to easily handle more complex scraping tasks. It extends the capabilities of your scripts by managing proxies and solving CAPTCHAs automatically, letting you scale your projects or handle more data-intensive tasks.
Keep Learning
Congratulations, you just built your first Pyppeteer scraper!
Using what you’ve learned today and ScraperAPI’s proxy mode, you’ll be able to scrape dynamic websites at a large scale with a high success rate, creating a consistent stream of data.
Of course, you can also use ScraperAPI’s JS rendering feature to reduce the complexity of your code. This allows you to download post-rendered HTML pages and access dynamic content much more easily.
Want to learn more about web scraping? Visit our blog for project-based learning, or check out some of our favorite projects here:
- Scrape Dynamic Tables with Python
- How to Scrape Quora with Python Selenium
- Build a LinkedIn Scraper without Headless browsers
- Use ScraperAPI to Scrape Google Domains in JSON Format
- Build Asynchronous Scrapers with ScraperAPI
Until next time, happy scraping!