


Scrapy saves you from a lot of trouble while scraping the web. While a simple Requests and BeautifulSoup combo might work for a few small, static web pages, it quickly becomes inefficient once you need to scale up and handle hundreds or even thousands of URLs concurrently.
This is precisely where Scrapy web scraping shines. Scrapy is a highly performant, open-source Python framework used for web scraping at scale. It’s easy to use and highly customizable, making it suitable for a wide range of scraping projects. In this article, I’ll introduce you to the fundamentals of Scrapy web scraping and then dive into advanced topics, such as managing multiple scrapers effectively.
Let’s get started!
What is Scrapy?
Scrapy is an open-source Python library that allows you to crawl websites concurrently without managing threads, processes, sessions, or other low-level networking details. Scrapy is built on top of Twisted, an asynchronous networking engine that manages multiple network connections in parallel.
Scrapy’s event-driven architecture (via Twisted) allows it to send multiple requests, process responses as they arrive, and parse data—all with high performance.
Scrapy’s flexibility enables you to:
- Use built-in or custom middleware to modify requests or responses at various points in the crawling process.
- Scale to multiple websites or domains by spinning up several spiders within a single project.
- Integrate various community-built plugins to extend its features and functionality, such as scraping dynamic content with scrapy-playwright and scrapy-selenium.
- Integrate with third-party APIs like ScraperAPI to get around IP bans, CAPTCHAs, and geolocation restrictions.
Is Scrapy good for web scraping?
Scrapy was explicitly built for large-scale, production-grade scraping, so it addresses many of the challenges inherent in web scraping. Below are key issues that developers encounter, which Scrapy solves:
- Auto-throttling mechanism: Scrapy dynamically adjusts crawl speed based on server and system load. This helps reduce the risk of overwhelming the server or getting blocked due to high request rates.
- Respect for robots.txt: By default, Scrapy respects the robots.txt of the sites you scrape but allows you to override this if needed.
- Session management: Scrapy handles cookies and sessions automatically, so you don’t have to attach cookies or session IDs to every request manually.
- Redirection handling: Scrapy follows HTTP redirections, and HTML meta refresh tags, so you don’t get stuck on partial or outdated URLs.
- Built-in retry system: Scrapy automatically retries failed requests,
and you can customize the retrying policy, defining which kinds of response codes should be retried.
- Duplicate filtering: Scrapy tracks the URLs you’ve already visited using the dupfilter_class, preventing redundant requests.
- Customizable scheduling: Scrapy allows you to customize its scheduling algorithm. The default scheduling is Depth-First Order (DFO), but you can switch to Breadth-First Order (BFO).
- Data export: Scrapy can export data to various formats, including JSON, CSV, and XML.
- HTTP cache: Scrapy provides a handy HTTP cache feature that Lets you test your spiders locally without repeatedly hitting web servers.
Scrapy’s modular architecture allows you to customize almost everything, making it easy to adapt the framework if the defaults don’t suit your needs.
Scrapy also benefits from a strong community, extensive documentation, and a variety of community-built plugins. If you don’t want to host your own web crawlers, you can deploy them to Scrapy Cloud, a dedicated PaaS platform with free and paid plans.
Your Step-by-Step Guide to Web Scraping with Scrapy
To ensure you learn everything you need to start using Scrapy for your projects, I’ll walk you through the complete scraping process, from setting up the tools to writing the logic of your spider.
By the end, you’ll have a great understanding of Scrapy and its unique capabilities, and you’ll be able to tackle the next section of this guide, where we’ll focus on achieving higher scalability.
With that said, let’s begin!
Step 1: How to Install Scrapy on Your Machine
The Scrapy team recommends installing their framework in a virtual environment (VE) instead of system-wide, so that’s exactly what we’re going to do.
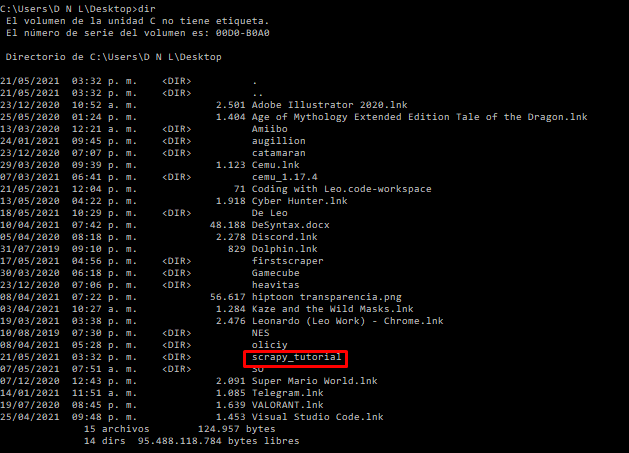
Open your command prompt on your desktop (or the directory where you want to create your virtual environment) and type python -m venv scrapy_tutorial.

The venv command will create a VE using the path you provided – in this case, scrapy_tutorial – and install the most recent version of Python you have in your system.
Additionally, it will add a few directories inside with a copy of the Python interpreter, the standard library, and various supporting files.
If you want to verify it was created, enter dir in your command prompt and it will list all the directories you have.
To activate your new environment, type scrapy_tutorial\scripts\activate.bat and run it.

Now that we’re inside our environment, we’ll use pip3 install scrapy to download the framework and install it within our virtual environment.
And that’s it. We’re now ready to start our project.
Now that we’re inside our environment, we’ll use pip3 install scrapy to download the framework and install it within our virtual environment.
And that’s it. We’re now ready to start our project.
Step 2: Create a Scrapy Project
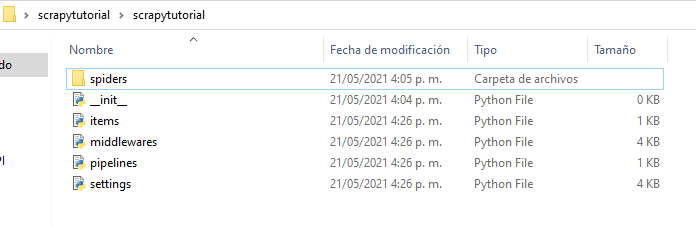
On your command prompt, go to cd scrapy_tutorial and then type scrapy startproject scrapytutorial:

This command will set up all the project files within a new directory automatically:
- scrapytutorial (folder)
- Scrapy.cfg

- scrapytutorial/
- Spiders (folder)
- _init_
- Items
- Middlewares
- Pipelines
- Setting
Step 3: Use Scrapy Shell to test selectors
Before jumping into writing a spider, we first need to take a look at the website we want to scrape and find which element we can latch on to extract the data we want.
Loading Scrapy Shell
For this project, we’ll crawl https://www.wine-selection.com/shop to collect the product name, link, and selling price.
To begin the test, let’s run scrapy shell and let it load.

This will allow us to download the HTML page we want to scrape and interrogate it to figure out what commands we want to use when writing our scraper script.
After the shell finishes loading, we’ll use the fetch command and enter the URL we want to download like so: fetch('https://www.wine-selection.com/shop'), and hit enter.

It should return a 200 status, meaning that the website is working, and save it within the response variable.
Note: We can check this by typing response on our command line.

Inspecting the page
Perfect. Our page is now ready for inspection.
We can type view(response) and it will open the downloaded page on our default browser or just open our browser and navigate to our target page. Either way is fine.
By using the inspection tool in Chrome (ctrl + shift + c), we identify the classes or IDs we can use to select each element within the page.
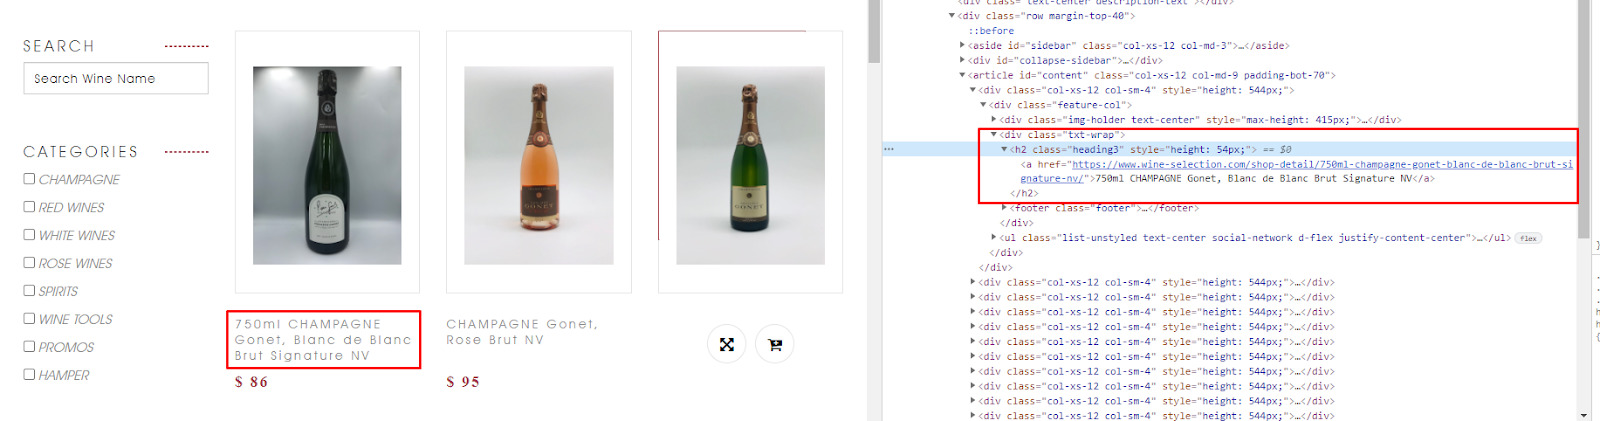
Upon closer look, all the information we want to scrape is wrapped within <div> with class="txt-wrap” across all product cards.
Let’s use this class as a selector by typing response.css('div.txt-wrap') and it will return all the elements that match this class – which to be honest is really overwhelming and won’t be of much help.
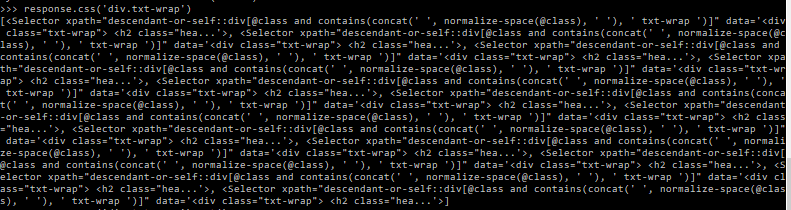
So to take it a bit further, let’s type this command again but adding the .get( ) command at the end of the string.

It has returned all the HTML code within that first div that meets the criteria, and we can see the price, the name, and the link within that code.
Using CSS selectors in Scrapy
To make our process more efficient, we’ll save this last response as a variable. Just enter wines = response.css('div.txt-wrap') and now we can call this variable in the next line.
Because we want to get the name of the product, we need to check where the name is being served again.

It seems that the title of the product is contained in a link tag without class. So what can we do now?
The good news is that there’s only one link within our div, so we can just add wines.css('a::text').get() to tell our program to bring the text that’s inside the <a></a> tags.

Note: when using CSS selectors, we can add ::text after our selector and it’ll return just the text inside the element. For XPath, add /text() – e.g. wines-xpath('//*[@id="content"]/div[1]/div/div[2]/h2/a/text()').get() .

Now we can do the same process for the rest of our elements:
- Getting the price:
wines.css('strong.price::text').get() - Getting the product link:
wines.css('a').attrib['href']

Tip: you might not want to have the space and dollar symbol ($) in your data. To quickly eliminate this add .replace('$ ', '') .

Step 4: Create a Custom Spider
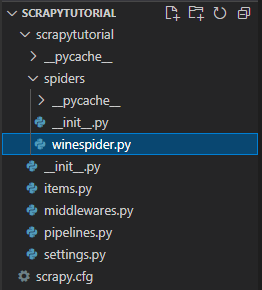
First, open the project folder on VScode (or your preferred code editor) and create a new file within the spider folder called winespider.py.
In the file write the following code:
import scrapy

class WinesSpider(scrapy.Spider):
    name = "winy"
    start_urls = ['https://www.wine-selection.com/shop']

def parse(self, response):
    for wines in response.css('div.txt-wrap'):
        yield {
            'name': wines.css('a::text').get(),
            'price': wines.css('strong.price::text').get().replace('$ ',''),
            'link': wines.css('a').attrib['href'],
        }
Let us break this code down:
- We imported Scrapy to our project at the top of the file.
- We defined a new class (spider) and added the subclass Spider.
- We then gave it a unique name (winy) that cannot be the same as any other spider within the project.
- To give our spider a target page, we used
start_urls = ['https://www.wine-selection.com/shop']. We could have added a list of URLs separated by commas, but we’re going to make our spider move through the website’s pagination later on. So we just provided the first page. - Last, we told Scrapy what information we wanted it to find within the HTML. If you noticed, we used the same logic we defined in Scrapy Shell before and used the
parse()function to handle the download page.
Step 5: Run Your Scraper and Save the Data on a JSON.file
To run your scraper, exit Scrapy Shell and move to the project folder on your command prompt and type: scrapy crawl and your spider’s name:

If everything is working, the data scraped will be logged into your command line:

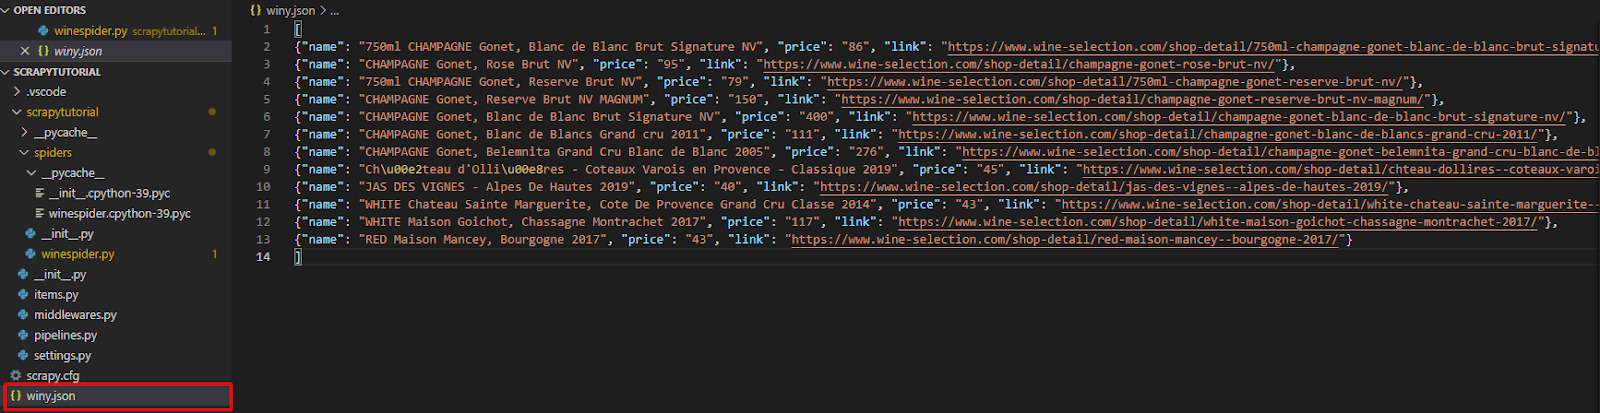
Now that we know it’s working, we can go ahead and run it again, but this time with -o winy.json to tell Scrapy to store the scraped data into a JSON file called winy.
Scrapy then handles everything for you so you don’t have to worry about writing your own output configuration.
Step 6: Make Your Scraper Crawl the Pagination
If you’ve been following along, congratulations, you just wrote your first web crawling spider with Scrapy! That’s impressive.
Let’s add some more functionality to our spider by making it follow the next page of the pagination.
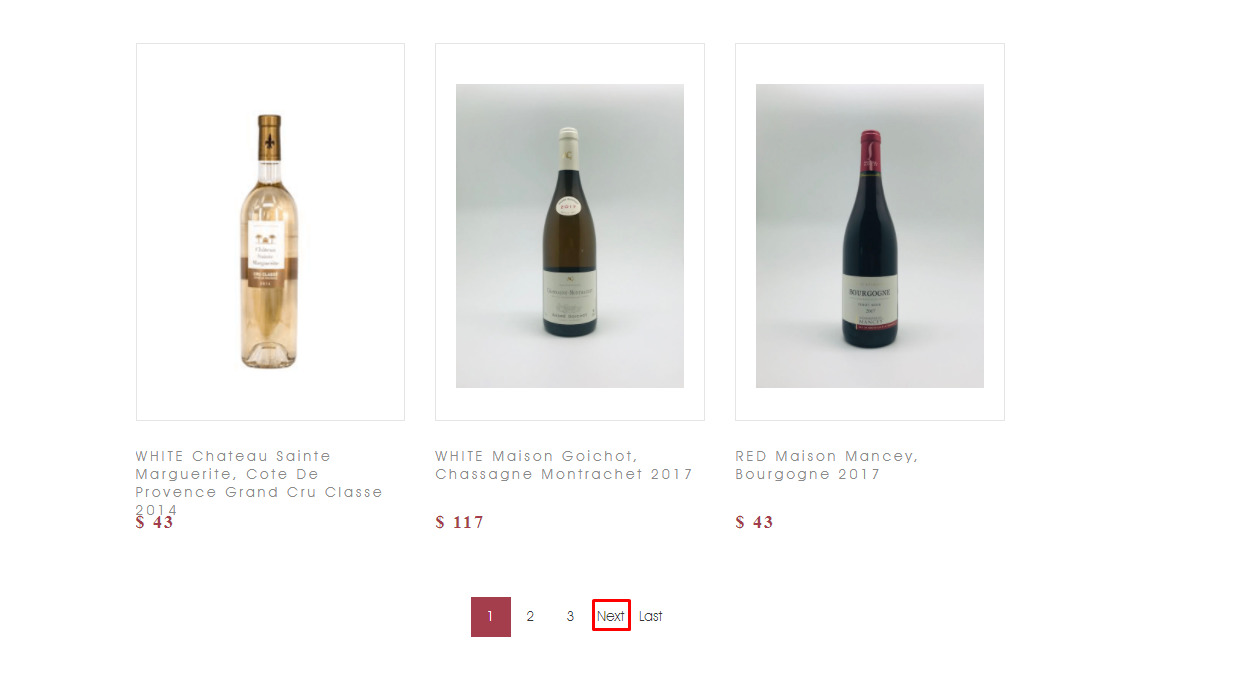
This page has a “next” button – which could be good news. After inspection, it seems like the target link our spider needs to follow is wrapped between link tags inside a list.

Before adding it to our main file we’ll test the selector using Scrapy Shell to verify our logic.
As stated above, we’ll need to fetch() the URL and then use the response to extract our data, but there’s one catch: all the links in the pagination use the same classes.
So if we try to write:
next_page = response.css('span.page-link > a').attrib['ahref']
    if next_page is not None:
        yield response.follow(next_page, callback=self.parse)
It will use the first page it finds using the path provided. Thus making our scraper go in circles.
Here is the good news: if we pay close attention to the structure of the button, there’s a rel = next attribute that only this button has. That has to be our target!
Time to update our code one last time…
import scrapy

class WinesSpider(scrapy.Spider):
    name = "winy"
    start_urls = ['https://www.wine-selection.com/shop']

def parse(self, response):
    for wines in response.css('div.txt-wrap'):
        yield {
            'name': wines.css('a::text').get(),
            'price': wines.css('strong.price::text').get().replace('$ ',''),
            'link': wines.css('a').attrib['href'],
        }

next_page = response.css('a[rel=next]').attrib['href']
    if next_page is not None:
        yield response.follow(next_page, callback=self.parse)
… and run it using scrapy crawl winy -o winy.csv to save our field in an easier to use format.
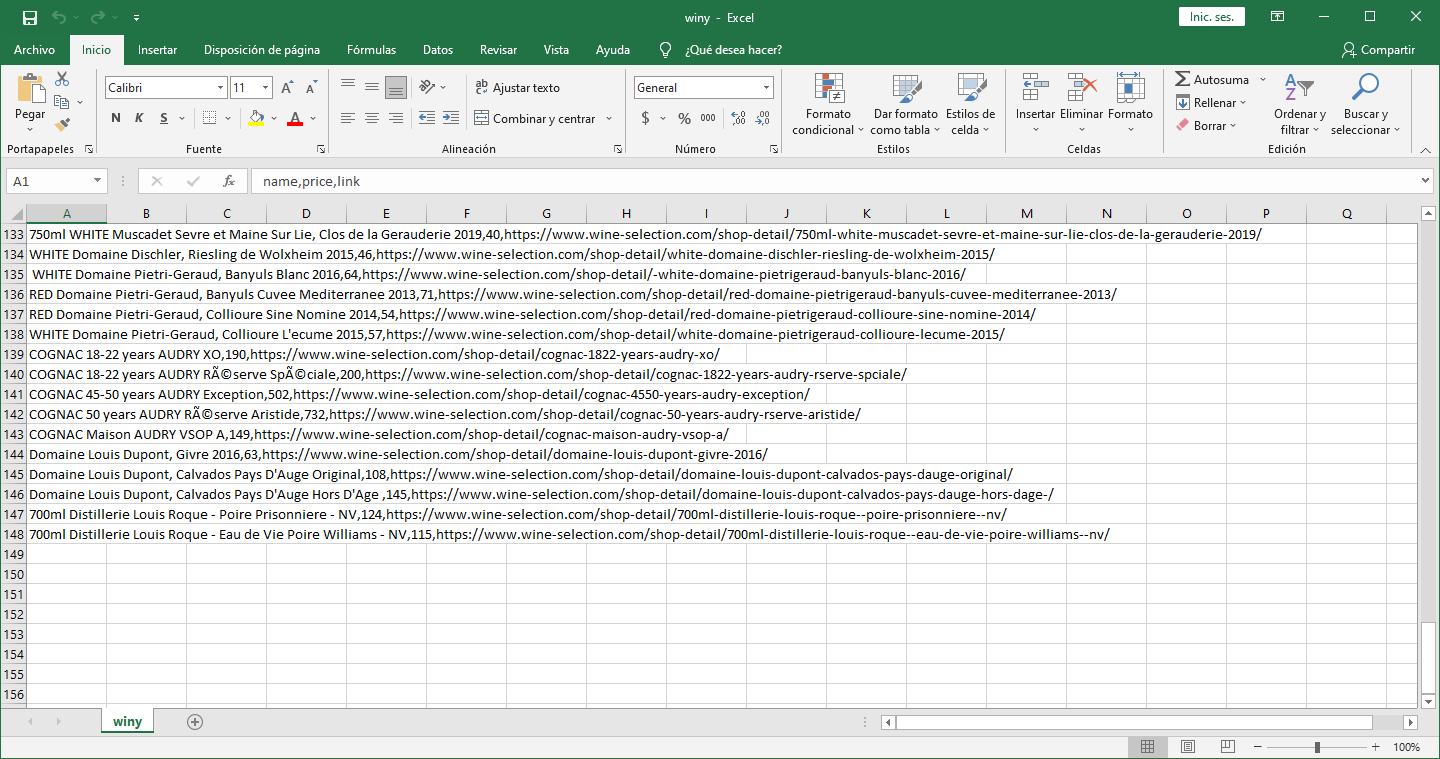
As you can see, it now returns 148 products.
Tip: If you want to add more information to an existing file, all you need to do is to run your scraper and use a lower-case “-o” (e.g. scrapy crawl -o winy.csv). If you want to override the entire file, use a capital “-O” instead (e.g scrapy crawl -O winy.csv).
Step 6: ScraperAPI and Scrapy Integration
Great job! You just created your first Scrapy web scraper.
Of course, there’s no one-size-fits-all scraper. Every website is structured differently, so you’ll have to find your way around them.
However, thanks to Scrapy, you can create custom spiders for every page and maintain them without affecting the rest. Scrapy makes your projects easier to manage and scale.
That said, if you are planning to build a large project, you’ll quickly find that just using Scrapy isn’t enough.
For some pages, you’ll need to tell your spiders how to handle bans, CAPTCHAs, execute JavaScript, and apply geotargeting.
These challenges add additional coding time and, in some cases, can make a simple project an absolute nightmare.
That’s what ScraperAPI was built for. Using years of statistical analysis, machine learning, huge browser farms, and 3rd party proxies, it prevents your scraper from getting blocked by anti-scraping techniques.
There are several ways to use ScraperAPI. The easiest way is by using a cURL to send your request. Something like this:
start_urls = ['https://api.scraperapi.com?api_key={yourApiKey}&url=https://www.wine-selection.com/shop']
This will send your request through ScraperAPI servers where the tool will choose which header is the more appropriate, rotate the IP address between every request and handle CAPTCHAs automatically.
To get your API key, just create a free ScraperAPI account. You’ll find your key in your dashboard and 5000 free API credits to test the full functionality of the tool.
However, this method won’t work for our scraper because we need it to scrape several URLs by following the links. Using this logic will only work for the initial request but not for the rest of them.
The first step for this integration is constructing the URL.
Define the get_scraperapi_url() Method
To construct our new URL, we’ll need to use the payload and the urlencode function.
We’ll start by adding a new dependency to the top of our file and, underneath it, define a constant called API_KEY:
import scrapy

from urllib.parse import urlencode

API_KEY = 'YOUR_API_KEY'
Note: Remember to use your API key when writing your scraper.
Now we’re ready to define our new method:
def get_scraperapi_url(url):
    payload = {'api_key': API_KEY, 'url': url}
    proxy_url = 'https://api.scraperapi.com/?' + urlencode(payload)
    return proxy_url
This method will tell our scraper how to construct the URL for the request, adding our API key and the target URL.
Send a Request Through ScraperAPI Servers
We used the start_urls function to send our request before, which automatically stores the returned information in a response variable.
In this case, we’ll need to define a method to use the previous method and add the additional strings to our URL when sending the request.
def start_requests(self):
    urls = ['https://www.wine-selection.com/shop']
    for url in urls:
        yield scrapy.Request(url=get_scraperapi_url(url), callback=self.parse)
As we can see, our scraper is using the values in get_scraperapi_url(url) and the URLs inside the urls variable to send the request. So after our spider runs through all the code and finds a new URL, it will loop back and construct the URL in the same way for each new request.
The rest of our code stays the same:
import scrapy
from urllib.parse import urlencode
API_KEY = '51e43be283e4db2a5afb62660xxxxxxx'

def get_scraperapi_url(url):
    payload = {'api_key': API_KEY, 'url': url}
    proxy_url = 'https://api.scraperapi.com/?' + urlencode(payload)
return proxy_url

class WinesSpider(scrapy.Spider):
    name = "winy"

def start_requests(self):
    urls = ['https://www.wine-selection.com/shop']
    for url in urls:
    yield scrapy.Request(url=get_scraperapi_url(url), callback=self.parse)

def parse(self, response):
    for wines in response.css('div.txt-wrap'):
        yield {
            'name': wines.css('a::text').get(),
            'price': wines.css('strong.price::text').get().replace('$ ',''),
            'link': wines.css('a').attrib['href'],
        }

next_page = response.css('a[rel=next]').attrib['href']
    if next_page is not None:
        yield response.follow(next_page, callback=self.parse)
If we run our scraper now, we’ll be getting the same results as before, but without risking our machine getting ban or blacklisted.
How to Manage Multiple Spiders
Sometimes, you need more than one spider in a single Scrapy project, especially in enterprise-level scenarios where you might need to scrape different sections of the same website or entirely different sites simultaneously. For instance, you could have one spider dedicated to scraping a product catalog, another to extract deeper data from product pages, and a third meant for monitoring competitor websites.
In this section, we’ll create a project demonstrating three common enterprise scraping scenarios: catalog scraping, detailed product information extraction, and competitor price monitoring.
Creating a Scrapy Project
First, make sure you’ve installed Scrapy in your environment:
pip install scrapy
Then, create a new Scrapy project by running the following command in your shell:
scrapy startproject scrapy_scraper
Change into the newly created scrapy_scraper directory. Inside it, you’ll find a spiders/ folder where we’ll place our spider files. If you want to use a different project name, simply replace “scrapy_scraper” with something else.
Creating Multiple Spiders
For our example, we’ll create a spider dedicated to catalog scraping, one to fetch detailed product information and potentially another to monitor competitors. Let’s begin by creating our first spider, which targets the product listing page.
To easily generate a Spider, run this command in your shell:
scrapy genspider fetch_spider web-scraping.dev/products
This command automatically generates a file named fetch_spider.py in the /spiders directory. Alternatively, you can create this file if it’s placed in the correct folder. The generated file contains a minimal spider template:
import scrapy

class FetchSpiderSpider(scrapy.Spider):
    name = "fetch_spider"
    allowed_domains = ["web-scraping.dev"]
    start_urls = ["https://web-scraping.dev/products"]

    def parse(self, response):
        pass
Using ScraperAPI in Scrapy
Most websites implement certain measures to prevent bots from crawling them, and getting around those measures can be difficult and tricky. As this project is more extensive, we risk our scrapers being blocked. To tackle this, we will use ScraperAPI to handle proxy rotation, browser fingerprinting, and CAPTCHA solving automatically.
Using ScraperAPI as your proxy solution is very straightforward. You only need to send the URL you want to scrape through their API endpoint. So, we define a helper function to help us send our requests to ScraperAPI instead of directly to the website
def get_scraperapi_url(url):
    APIKEY = "YourAPIKey"
    payload = {'api_key': APIKEY, 'url': url, 'render': True, 'country_code': 'us'}
    proxy_url = 'https://api.scraperapi.com/?' + urlencode(payload)
    return proxy_url
Important: Don’t forget to replace “YourAPIKey” with your actual API key from Scraper API.
We can specify parameters like render=True (to handle JavaScript-rendered content) and a country_code to handle location-based content. See a full list of parameters you can include with your requests here.
The Catalog Spider (fetch_spider.py)
We can then scrape the product site at web-scraping.dev/products. This spider collects basic product data (title, price, and description) and stores any product-detail links it encounters in a global list for our second spider to consume.
import scrapy
from urllib.parse import urlencode

def get_scraperapi_url(url):
    APIKEY = "YourAPIKey"
    payload = {'api_key': APIKEY, 'url': url, 'render': True, 'country_code': 'us'}
    proxy_url = 'https://api.scraperapi.com/?' + urlencode(payload)
    return proxy_url

# Global list for storing product links
PRODUCT_LINKS = []

class FetchSpiderSpider(scrapy.Spider):
    name = "fetch_spider"

    # This spider will export to `fetch_products_results.json` only
    custom_settings = {
        "FEEDS": {
            "fetch_products_results.json": {
                "format": "json",
                "encoding": "utf8",
                "indent": 4,
                "store_empty": False,
            }
        }
    }

    allowed_domains = ["web-scraping.dev", "api.scraperapi.com"]

    def start_requests(self):
        start_urls = ["https://web-scraping.dev/products"]
        for url in start_urls:
            # Route every request through ScraperAPI
            yield scrapy.Request(url=get_scraperapi_url(url), callback=self.parse)

    def parse(self, response):
        for selector in response.css('div.row'):
            links = selector.css('h3.mb-0 a::attr(href)').getall()
            PRODUCT_LINKS.extend(links)

            yield {
                'title': selector.css('h3.mb-0 a::text').get(),
                'description': selector.css('div.short-description::text').get(),
                'price': selector.css('div.price::text').get(),
                'links': links
            }

        next_page_link = response.css('div.paging a:last-of-type::attr(href)').get()
        if next_page_link:
            yield response.follow(next_page_link, callback=self.parse)

        print("These are the product links ", PRODUCT_LINKS, "\n")
Within the parse method, we extend our spider to capture any product links the listing might contain, and we’ll store those links in a global list named PRODUCT_LINKS, so our next spider can easily access them.
The Detail Spider (product_detail.py)
For detailed product information, we create a separate spider that consumes the URLs collected by our first spider:
import scrapy
# Import the global list and helper function from fetch_spider
from .fetch_spider import PRODUCT_LINKS, get_scraperapi_url

class ProductDetailSpider(scrapy.Spider):
    name = "product_detail_spider"

    # Export to `detail_results.json` only
    custom_settings = {
        "FEEDS": {
            "detail_results.json": {
                "format": "json",
                "encoding": "utf8",
                "indent": 4,
                "store_empty": False,
            }
        }
    }
    allowed_domains = ["web-scraping.dev", "api.scraperapi.com"]

    def start_requests(self):
        print(f"[DEBUG] PRODUCT_LINKS in product_detail_spider: {PRODUCT_LINKS}")
        for url in PRODUCT_LINKS:
            print(f"[DEBUG] Now crawling: {url}")
            yield scrapy.Request(url=get_scraperapi_url(url), callback=self.parse)

    def parse(self, response):
        brand = response.xpath("//td[@class='feature-label' and text()='brand']/following-sibling::td[@class='feature-value']/text()").get()
        if brand:
            brand = brand.strip()

        packs = []
        packs_rows = response.css("table.table-product:nth-of-type(2) tbody tr")
        for row in packs_rows:
            version = row.css("td:nth-of-type(1)::text").get()
            pkg_weight = row.css("td:nth-of-type(2)::text").get()
            pkg_dim = row.css("td:nth-of-type(3)::text").get()
            variants = row.css("td:nth-of-type(4)::text").get()
            delivery_type = row.css("td:nth-of-type(5)::text").get()

            packs.append({
                "version": version.strip() if version else None,
                "package_weight": pkg_weight.strip() if pkg_weight else None,
                "package_dimension": pkg_dim.strip() if pkg_dim else None,
                "variants": variants.strip() if variants else None,
                "delivery_type": delivery_type.strip() if delivery_type else None
            })

        yield {
            "url": response.url,
            "brand": brand,
            "packs": packs,
        }
This spider will gather detailed information about the products initially scraped by FetchSpiderSpider. We start by importing both the global PRODUCT_LINKS and the get_scraperapi_url() function from our first spider. During the start_requests() method, we wrap each link with get_scraperapi_url() to ensure all requests flow through ScraperAPI.
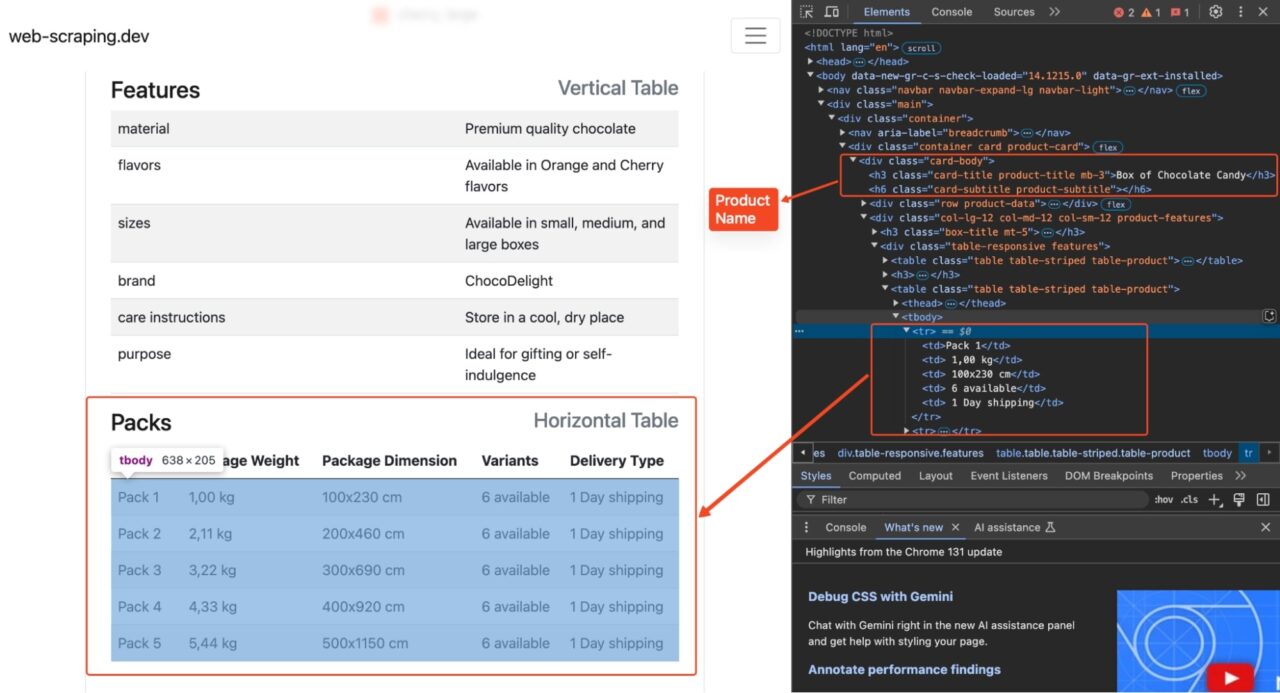
Inside the parse method, we use XPath and CSS selectors to pull more granular information from each product’s detail page to gather package details like brand, version, weight, and dimensions. The results are yielded as a dictionary, and Scrapy writes them to detail_results.json using the FEEDS custom setting.
When using the feed exports, you define where to store the feed using one or multiple URIs (through the FEEDS setting). The feed exports support multiple storage backends, including S3, google cloud storage, and standard output.
The Competitor Spider (ebay_spider.py)
Finally, for competitor analysis, we create a third spider that scrapes eBay for comparable products:
import scrapy
from .fetch_spider import get_scraperapi_url

class EbaySpiderSpider(scrapy.Spider):
    name = "ebay_spider"

    custom_settings = {
        "FEEDS": {
            "ebay_results.json": {
                "format": "json",
                "encoding": "utf8",
                "indent": 4,
                "store_empty": False,
            }
        }
    }

    allowed_domains = ["ebay.com", "api.scraperapi.com"]

    def start_requests(self):
        start_urls = [
            "https://www.ebay.com/shop/drinks-beverages?_nkw=drinks+beverages"
        ]
        for url in start_urls:
            yield scrapy.Request(url=get_scraperapi_url(url), callback=self.parse)

    def parse(self, response):
        for product in response.css("div.s-item__info"):
            product_name = product.css("div.s-item__title span::text").get()
            product_link = product.css("a.s-item__link::attr(href)").get()
            price = product.css("span.s-item__price::text").get()
            seller_info = product.css("span.s-item__seller-info-text::text").get()

            yield {
                "product_name": product_name,
                "product_link": product_link,
                "price": price,
                "seller_info": seller_info,
            }

        next_page = response.css("a.pagination__next::attr(href)").get()
        if next_page:
            yield scrapy.Request(url=get_scraperapi_url(next_page), callback=self.parse)
Here, we again rely on get_scraperapi_url() for each request because eBay implements strict anti-bot detection measures that will easily block normal requests after a few tries.

In the parse method, we select product listings from the main results page and extract relevant data such as name, link, price, and seller info. We then look for a “next page” link using a.pagination__next::attr(href) to continue scraping subsequent listings until no more pages remain.
All of these results are exported to ebay_results.json. You can further analyze or compare this data against the local site data from fetch_spider.py and product_detail.py.
Running All Spiders
You might find it inconvenient to issue a crawl command from a command terminal to each of the spiders, and by default, Scrapy runs a single spider per process when you run scrapy crawl. However, Scrapy supports running multiple spiders so that you can execute a Scrapy project from within a Python script. Create a Python script called run_spiders.py and add the following code to it:
from scrapy.crawler import CrawlerProcess
from scrapy.utils.project import get_project_settings

from scrapy_scraper.spiders.fetch_spider import FetchSpiderSpider
from scrapy_scraper.spiders.product_detail import ProductDetailSpider
from scrapy_scraper.spiders.ebay_spider import EbaySpiderSpider

def run_spiders_sequential():
    settings = get_project_settings()
    process = CrawlerProcess(settings)

    # 1) Crawl the first spider
    first_spider_deferred = process.crawl(FetchSpiderSpider)

    # 2) When the first spider finishes, start the second
    first_spider_deferred.addCallback(
        lambda _: process.crawl(ProductDetailSpider)
    )

    # 3) Finally, run the third spider
    first_spider_deferred.addCallback(
        lambda _: process.crawl(EbaySpiderSpider)
    )

    # Run all spiders in sequence (blocks until done)
    process.start()

if __name__ == "__main__":
    run_spiders_sequential()
This code uses Scrapy’s CrawlerProcess to handle multiple spiders in one place. First, it crawls the FetchSpiderSpider, which populates the PRODUCT_LINKS global variable and collects general product data. When the first spider completes, it triggers ProductDetailSpider, which scrapes more in-depth information (like brand and packaging details) for the specific products found earlier. Finally, it runs the EbaySpiderSpider, collecting listings from eBay to serve as a data comparison.
Each spider stores its results in a separate JSON file:
Fetch_products_results.json
[
{
    "title": "Box of Chocolate Candy",
    "description": "Indulge your sweet tooth with our Box of Chocolate Candy. Each box contains an assortment of rich, flavorful chocolates with a smooth, creamy filling. Choose from a variety of flavors including zesty orange and sweet cherry. Whether you're looking for the perfect gift or just want to treat yourself, our Box of Chocolate Candy is sure to satisfy.",
    "price": "24.99",
    "links": [
        "https://web-scraping.dev/product/1"
    ]
},
{
    "title": "Dark Red Energy Potion",
    "description": "Unleash the power within with our 'Dark Red Potion', an energy drink as intense as the games you play. Its deep red color and bold cherry cola flavor are as inviting as they are invigorating. Bring out the best in your gaming performance, and unlock your full potential.",
    "price": "4.99",
    "links": [
        "https://web-scraping.dev/product/2"
    ]
},
{
    "title": "Teal Energy Potion",
    "description": "Experience a surge of vitality with our 'Teal Potion', an exceptional energy drink designed for the gaming community. With its intriguing teal color and a flavor that keeps you asking for more, this potion is your best companion during those long gaming nights. Every sip is an adventure - let the quest begin!",
    "price": "4.99",
    "links": [
        "https://web-scraping.dev/product/3"
    ]
},
]
detail_results.json
	[
{
    "url": "https://api.scraperapi.com/?api_key=802ed73da322bc31627d753f410e1cd7&url=https%3A%2F%2Fweb-scraping.dev%2Fproduct%2F5&render=True&country_code=us",
    "brand": "GameFuel",
    "packs": [
        {
            "version": "Pack 1",
            "package_weight": "1,00 kg",
            "package_dimension": "100x230 cm",
            "variants": "2 available",
            "delivery_type": "1 Day shipping"
        },
        {
            "version": "Pack 2",
            "package_weight": "2,11 kg",
            "package_dimension": "200x460 cm",
            "variants": "2 available",
            "delivery_type": "1 Day shipping"
        },
        {
            "version": "Pack 3",
            "package_weight": "3,22 kg",
            "package_dimension": "300x690 cm",
            "variants": "2 available",
            "delivery_type": "1 Day shipping"
        },
        {
            "version": "Pack 4",
            "package_weight": "4,33 kg",
            "package_dimension": "400x920 cm",
            "variants": "2 available",
            "delivery_type": "1 Day shipping"
        },
        {
            "version": "Pack 5",
            "package_weight": "5,44 kg",
            "package_dimension": "500x1150 cm",
            "variants": "2 available",
            "delivery_type": "1 Day shipping"
        }
    ]
},
ebay_results.json
[
	{
    "product_name": "Starbucks Flavored Syrups Perfect for Coffee, Lattes, & Beverages",
    "product_link": "https://www.ebay.com/itm/326355150697?_skw=drinks+beverages&itmmeta=01JFWJR08BEDHGNAPC6Q86FSWE...",
    "price": "$22.99",
    "seller_info": "love4coffee213 (3,009) 99.3%"
},
{
    "product_name": "Non-Alcoholic Malt Beverage ?C Natural Cane Sugar Drink (24-Pack)",
    "product_link": "https://www.ebay.com/itm/176741088873?_skw=drinks+beverages&itmmeta=01JFWJR08B7W8HRPEG9X15H1GR...",
    "price": "$28.51",
    "seller_info": "southmid2aots (45) 97.9%"
},
{
    "product_name": "Georgia Coffee, Popular Japanese Drink, Made in Japan",
    "product_link": "https://www.ebay.com/itm/235185348678?_skw=drinks+beverages&itmmeta=01JFWJR08BQQ4KK5QABZD1V4M5...",
    "price": "$33.98",
    "seller_info": "admiraldumz (534) 100%"
},
{
    "product_name": "12 Bottles of Orangina Sparkling Citrus Beverage, With Pulp, 14.8 fl oz Each",
    "product_link": "https://www.ebay.com/itm/166710448281?_skw=drinks+beverages&epid=23044027124&itmmeta=01JFWJR08BS3NYQ5F0BWH3JPKK...",
    "price": "$46.00",
    "seller_info": "crazyboots80 (3,115) 98.9%"
},
{
    "product_name": "A&W Root Beer Drink Mix Singles to Go! 6 Boxes, 6 Packets Each",
    "product_link": "https://www.ebay.com/itm/326378680780?_skw=drinks+beverages&epid=21044536075&itmmeta=01JFWJR08BE7BXZ3XPPRH5A28S...",
    "price": "$16.99",
    "seller_info": "mercantile1 (1,366) 100%"
},
]
You can subsequently merge or transform these JSON files as needed by inserting them into a database or performing additional analytics.
Common Challenges of Web Scraping with Scrapy & Their Solutions
While Scrapy is excellent for scraping static websites, many modern websites rely heavily on JavaScript to render content dynamically. Traditional Scrapy spiders often struggle with these sites because the HTML response they receive does not actually contain the data they need. Additionally, anti-bot mechanisms can restrict or block your scraping attempts.
Below are some common Scrapy challenges and solutions for overcoming them:
- JavaScript-Heavy Websites: Scrapy is primarily designed to scrape static HTML and doesn’t natively execute JavaScript, making it difficult to scrape websites that use AJAX or client-side rendering. Fortunately, you can integrate it with plugins like scrapy-playwright or scrapy-selenium, which allow you to scrape dynamic content rendered by JavaScript.
- Rate Limiting and IP Blocking: Scrapy has built-in features to manage request rates and handle retries, but aggressive scraping can still lead to IP bans. To avoid detection, you must use strategies such as rotating proxies, rotating user agents, and implementing delay configurations.
Dependency on Python: Scrapy is a Python-based framework, so users unfamiliar with Python may face a learning curve. This can easily be fixed by taking advantage of Scrapy’s robust documentation and community resources to learn Python basics and get up to speed quickly.
Optimizing Scrapy for Large-Scale Crawling
For production-level or large-scale scraping, Scrapy’s default settings often need adjustments. Here are some essential configurations for the settings.py file:
# settings.py

# Configure concurrent requests and delays
CONCURRENT_REQUESTS = 16
CONCURRENT_REQUESTS_PER_DOMAIN = 8
DOWNLOAD_DELAY = 1

# Auto-throttling configuration
AUTOTHROTTLE_ENABLED = True
AUTOTHROTTLE_START_DELAY = 5
AUTOTHROTTLE_MAX_DELAY = 60
AUTOTHROTTLE_TARGET_CONCURRENCY = 1.0

# Disable robots.txt if using proxy services
ROBOTSTXT_OBEY = False

# Configure retry handling
RETRY_ENABLED = True
RETRY_TIMES = 3
RETRY_HTTP_CODES = [500, 502, 503]
Anti-bot technologies can detect and block your crawler even with an advanced Scrapy spider. To minimize this risk, use tools like ScraperAPI, which provides premium proxies and robust anti-bot bypass capabilities. ScraperAPI ensures reliable access to data without worrying about IP bans or CAPTCHAs.
Try ScraperAPI for free to enhance your scraping strategy and bypass anti-bot defenses effortlessly!
Additional Resources
- XPath selectors cheat sheet
- CSS selector cheat sheet
- Guide on Scrapy selectors
- Scraping millions of Google SERPs with Scrapy and ScraperAPI [case study]
FAQs about web scraping with Scrapy
It’s all down to scale. Scrapy is generally more efficient for large-scale, structured scraping tasks thanks to its concurrency and built-in pipelines. BeautifulSoup is better suited for quick, smaller projects that do not require advanced crawling features.
Scrapy is designed for fast, large-scale data extraction from static or lightly dynamic sites, while Selenium is a full browser automation tool that can handle heavy JavaScript rendering and mimic human interaction. If you need speed and don’t require full browser rendering, Scrapy is usually best.
